VTEX
VTEX is an enterprise digital commerce platform that allows you to create an online store with out-of-the-box capabilities fast. For more information, refer to official VTEX webpage.
Prerequisites
- You need an active account in PayU Latam.
- You need an active account in PaymentsOS. If you don’t have an account, click here to create one.
All the commerces that require to integrate PayU with VTEX must have an account in PaymentsOS. - You need an account with enough rights and permissions to access the VTEX admin. This account must have enabled the two-factor authentication.
Configuration procedure
The procedure to enable payment methods in VTEX processed by our gateway is divided in two steps. Before moving on, make sure you have meet the prerequisites above.
1. Configure your PaymentsOS account
The integration of PayU Latam with VTEX is performed using PaymentsOS as a middleware. As the first step, you need to configure in PaymentsOS your account the following objects.
- A Provider configuration.
- A Business unit.
- A WebHook.
You can configure these objects using one of the following options:
Configure the account using Postman
Follow these steps to configure your account using Postman.
- Click the button below to import our collection in Postman (you may need to refresh the page if the button does not work for you).
-
After you run the collection, you need to set the globals. Download the globals file here.
-
In the Postman collection, click Import next to your workspace name and locate the json file recently downloaded.
-
When finish, click Import.
-
It is mandatory to run the collection methods in the order displayed. First, click the
POSTmethod called1. Loginand go to Body tab.
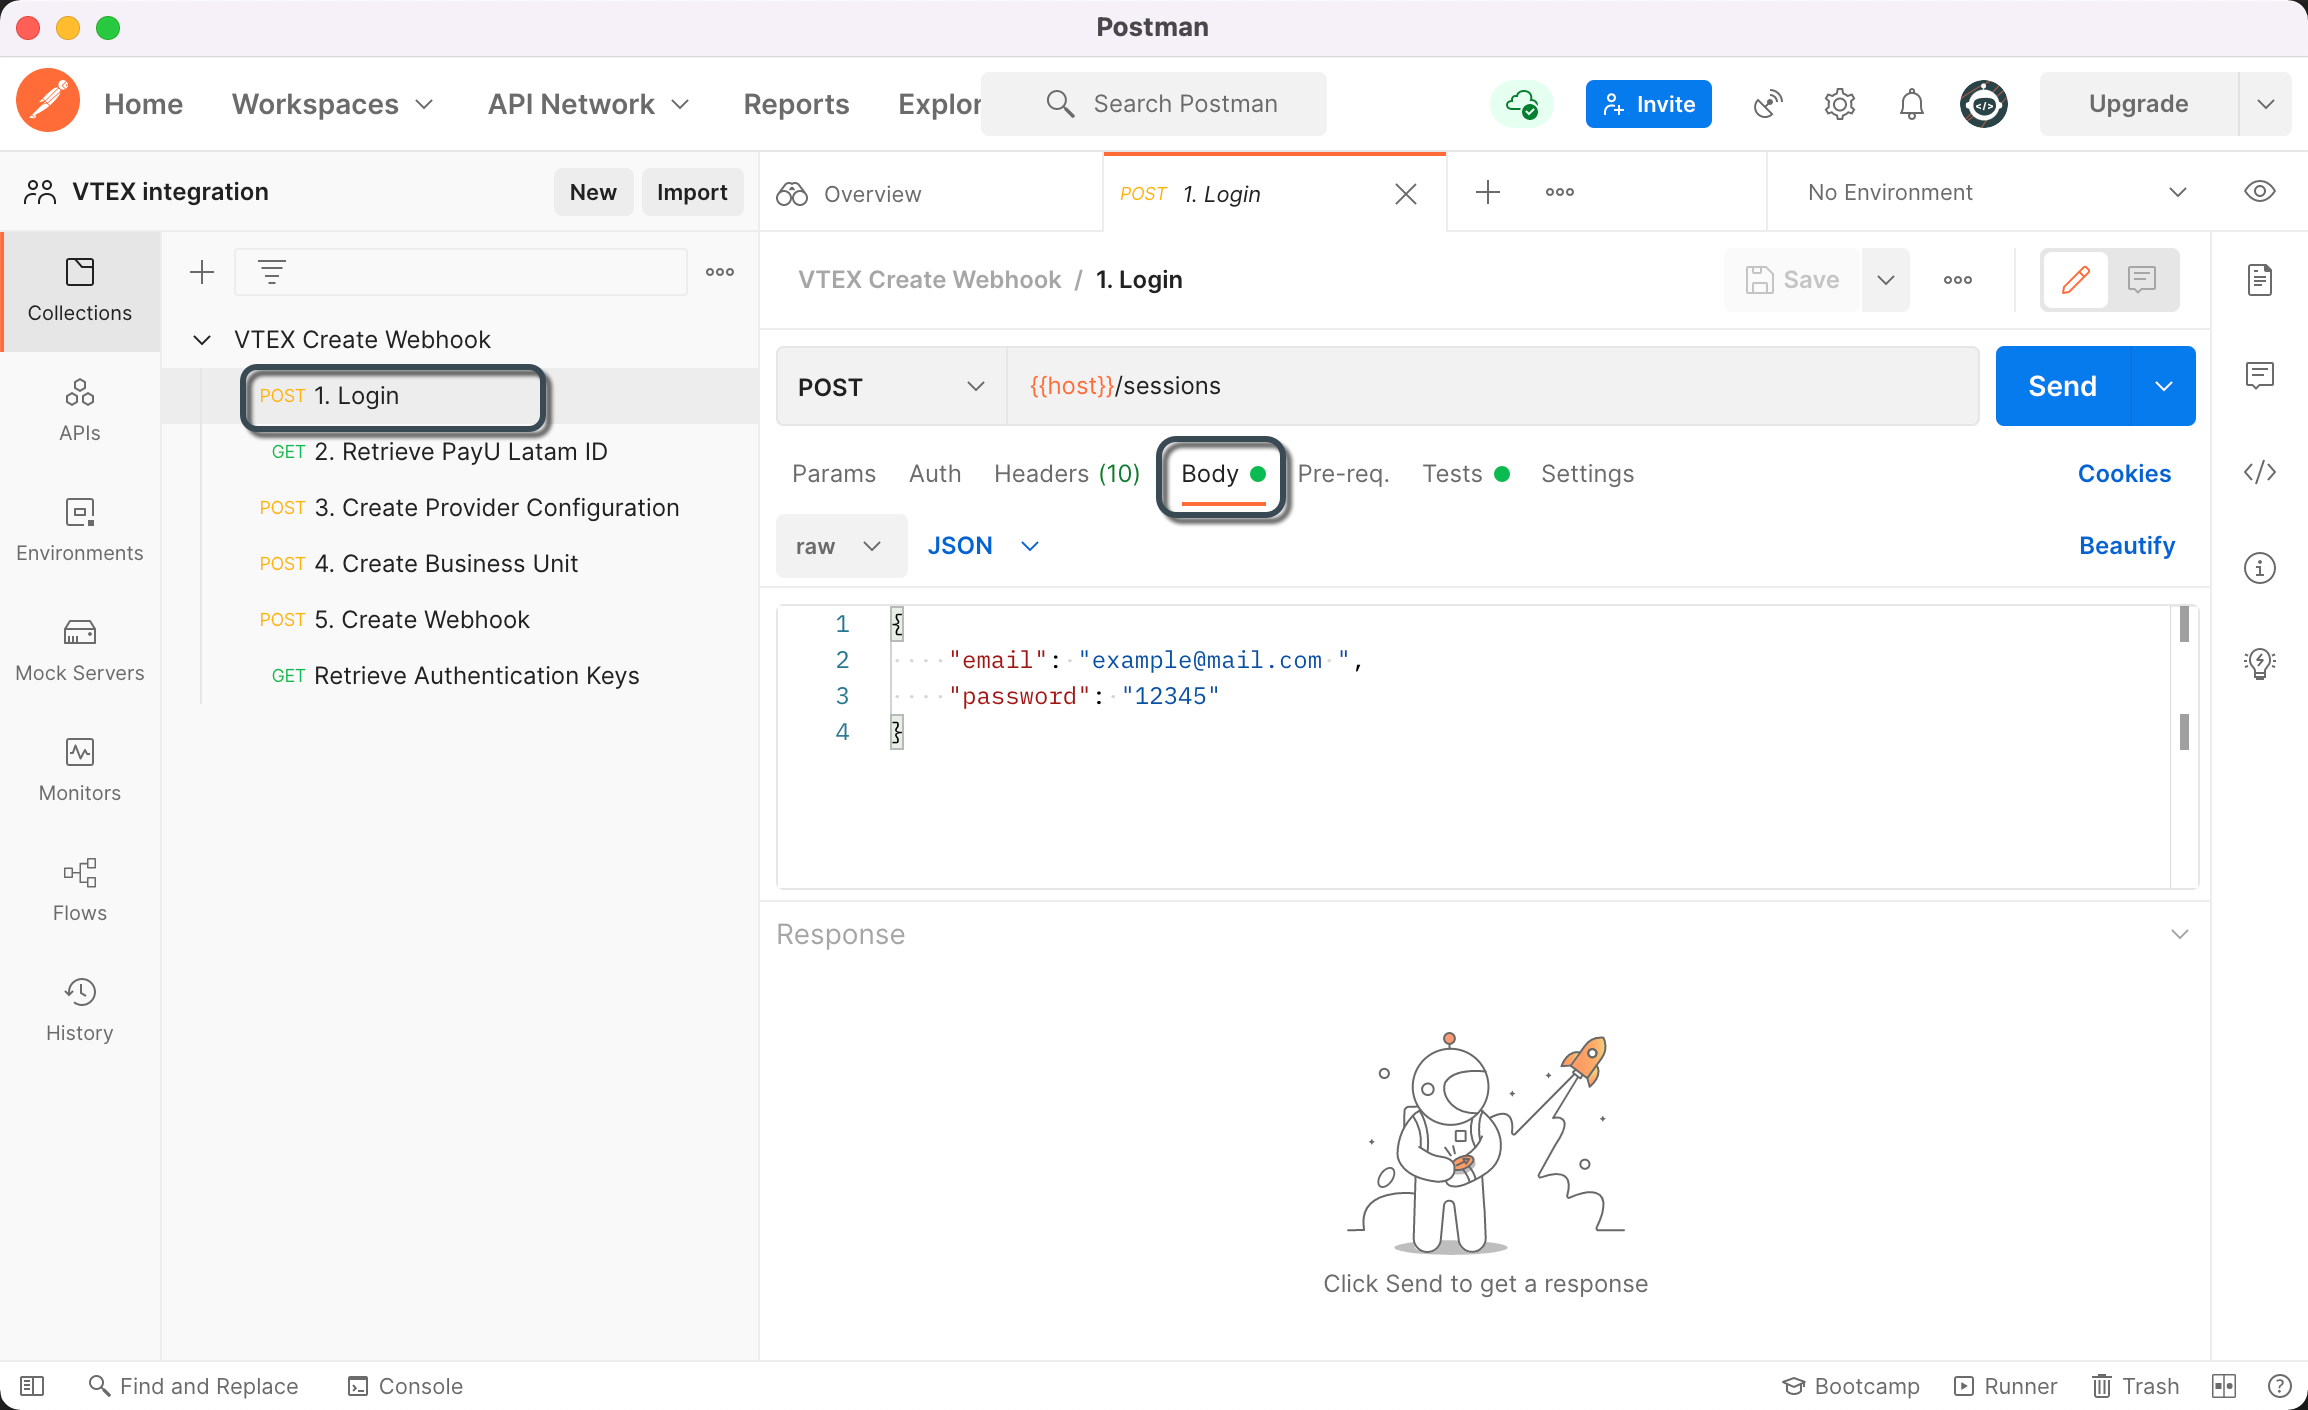
-
Provide the email and password of your PaymentsOS account. Then, click Send.
-
If the login was successful, the authentication data is set for the second method.
Click theGETmethod2. Retrieve PayU Latam ID. -
In the top right corner, click the eye icon and locate the
envparameter. Then, click the pencil icon and settestif you are processing in the test environment andliveotherwise.

-
Once configured, click Send.
-
Click the
POSTmethod3. Create Provider Configuration, this method creates the Provider Configuration in PaymentsOS. Then, go to Body tab.
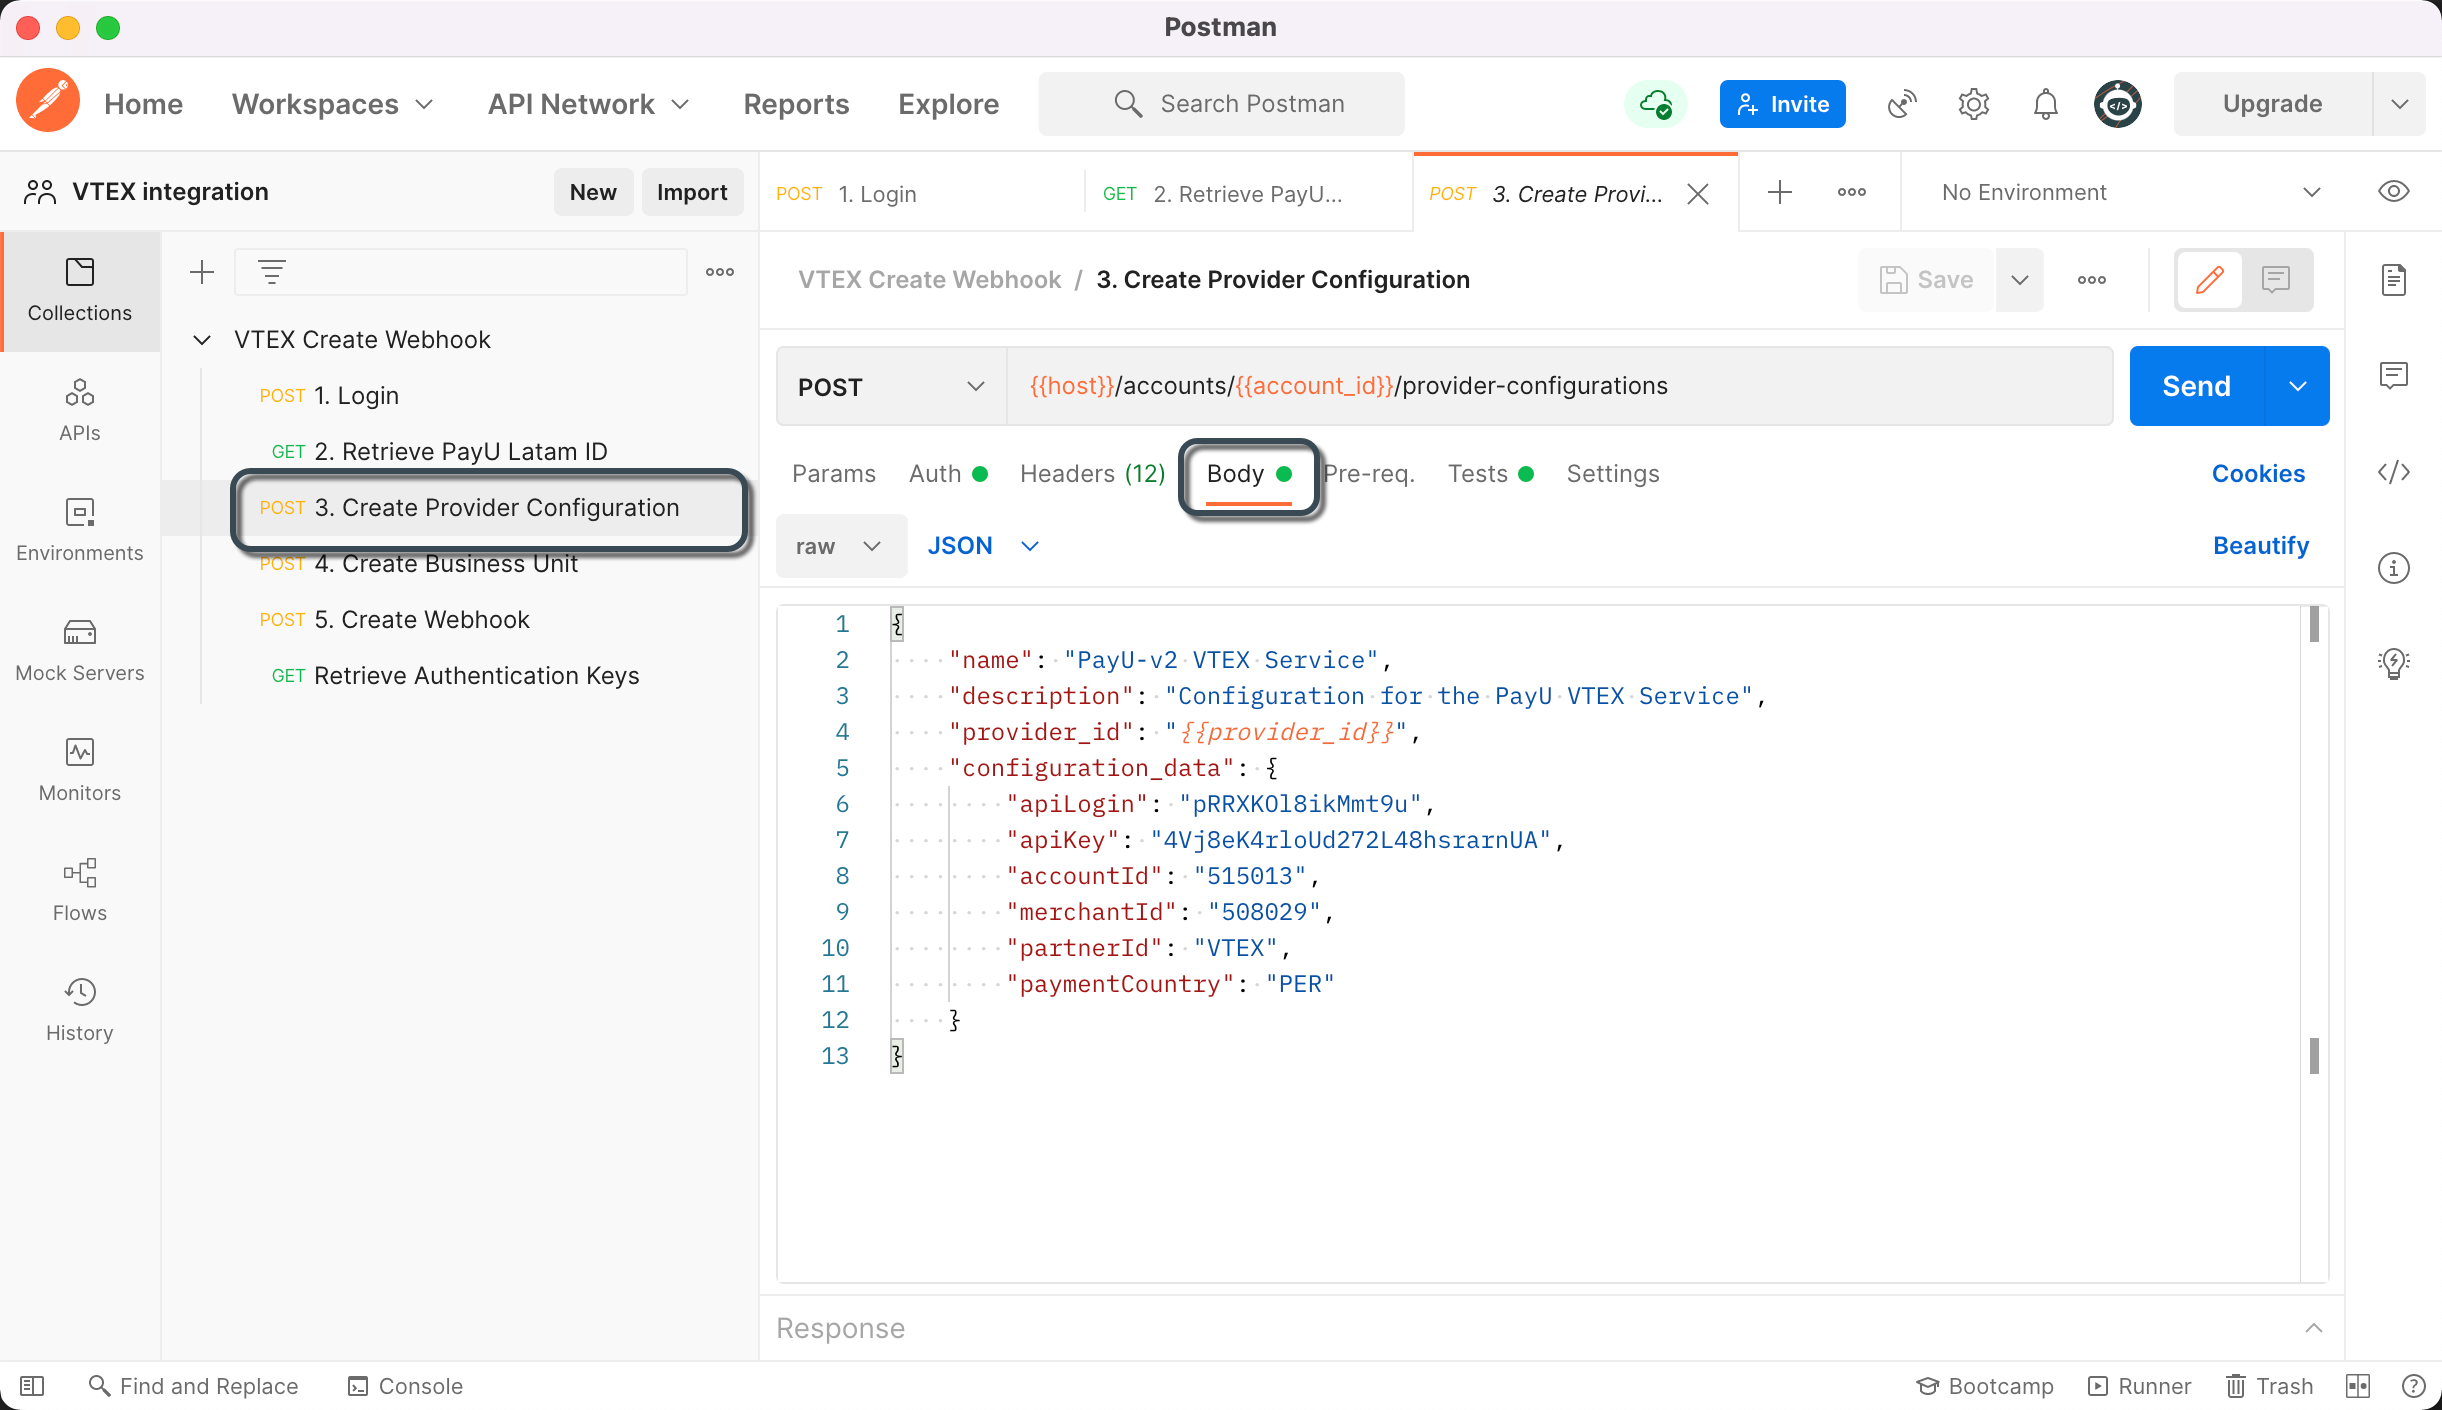
Provide the following information:
| Parameter | Description |
|---|---|
| name | Provide a to the Provider Configuration. |
| description | Provide a meaningful description for the Provider Configuration. This value is optional. |
| configuration_data.apiLogin | User or login provided by PayU. How do I get my API Login |
| configuration_data.apiKey | Unique key of your commerce. How do I get my API Key |
| configuration_data.accountId | ID of the PayU account according to the country where you want to sell. |
| configuration_data.merchantId | ID of your commerce in PayU Latam. |
| configuration_data.paymentCountry | Processing country in format ISO 3166 Alpha-3. |
Note
The parameterprovider_id is automatically set by the response of the method 2. Retrieve PayU Latam ID. Do not change this value.
- Click the
POSTmethod4. Create Business Unitthis method creates the Business Unit in PaymentsOS. Then, go to Body tab.
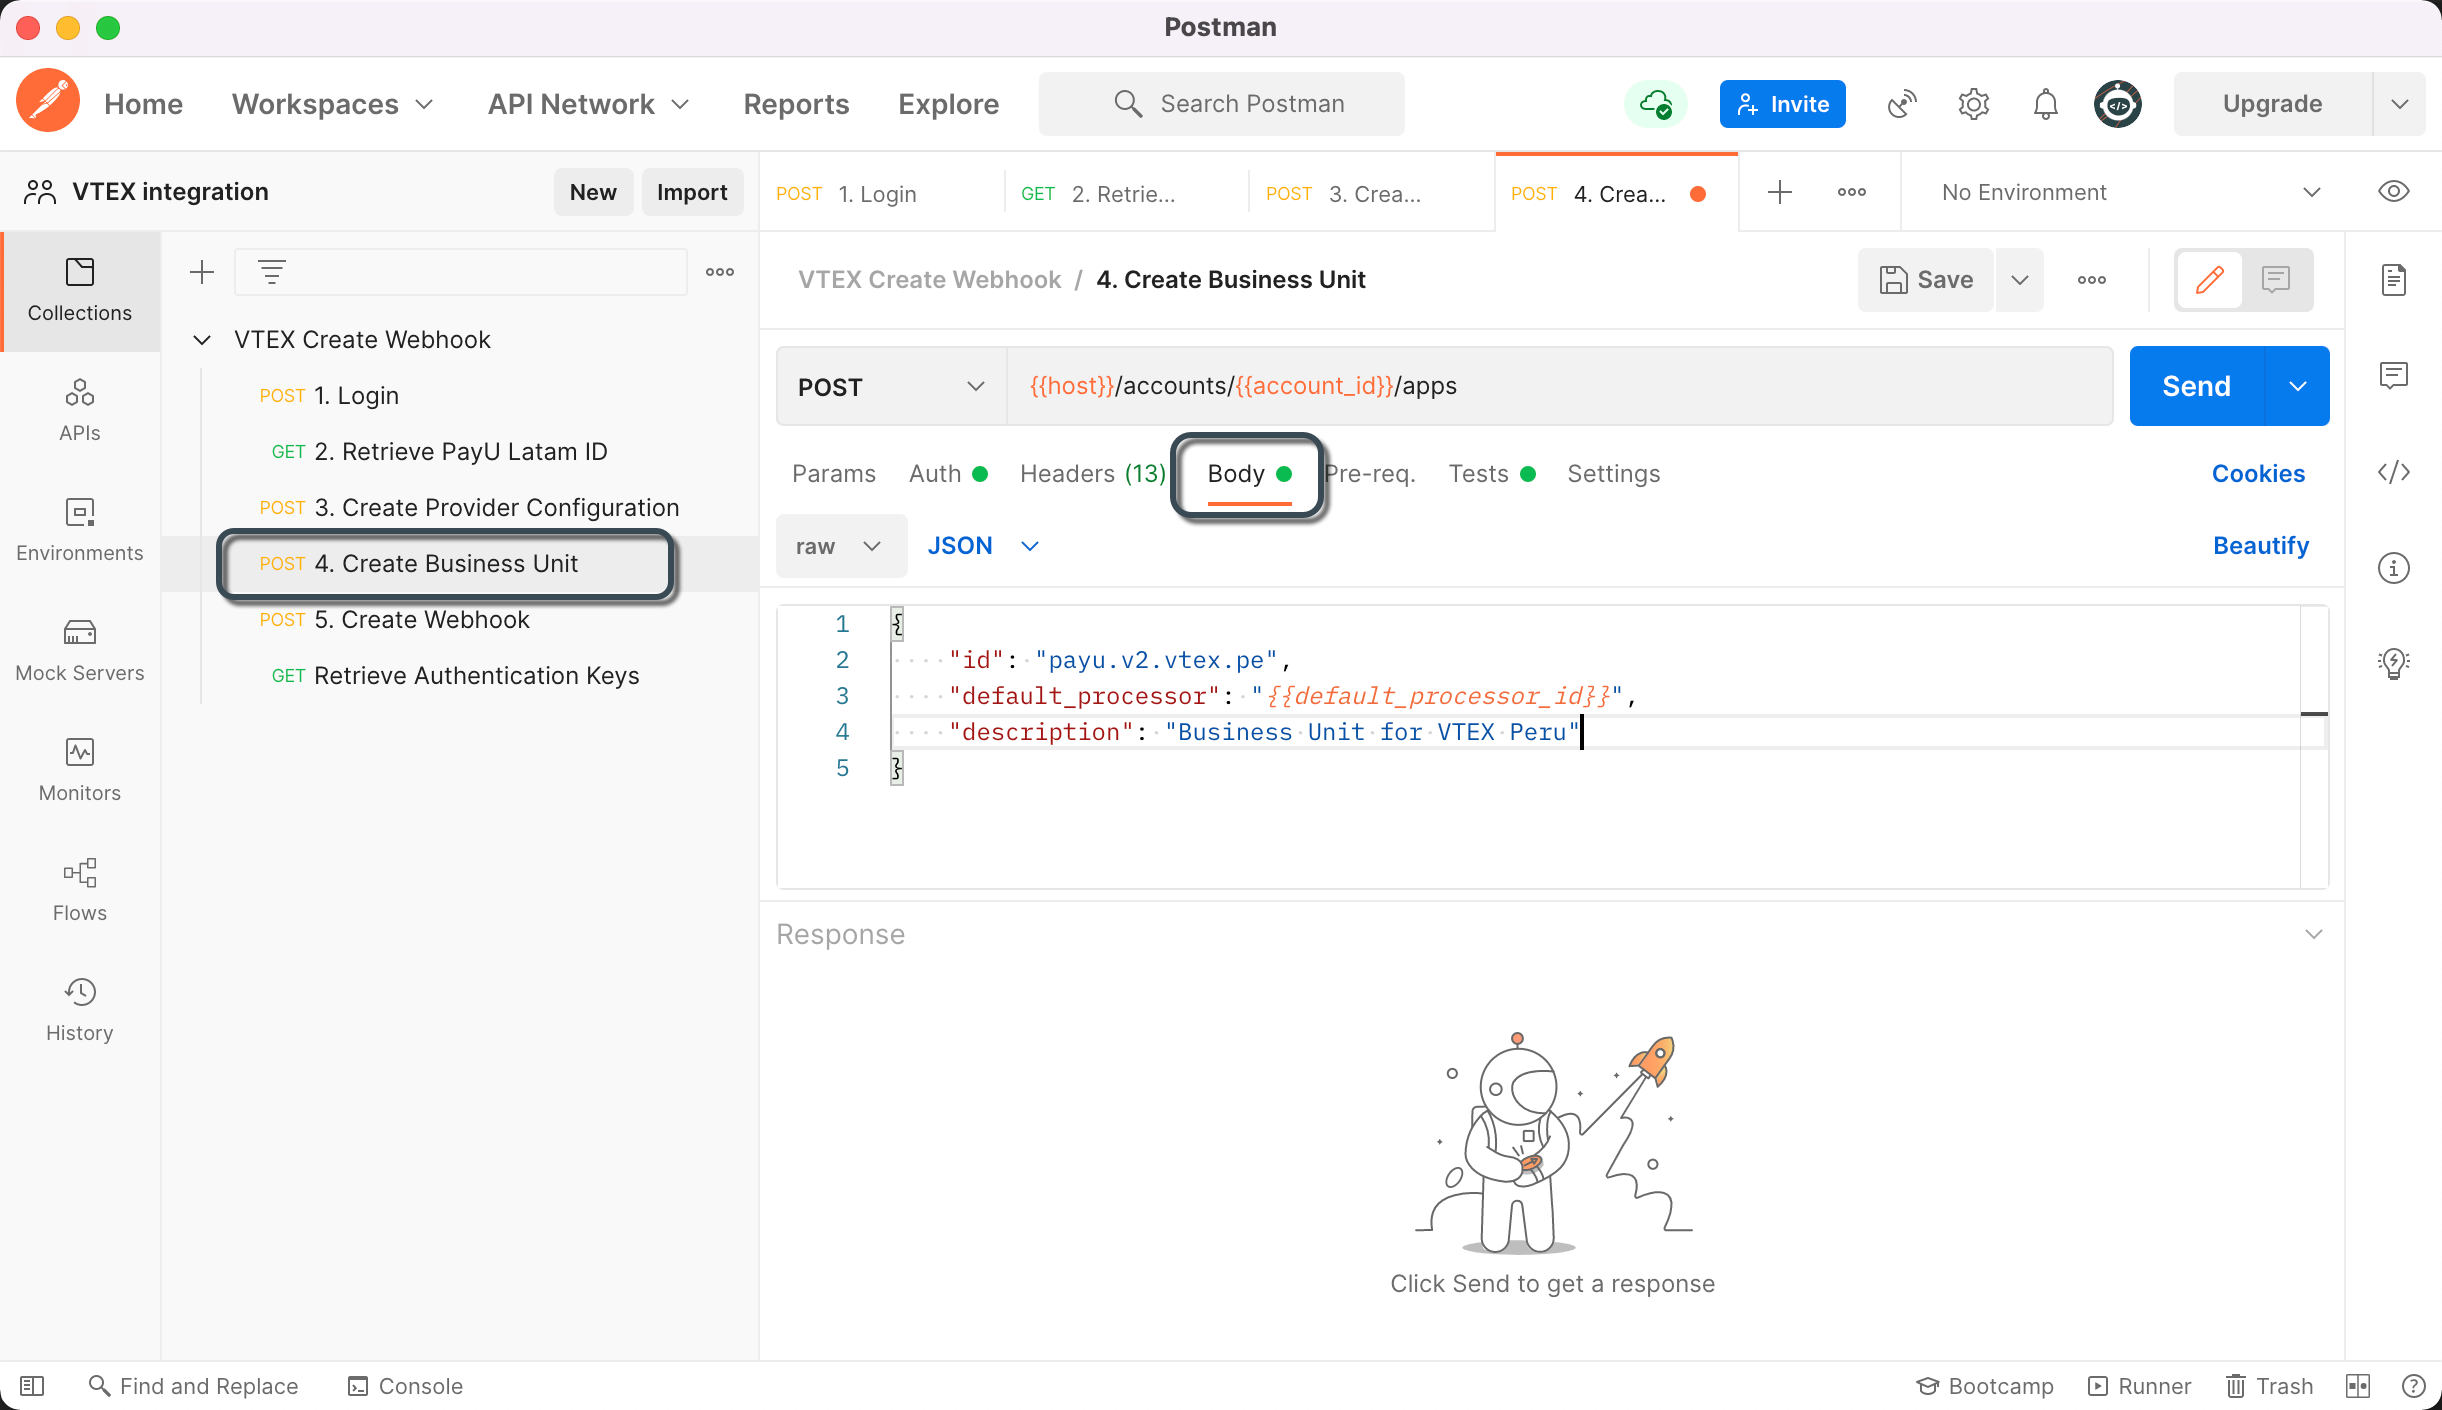
Provide the following information:
| Parameter | Description |
|---|---|
| id | Identifier of the Business Unit. This id must be in lowercase and without blank spaces. Make sure you have provided the correct value for the id as this cannot be updated later. |
| description | Provide a meaningful description for the Business Unit. This value is optional. |
Note
The parameterdefault_processor is automatically set by the response of the method 3. Create Provider Configuration. Do not change this value.
- Click the
POSTmethod5. Create Webhookthis method creates the WebHook in PaymentsOS. This WebHook is the confirmation URL that will receive the notifications sent by VTEX when a transaction changes its state.
Then, go to Body tab.

Set the endpoint parameter with the following values according to your environment.
- Test:
https://sandbox.api.payulatam.com/vtex-payments-integration/paymentsos/webhook - Live:
https://api.payulatam.com/vtex-payments-integration/paymentsos/webhook
Leave the other parameters with their default value.
At this point, your PaymentsOS account has been configured as a middleware, the next step is the configuration of the VTEX provider.
Configure the account manually using PaymentsOS dashboard
Follow these steps to configure your account using PaymentsOS dashboard.
- Create the Provider configuration.
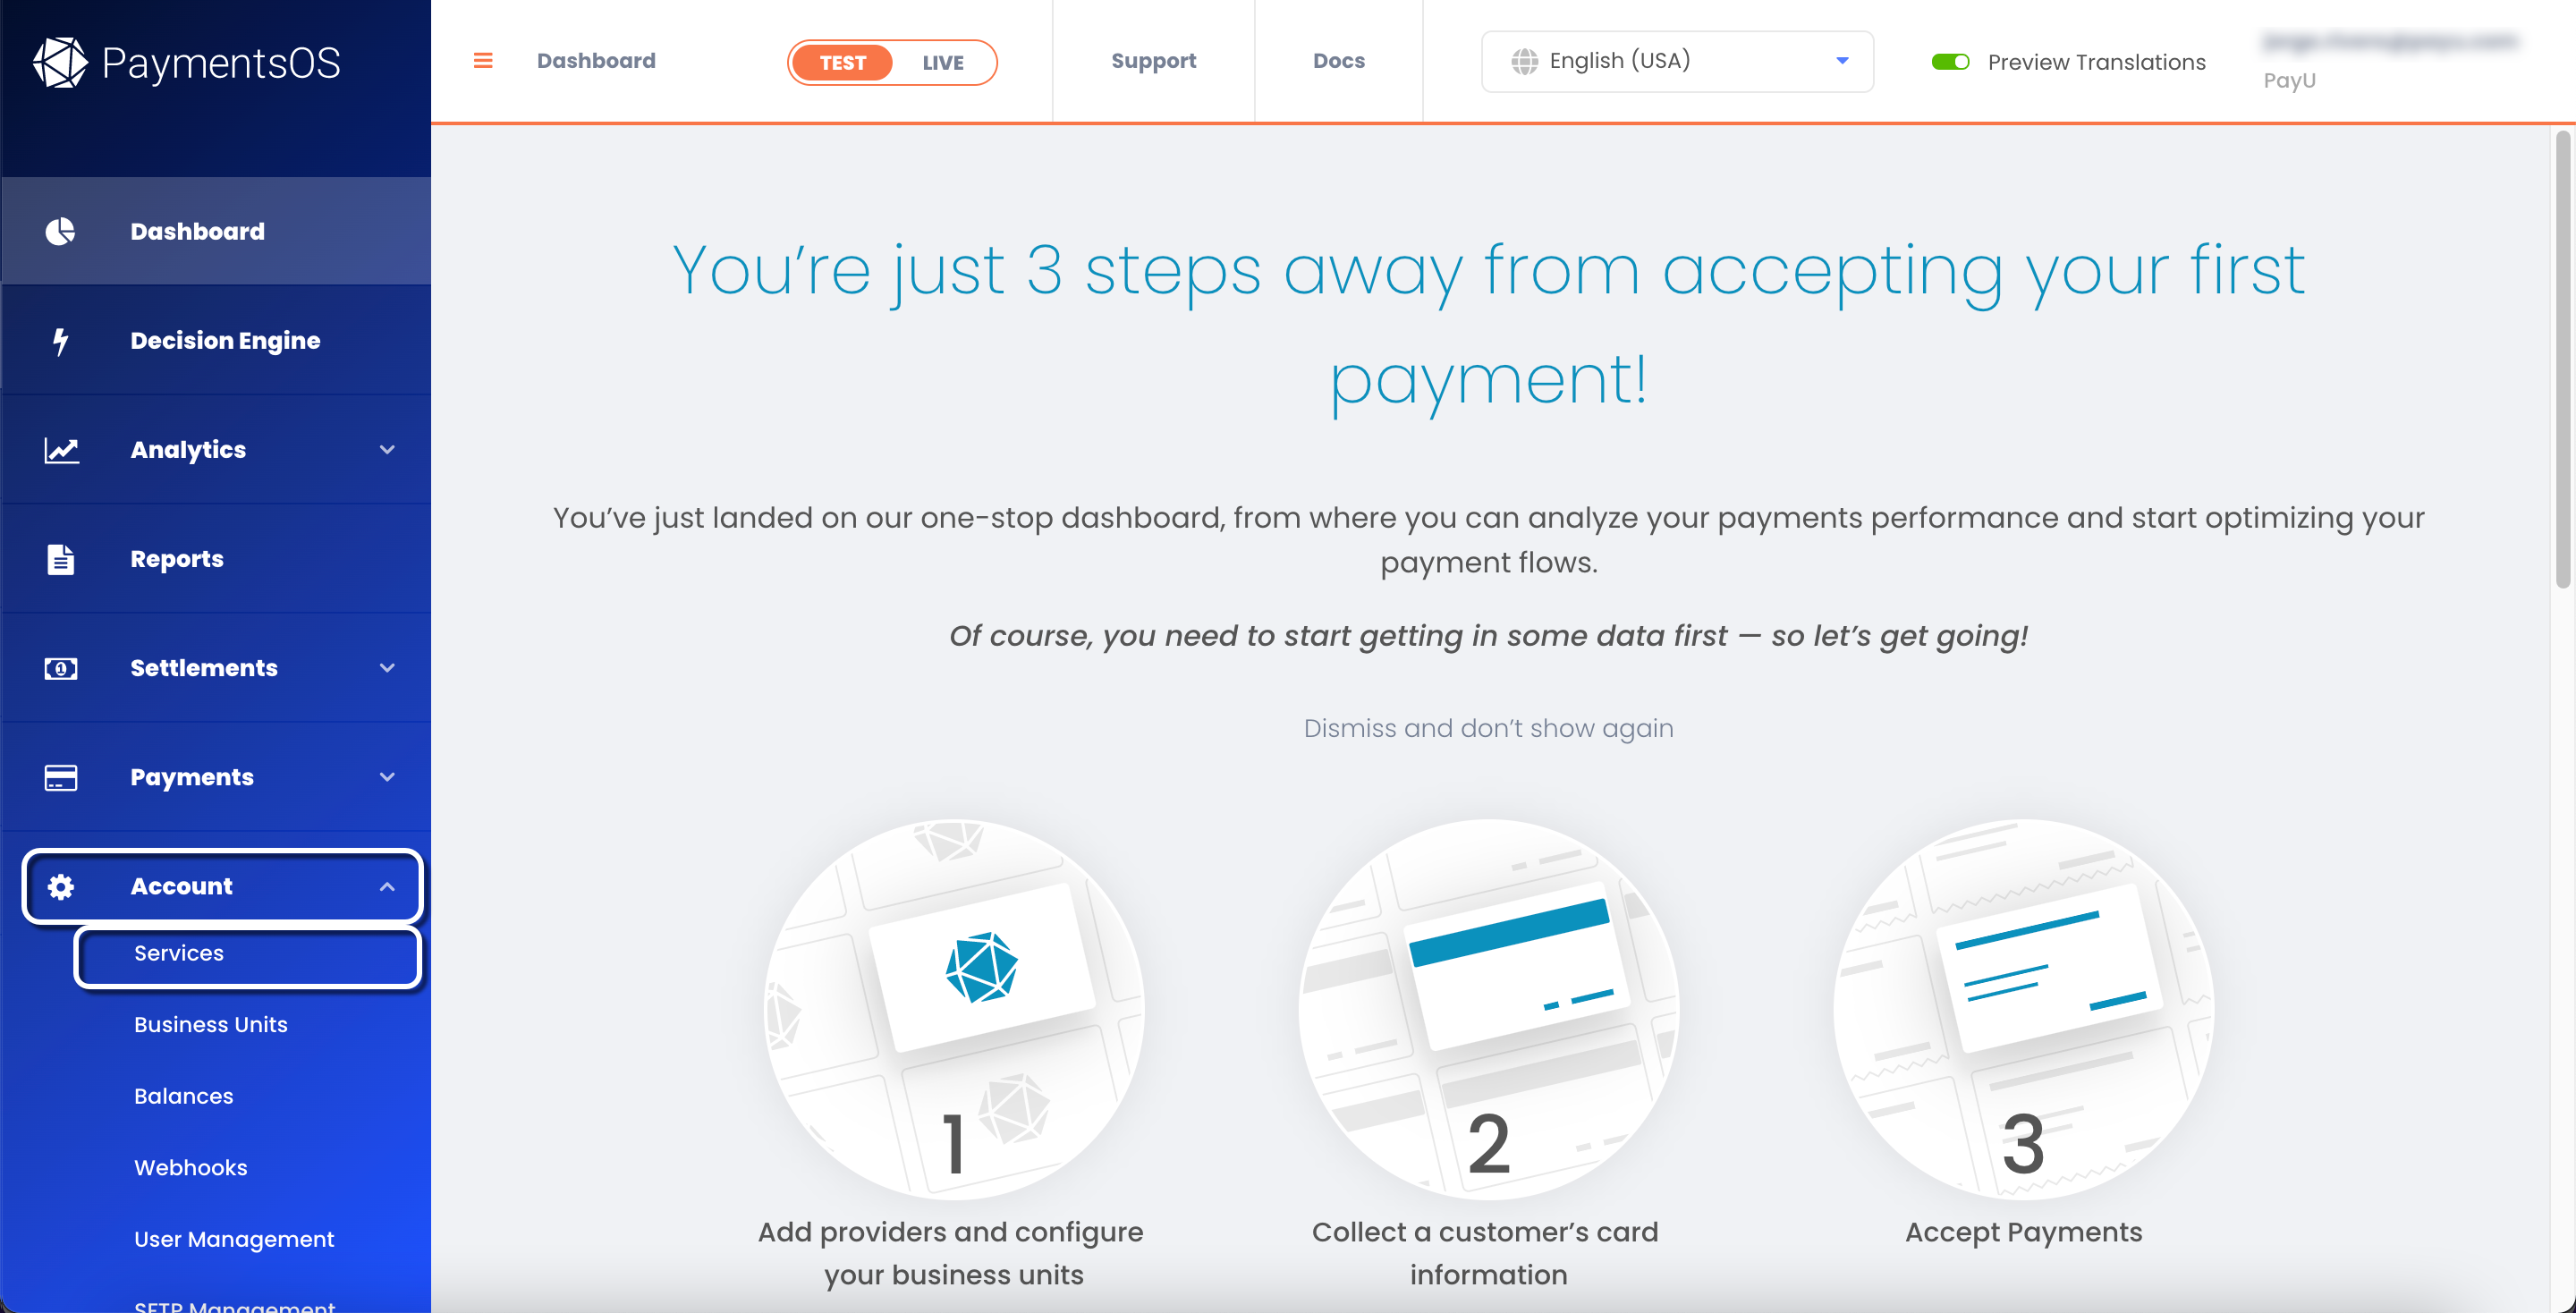
In the PaymentsOS dashboard, expand the Account menu, then select Services.
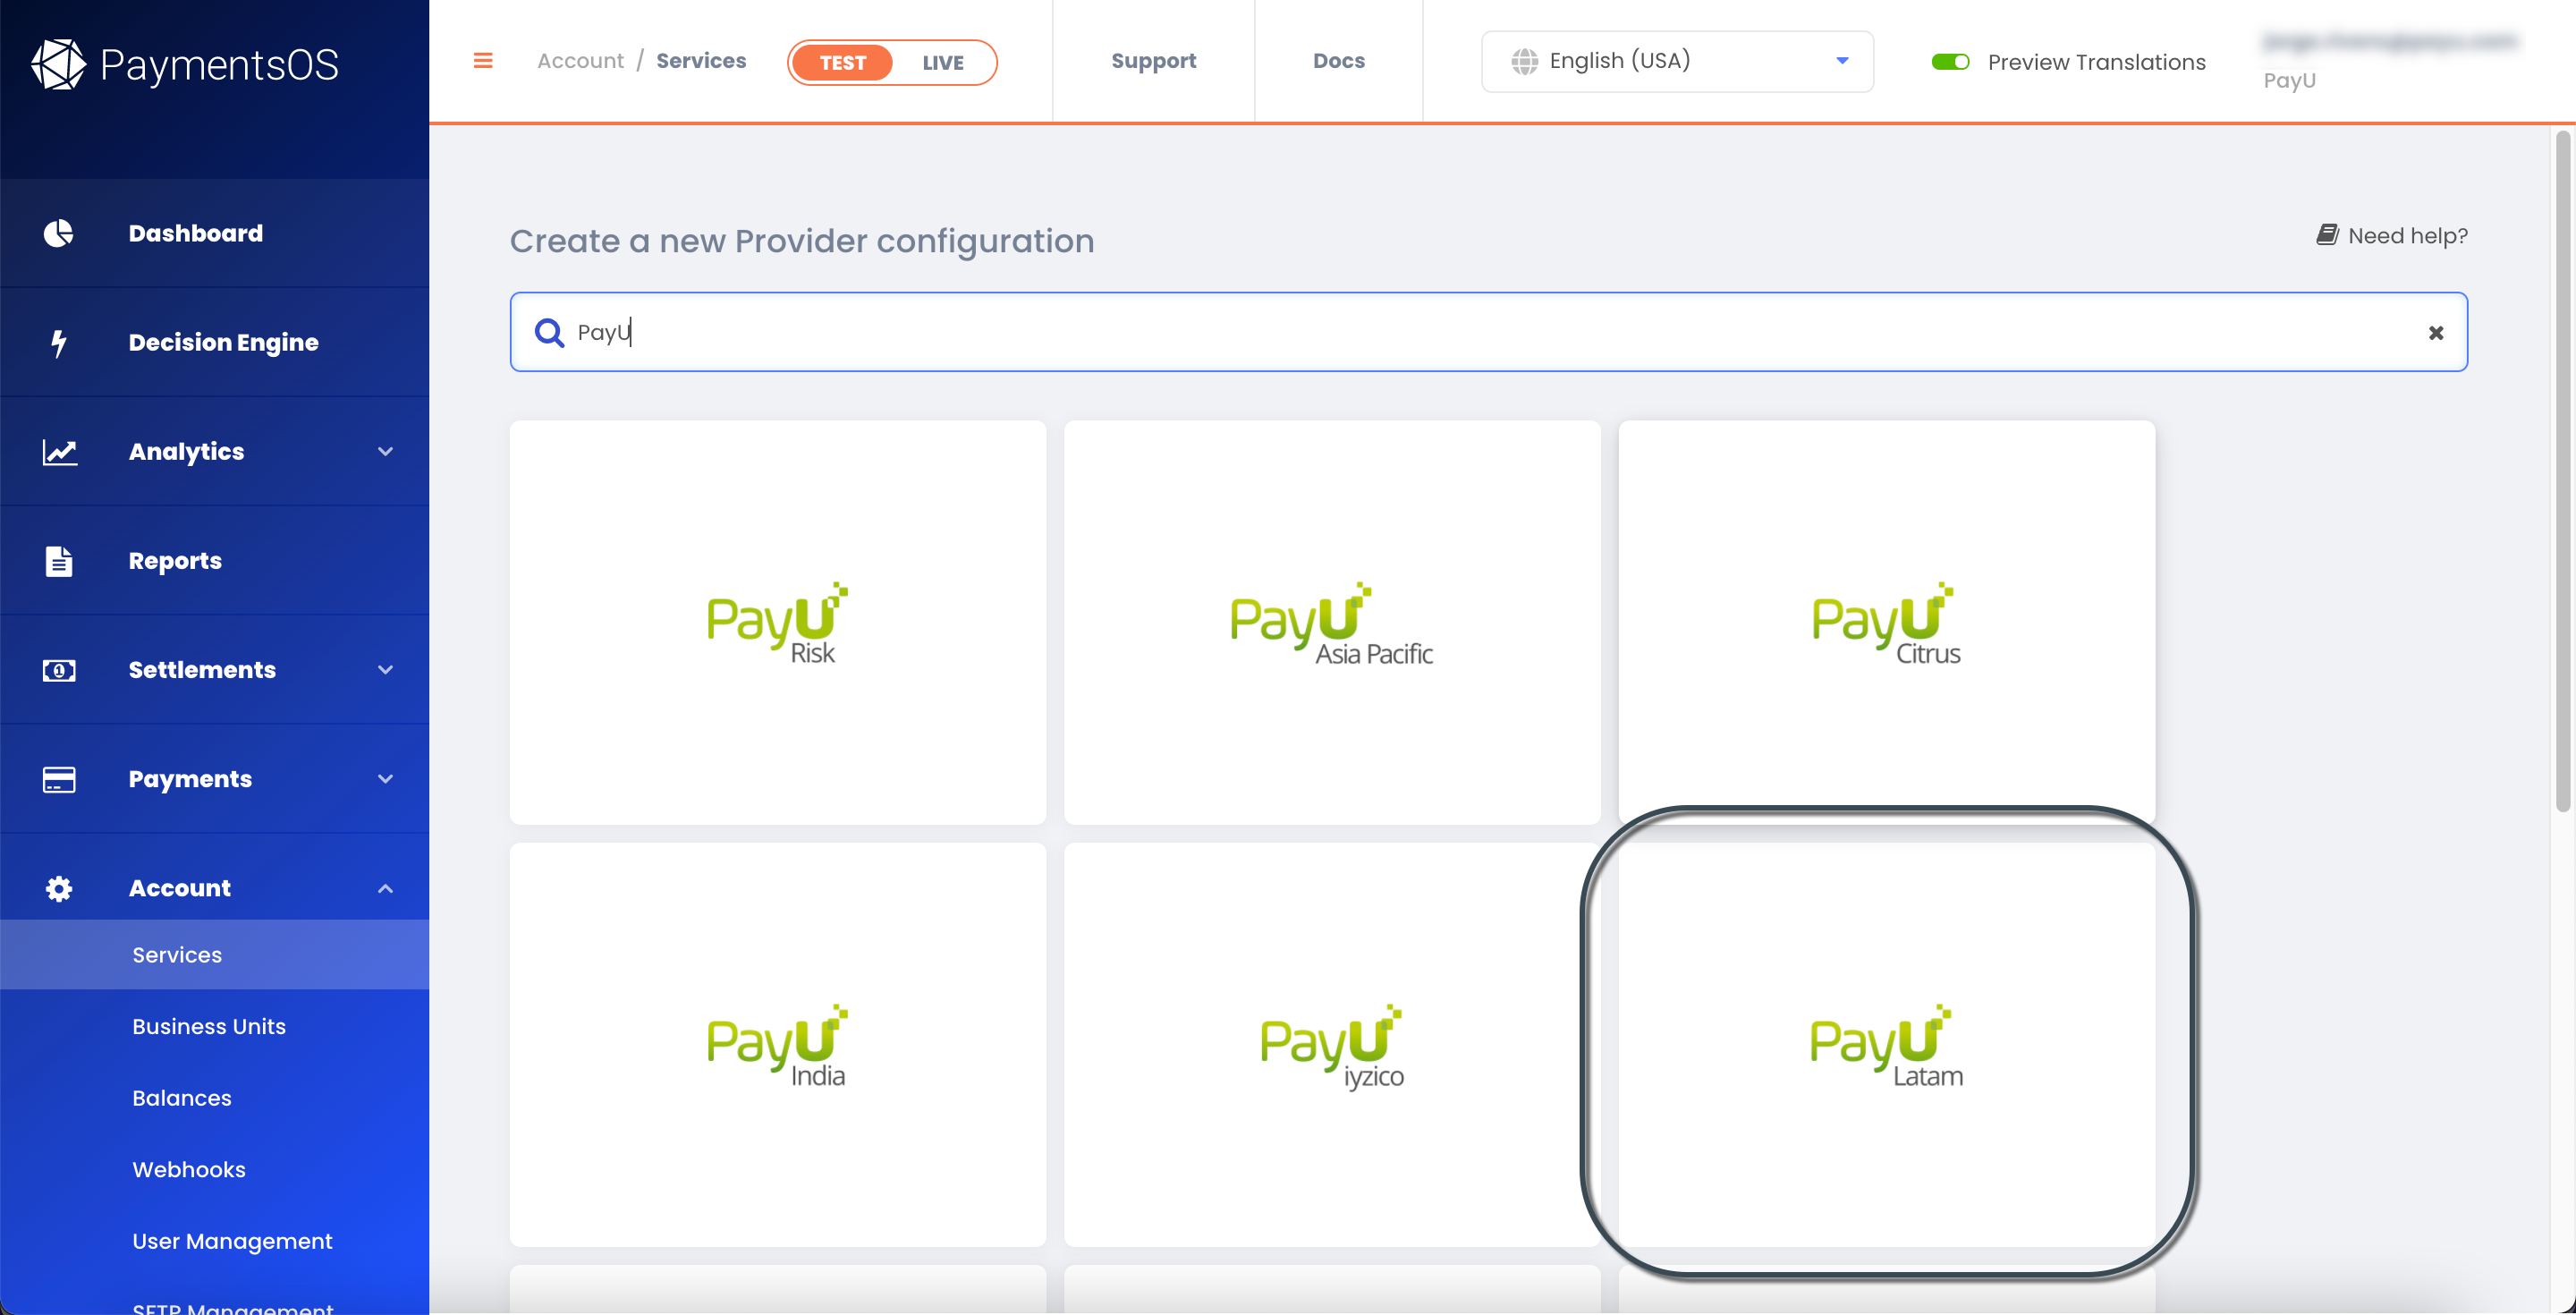
Use the Search field in the Create a new Provider configuration section and enter PayU to find the PayU Latam provider.
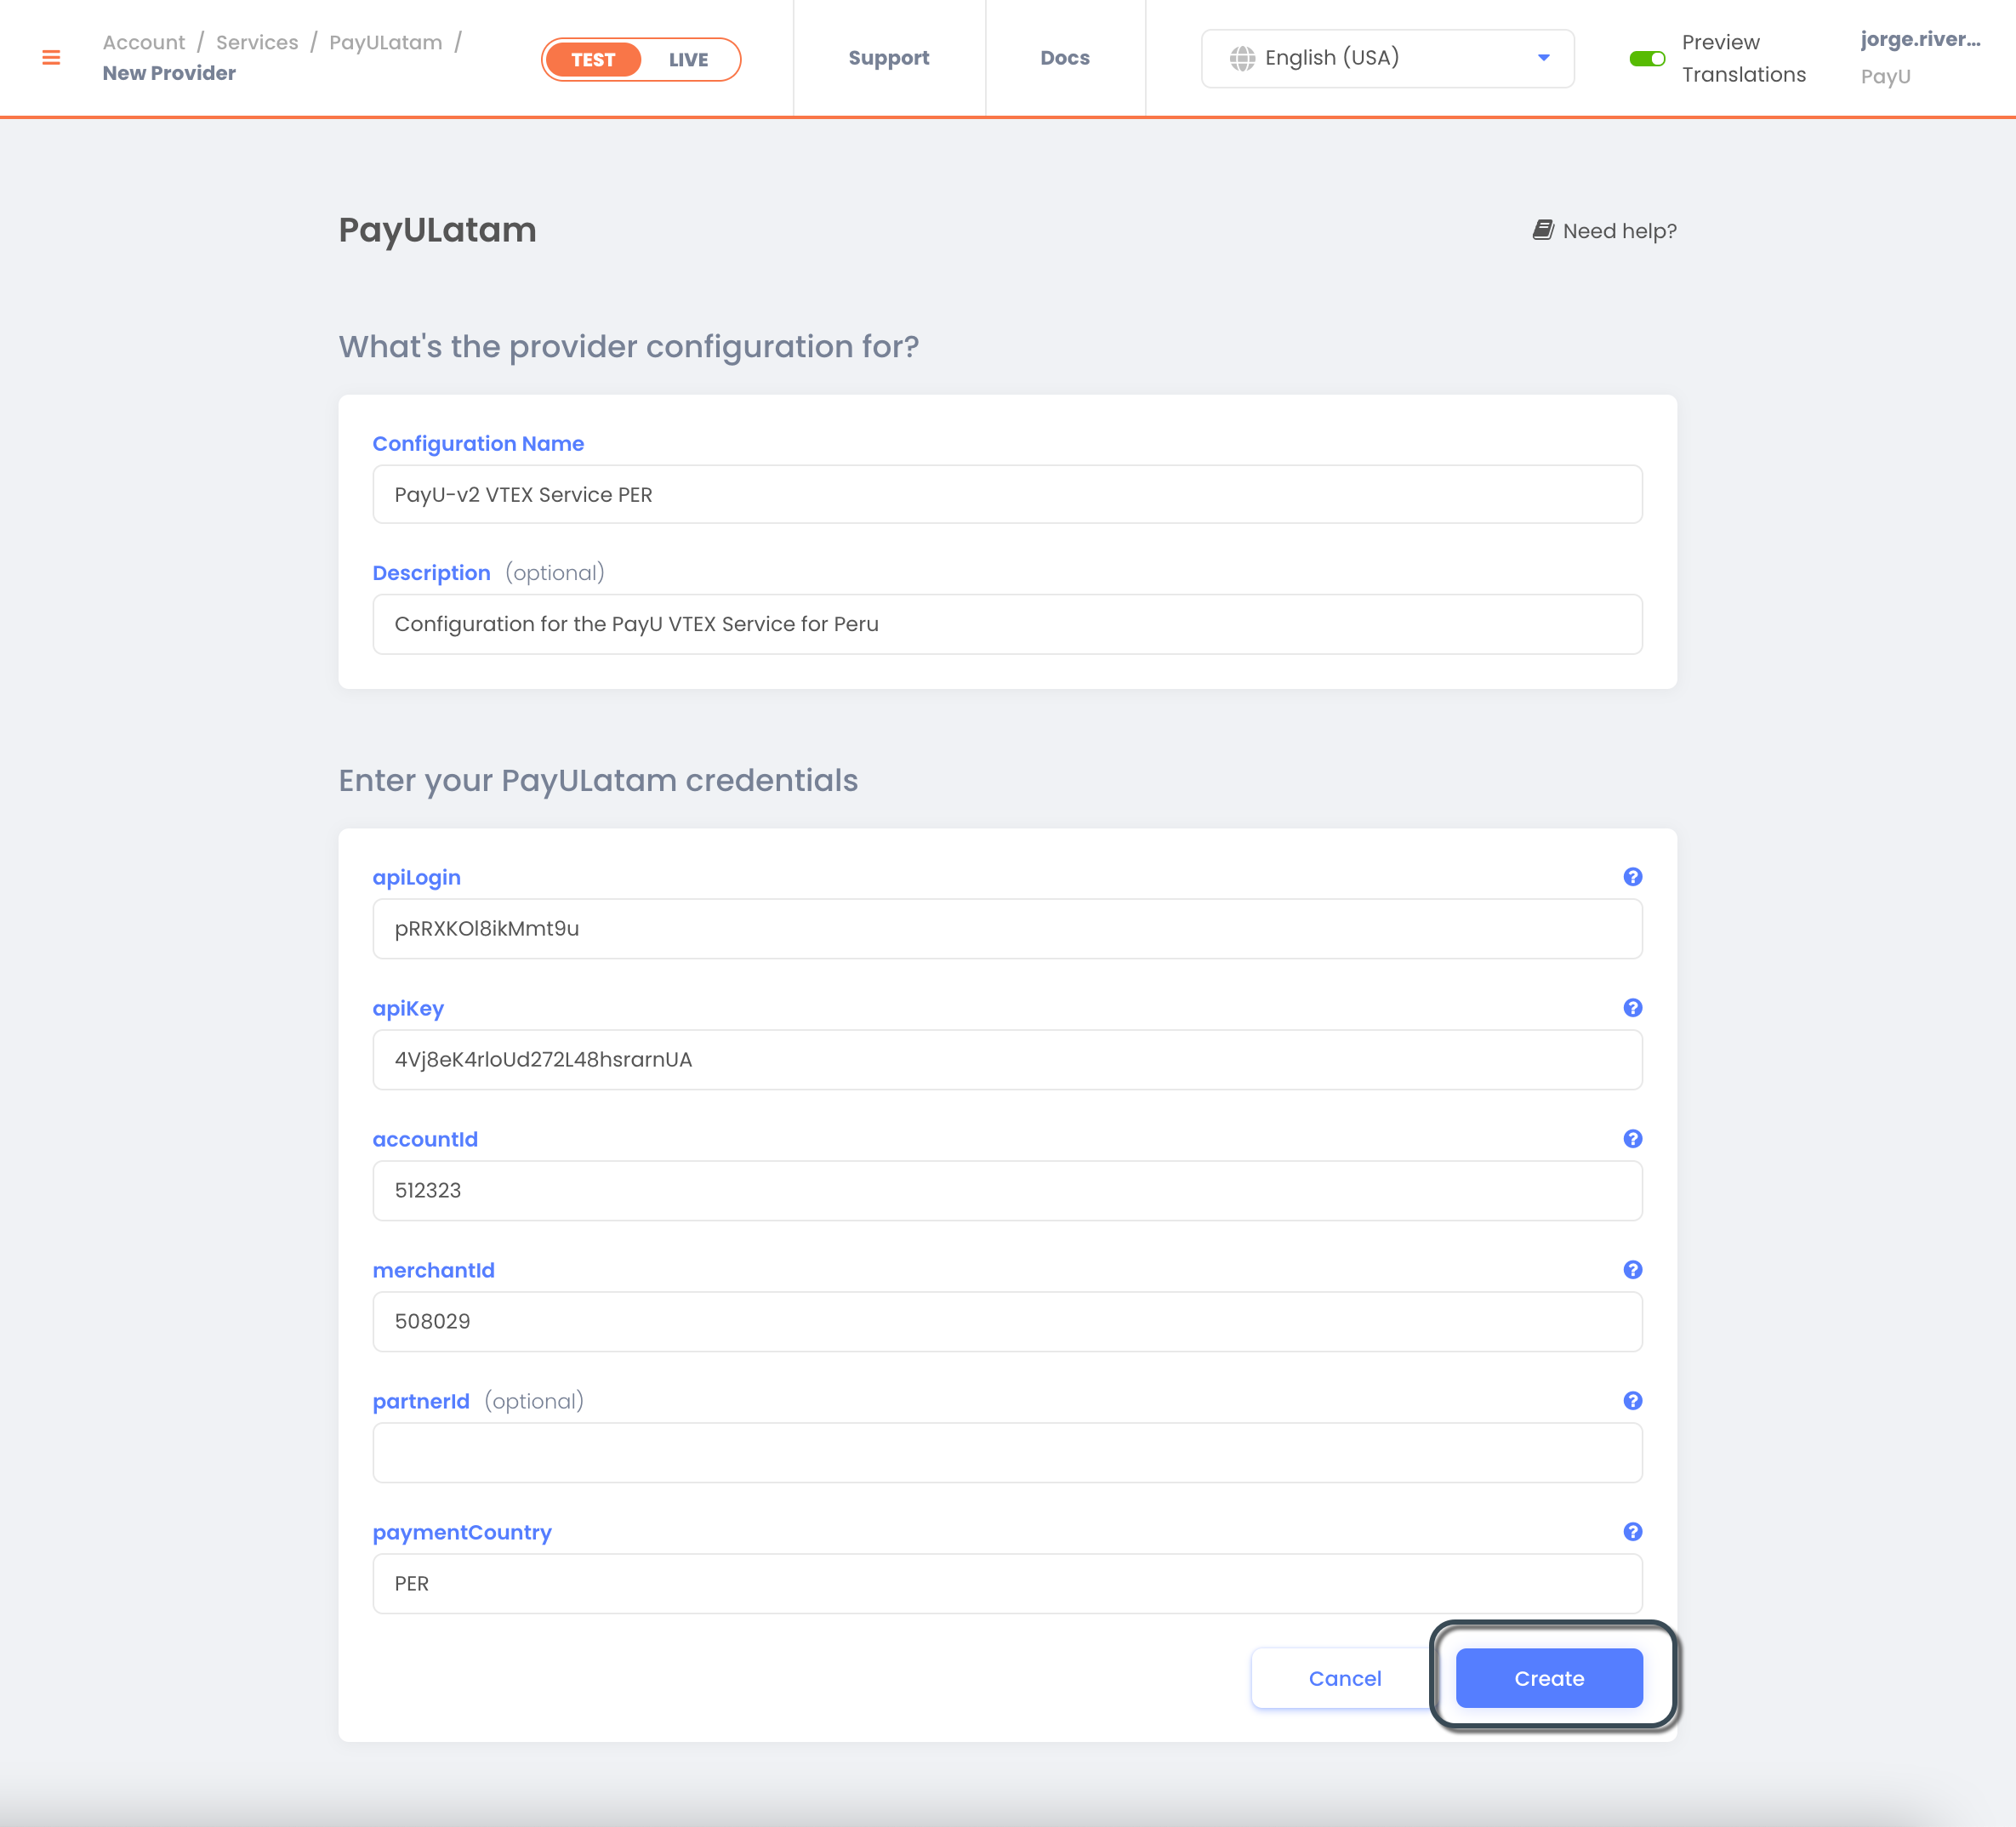
Provide the following information for the Provider Configuration:
| Parameter | Description |
|---|---|
| Configuration Name | Provide a name to the Provider Configuration. |
| Description | Provide a meaningful description for the Provider Configuration. This value is optional. |
| apiLogin | User or login provided by PayU. How do I get my API Login |
| apiKey | Unique key of your commerce. How do I get my API Key |
| accountId | ID of the PayU account according to the country where you want to sell. |
| merchantId | ID of your commerce in PayU Latam. |
| paymentCountry | Processing country in format ISO 3166 Alpha-3. |
When finish, click Create.
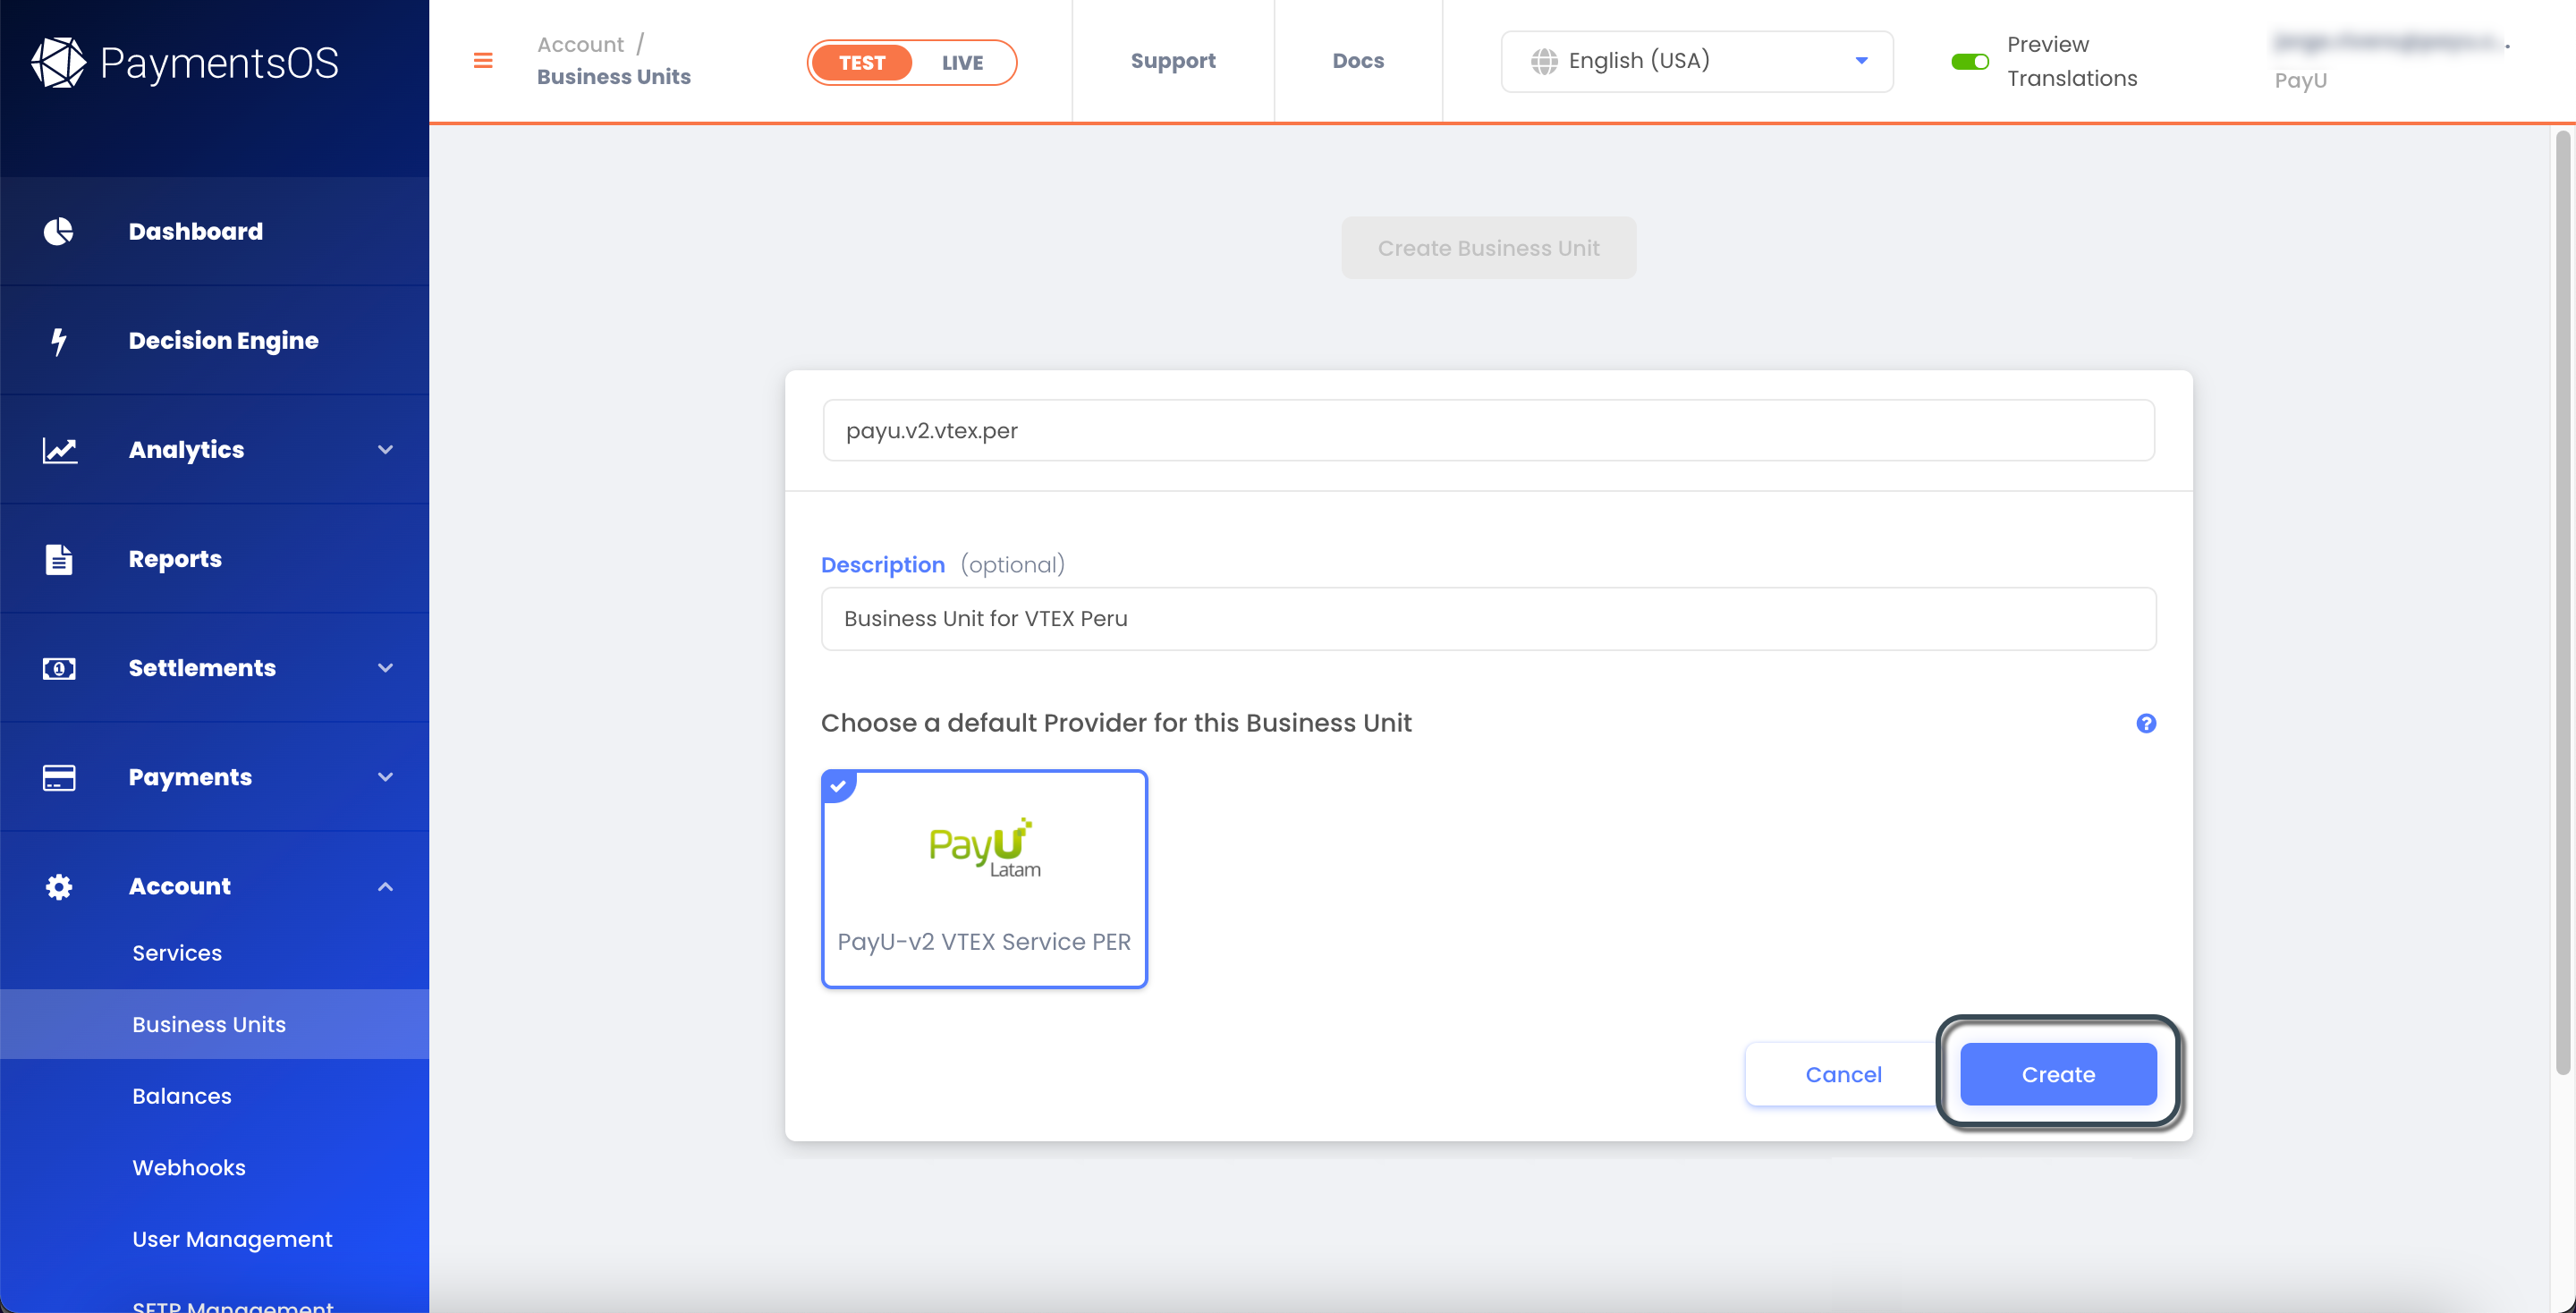
- Create the Business Unit.
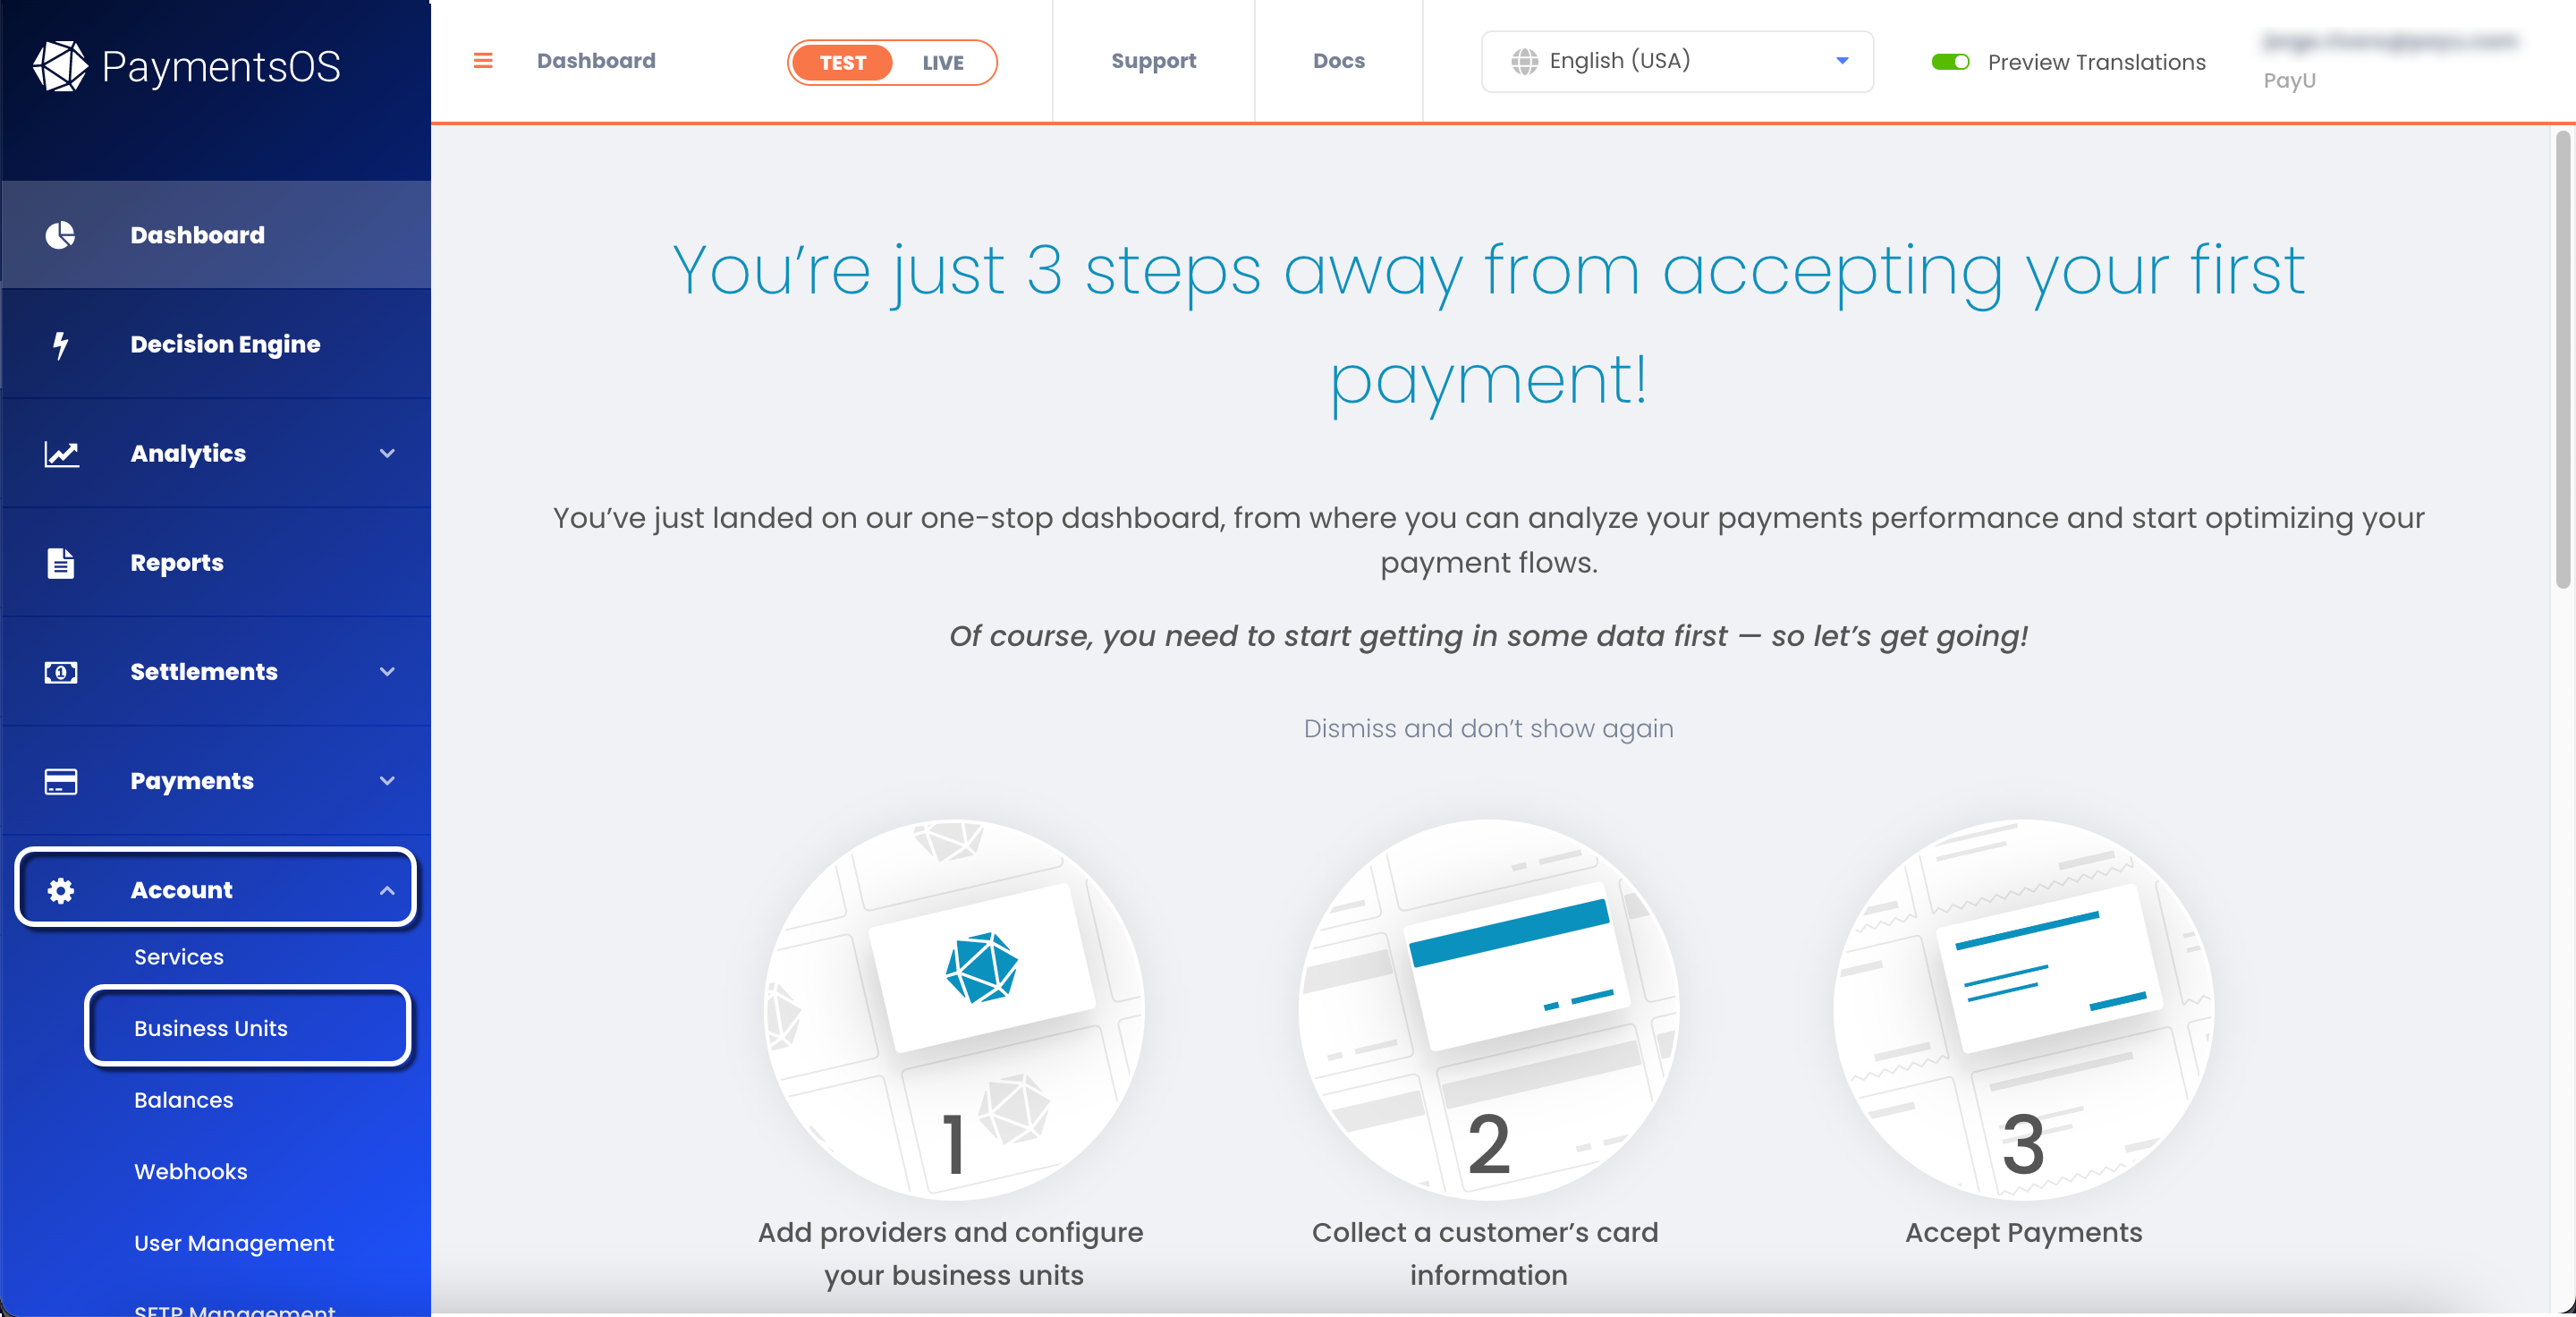
Back in the PaymentsOS dashboard, expand the Account menu, then select Business Units.
Click the Create Business Unit button and provide the following information:
| Parameter | Description |
|---|---|
| Business Unit Name | Name of the Business Unit. This name must be in lowercase and without blank spaces. Make sure you have provided the correct name as this cannot be updated later. |
| description | Provide a meaningful description for the Business Unit. This value is optional. |
In the Choose a default Provider for this Business Unit section, select the Provider Configuration created in the last step.
When finish, click Create.
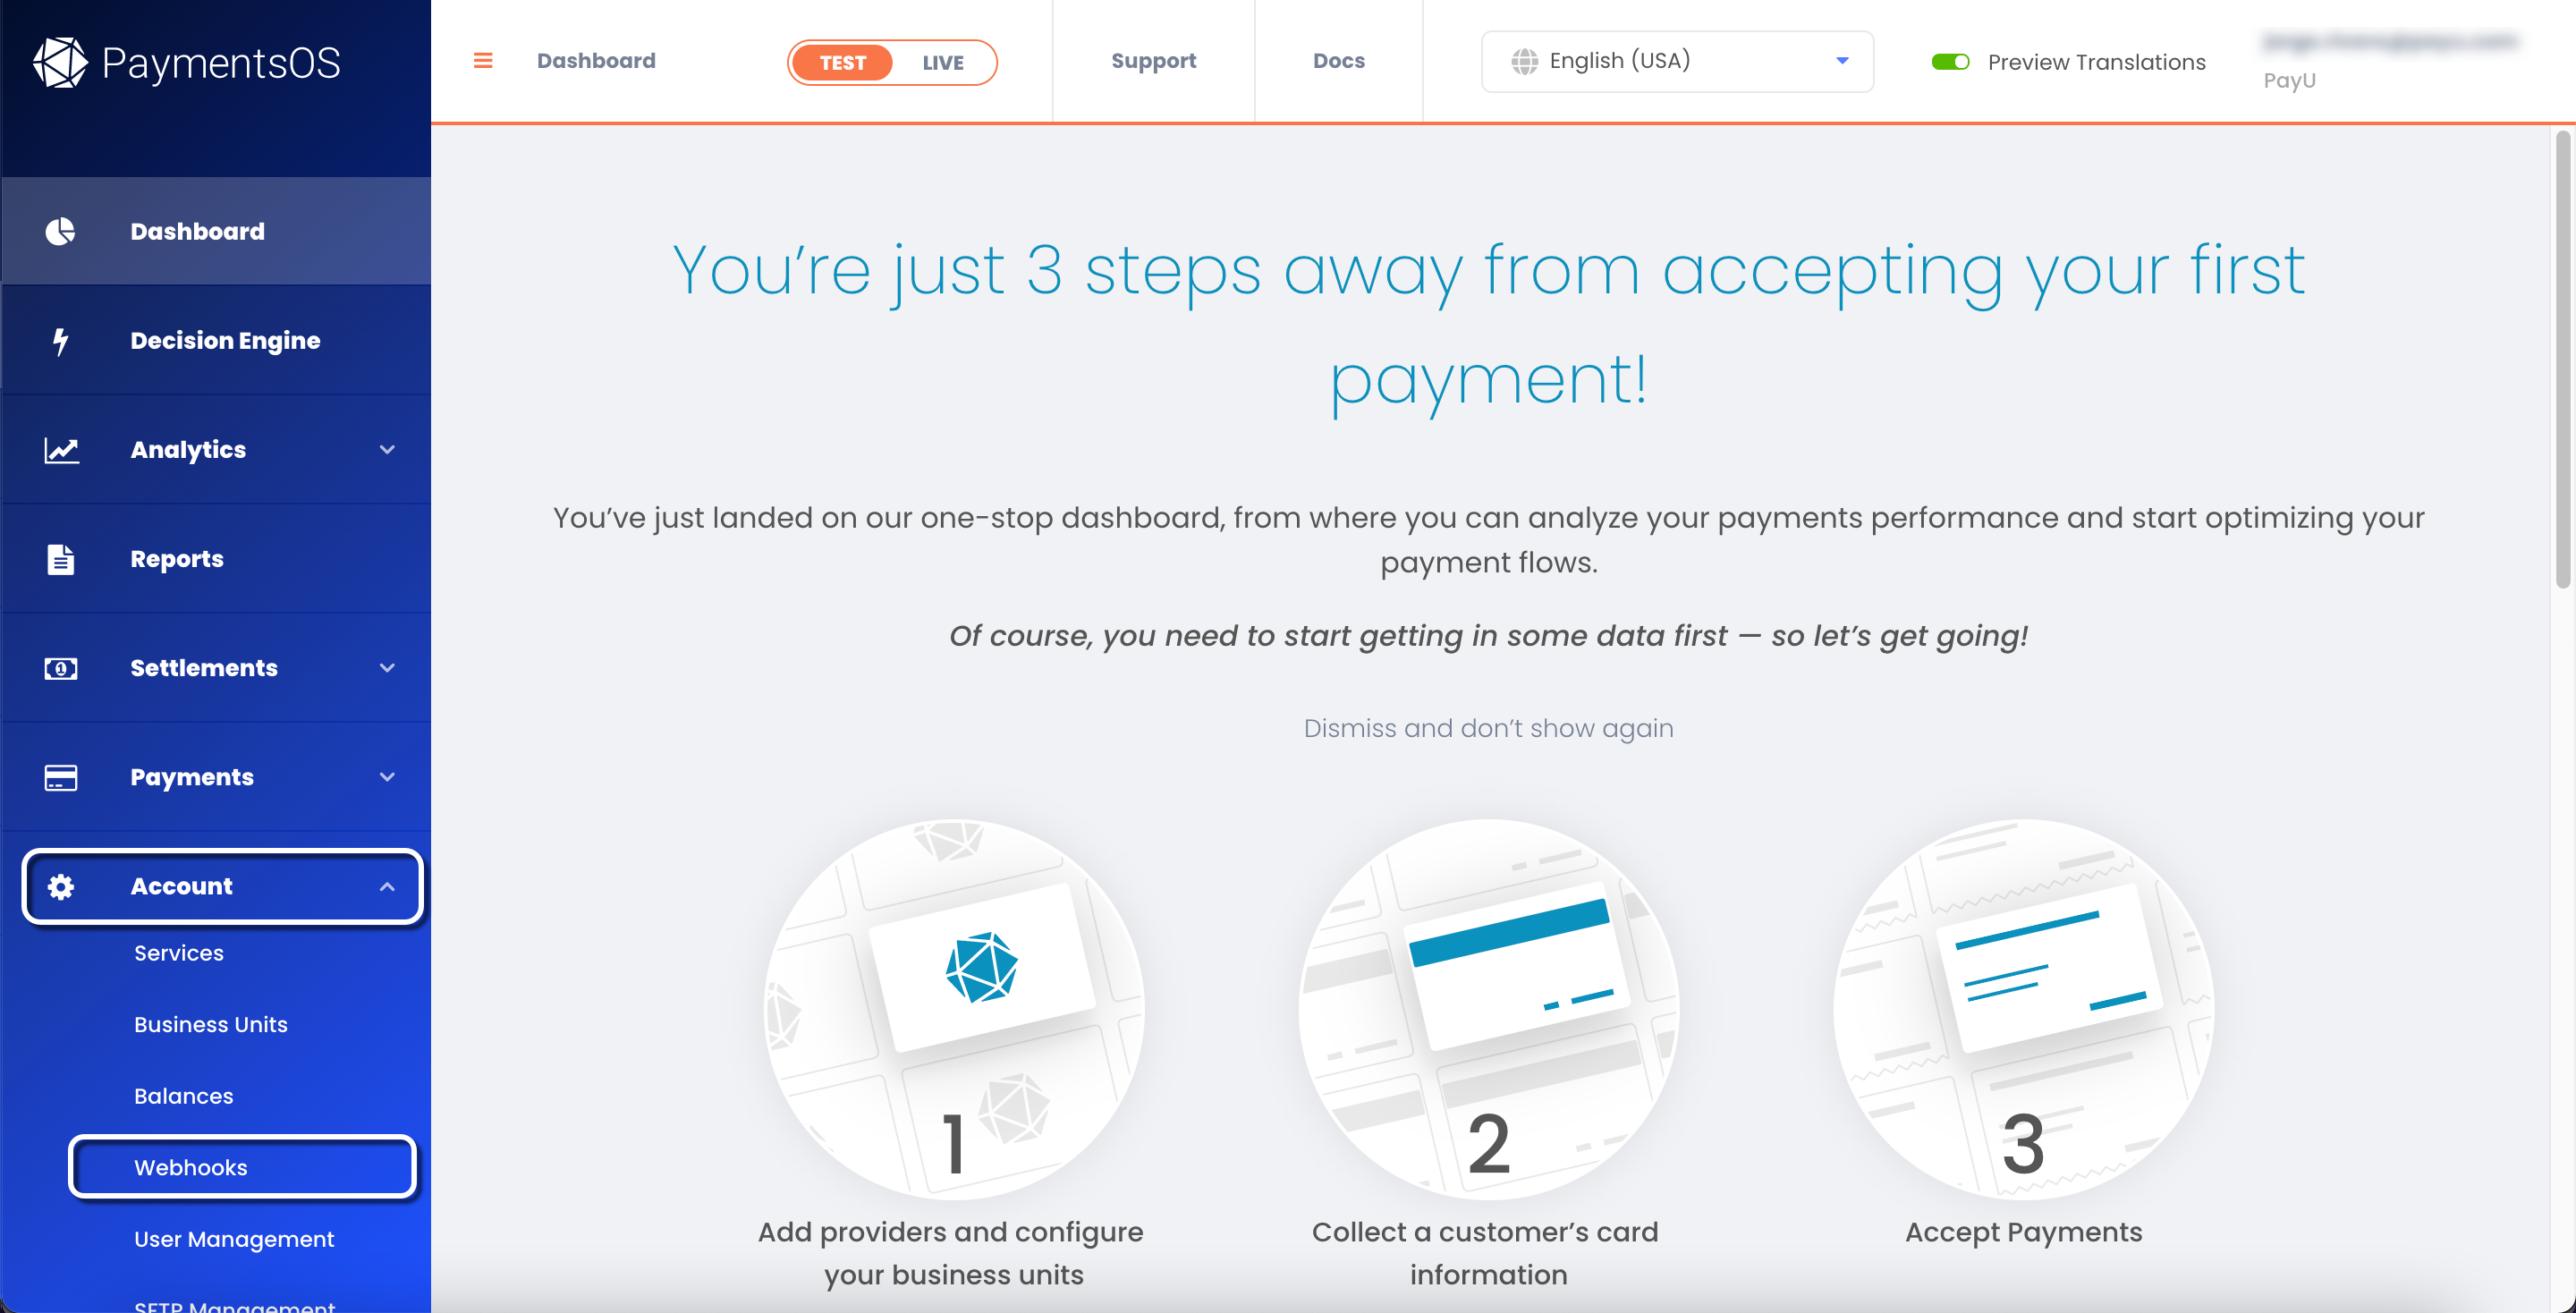
- Create the Webhook. This WebHook is the confirmation URL that will receive the notifications sent by VTEX when a transaction changes its state.
Back in the PaymentsOS dashboard, expand the Account menu, then select Webhooks.
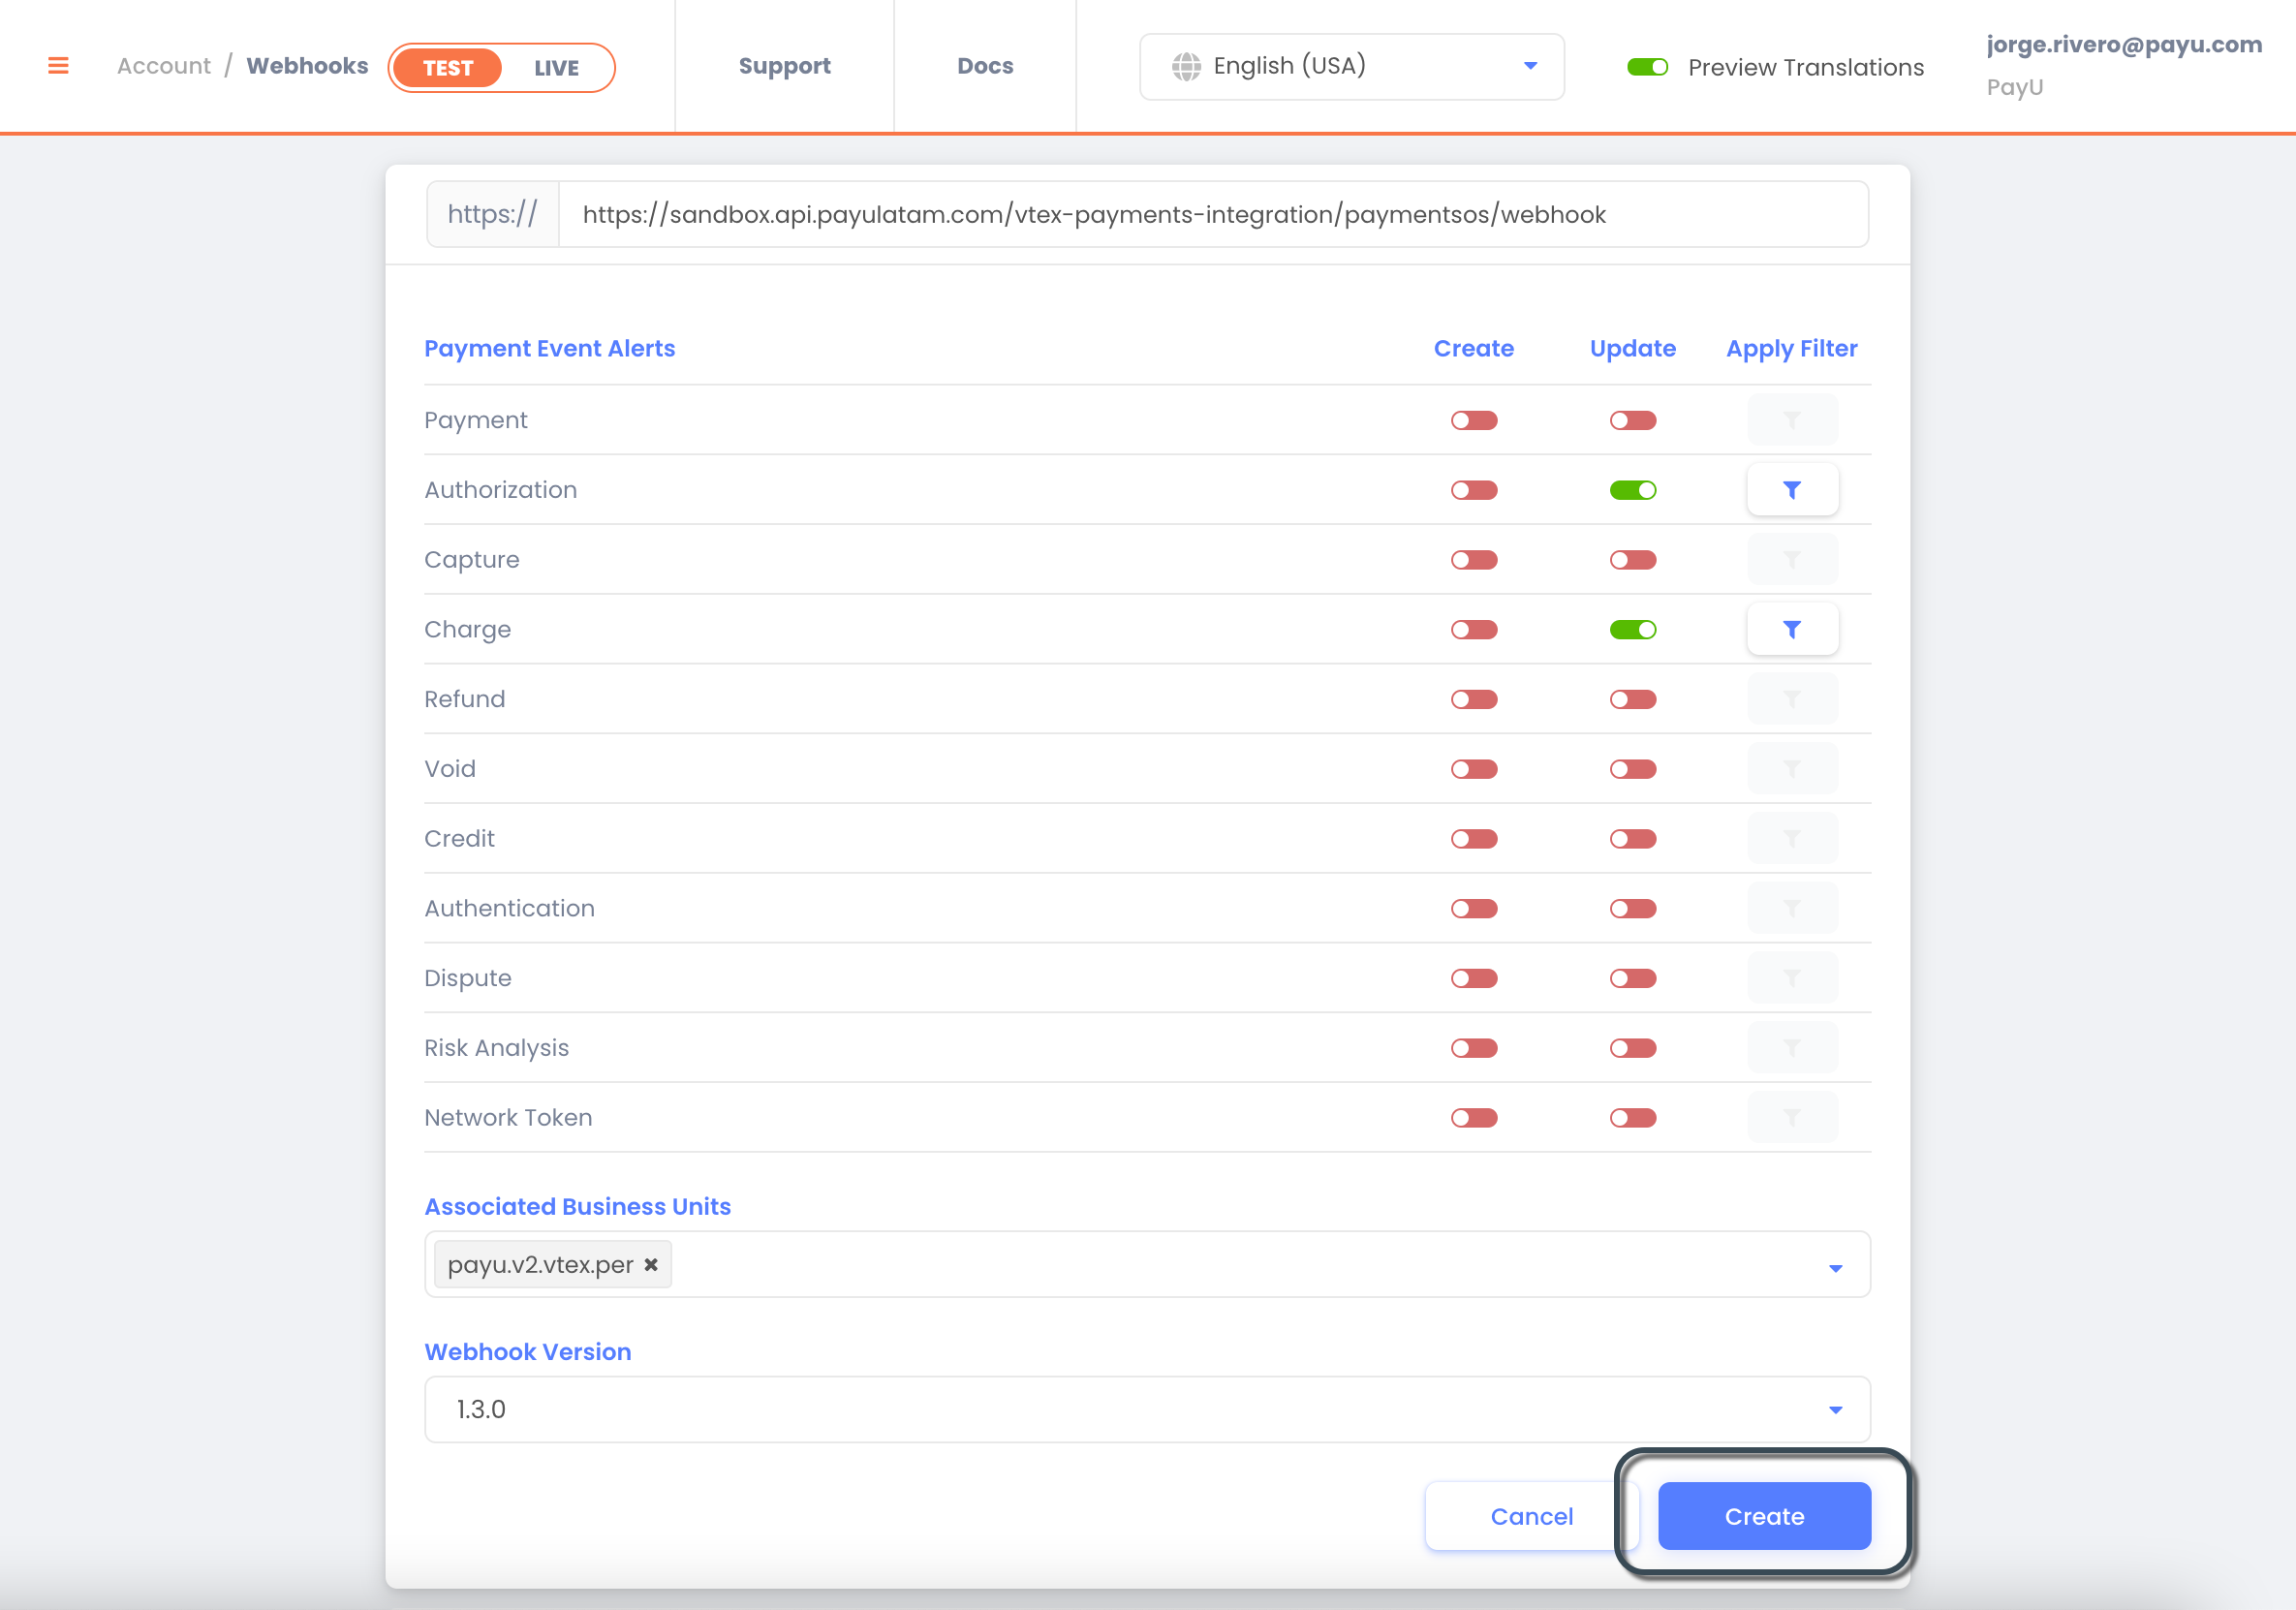
Click the Create a Webhook Endpoint button and provide the URL according to your environment:
- Test:
https://sandbox.api.payulatam.com/vtex-payments-integration/paymentsos/webhook - Live:
https://api.payulatam.com/vtex-payments-integration/paymentsos/webhook
In the Payment Events Alert table, enable the Update event for Authorization and Charge. Furthermore, select in the Associated Business Units combo the Business Unit created in the last step.
When finish, click Create.
At this point, your PaymentsOS account has been configured as a middleware, the next step is the configuration of the VTEX provider.
2. Configure the VTEX provider
Once you have configured your PaymentsOS account, the next step is the configuration of the VTEX provider per each payment method. For this step, it is mandatory that you have a valid user to access the VTEX admin.
Configure the Gateway affiliation
Before configuring the Gateway affiliation, make sure you have configured FingerPrint for PayU. To do so, refer to this article.
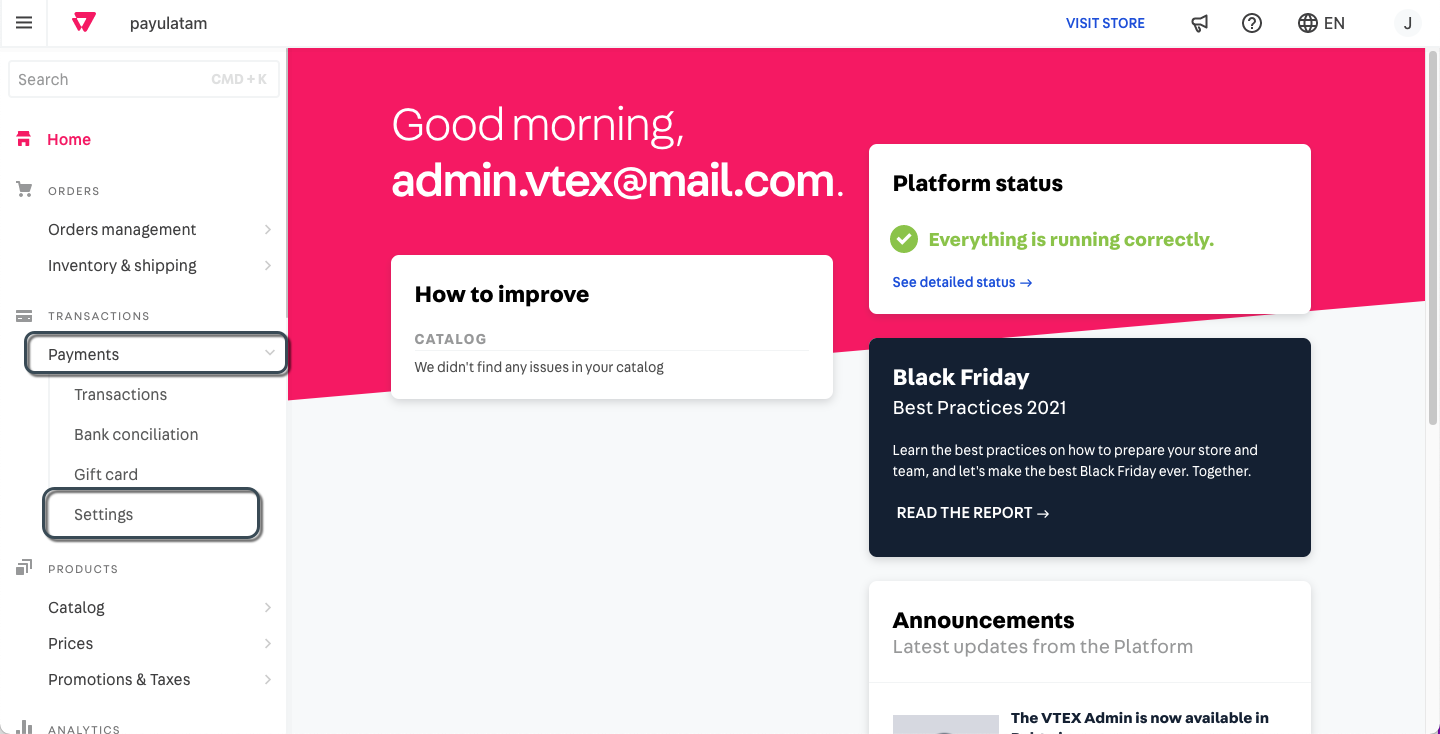
- In the VTEX admin, expand the Payments menu inside Transactions group. Then, select Settings.
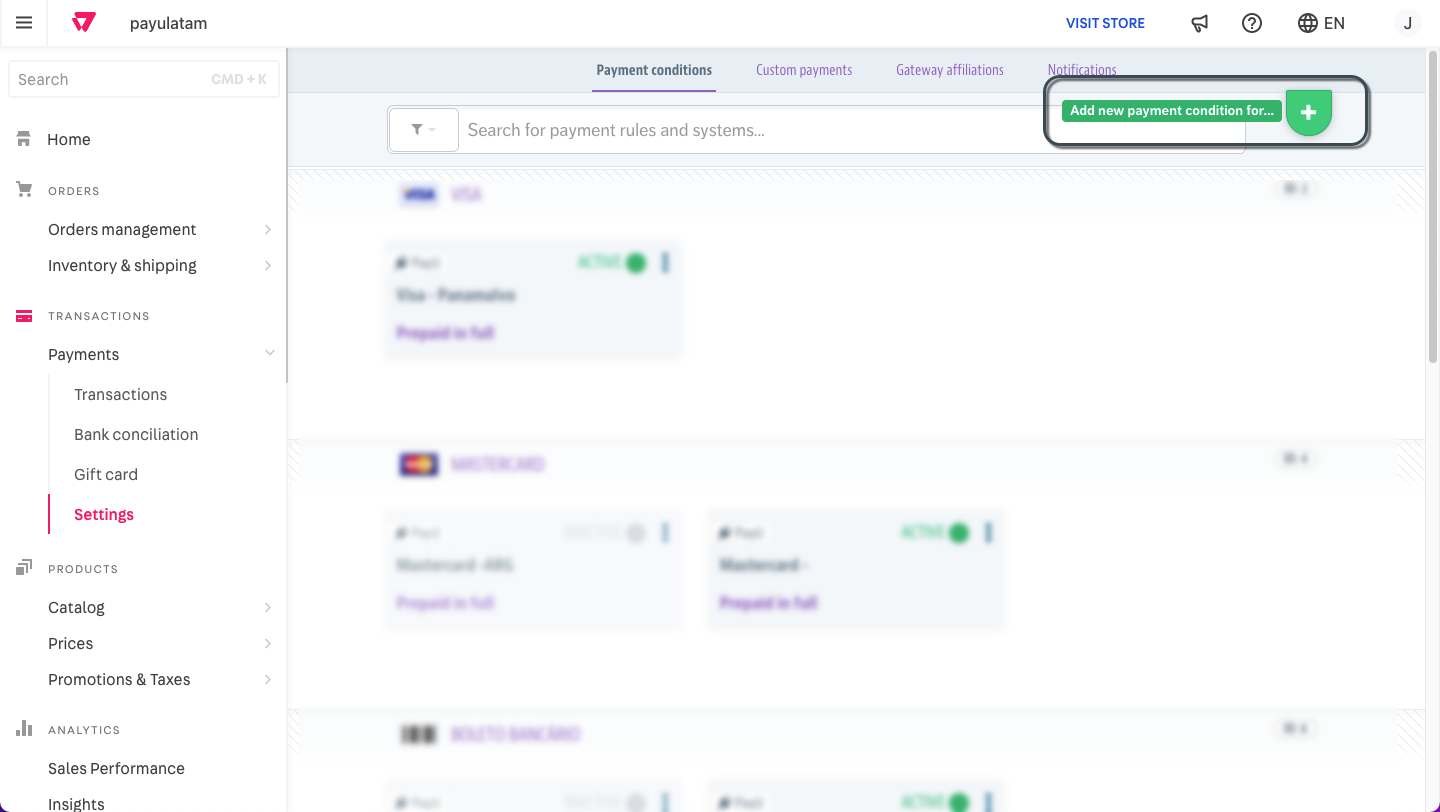
- Before configuring Payment conditions, you must create an affiliation to our gateway. In the top panel, click Gateway affiliations.

- Click the plus icon. Scroll down to OTHERS section and locate the PayUv2 connector.
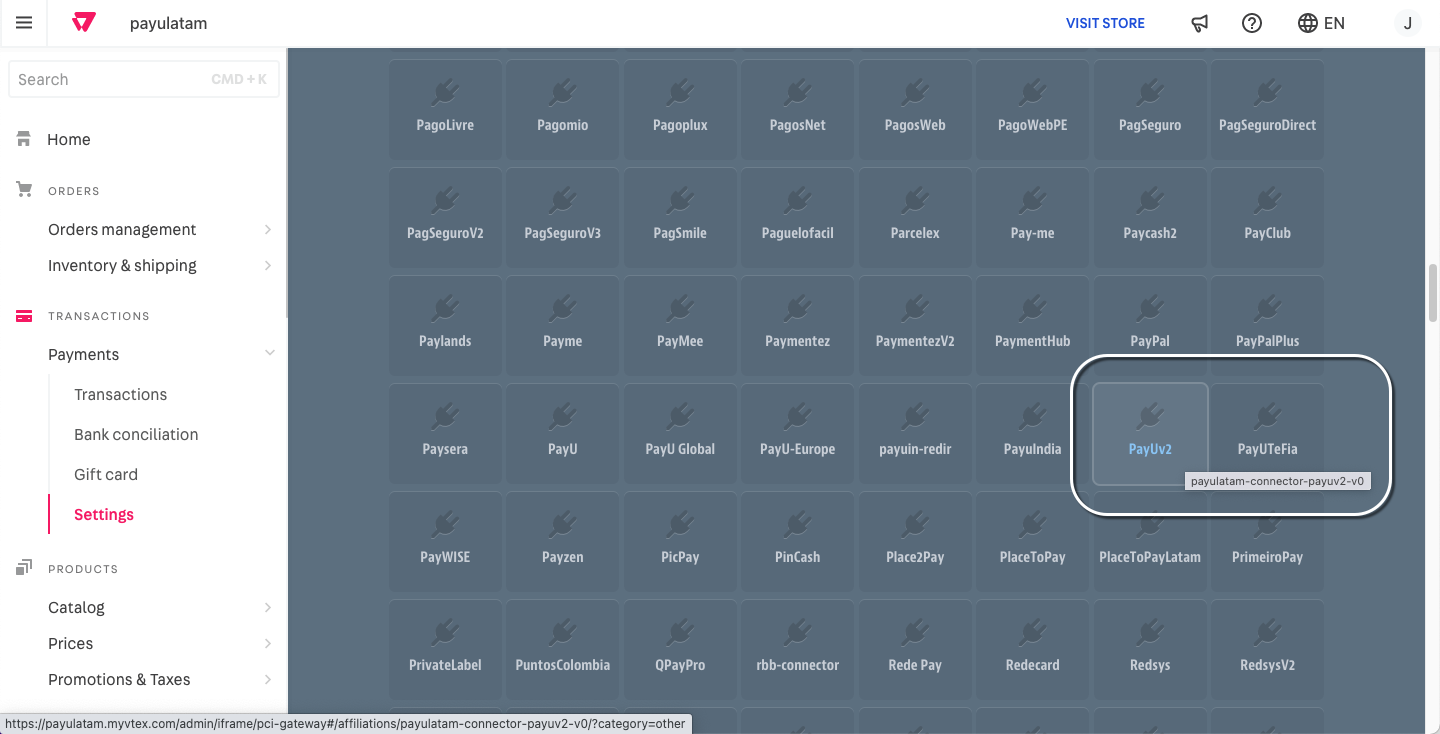
Important
Make sure you have selected the PayUv2 connector, the procedure explained in this guide applies specifically to this connector.- In the connector configuration, you must install the connector by clicking the Install app button. Then, provide the following information for the connector.
Note
The information of the connector can be obtained either:
- Using the Postman collection.
Run the Retrieve Authentication Keys method setting the global parameterenvastestorliveaccording to your processing environment. - Using the PaymentsOS dashboard.
Go to Account > Business Units and select the Business unit you create in the previous step. Recall that you must use the select at the top to choose the processing environment.
Some values are hidden by default, click the eye icon to display them.
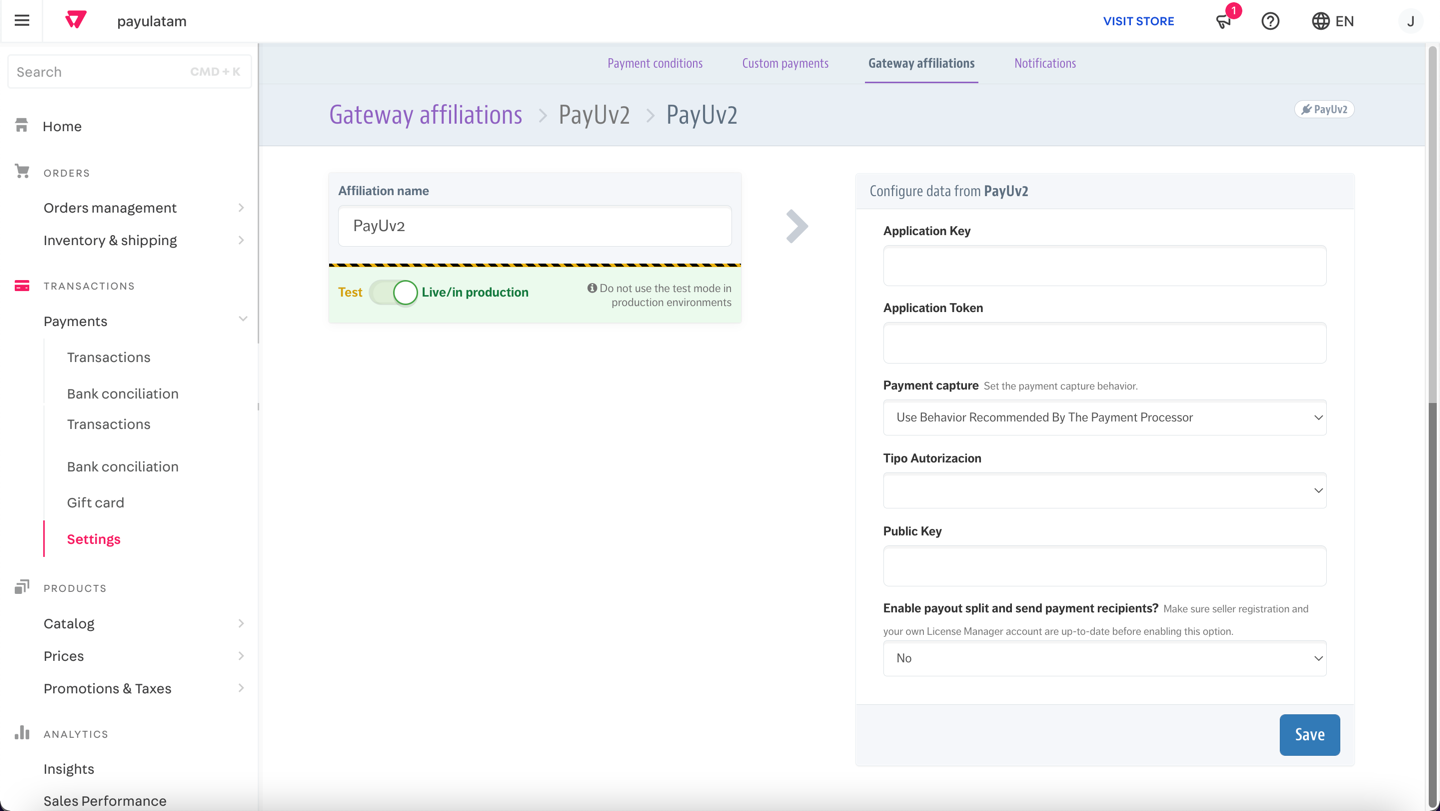
| Field | Description |
|---|---|
| Affiliation name | Name you want to set to identify the Gateway affiliation. |
| Environment selector | Choose the environment where you want to create the transactions. According to the selection you make here, you must provide the other parameters selecting the same environment in PaymentsOS. |
| Application Key | App ID of the Business Unit. |
| Application Token | Private API Key of the Business Unit. |
| Payment capture | Select how you want to perform the settlement (charge) in your affiliation.
For more information about this parameter, refer to Custom Auto Capture Feature in the developers documentation. The default value for this option is seven (7) days after the approval. |
| Scheduled time frame in hours for automatic capture | This field appears when selecting Scheduled: Schedules the automatic capture as the Payment capture method; select the automatic capture time frame you want to configure according to your own configuration. This value must be integer, thus, no decimals are permitted. |
| Tipo Autorizacion | Choose if your payment transactions are executed in using one-step or two-step flow.
Refer to the following link to learn more about the Payment flows. |
| Public Key | Public API Key of the Business Unit. |
| Enable payout split and send payment recipients? | Select No for this field. |
When finish, click Save.
Configure Payment methods
Configure the payment methods to be displayed on the website for checkout. Consult our available Payment methods.
Important
- PSE (Colombian Bank transfer method) is not supported through this version of the connector. If you need to configure this Payment method, refer to the procedure to install version 1 of the conector.
- PIX is not available for Brazil using VTEX.
- Changes to payment conditions can take up to 10 minutes to apply to the checkout flow.
Configure credit or debit cards.
According to your processing country, you can configure the affiliation you create to use credit or debit cards*. Follow the instructions below to add this payment method to your VTEX shop.
* Debit cards usage depends on your processing country.
Important
Click here if you want to know how to configure Co-branded or Private labels cards- In the Settings option (Transactions > Payments > Settings), select the Payment conditions tab and click the plus icon.
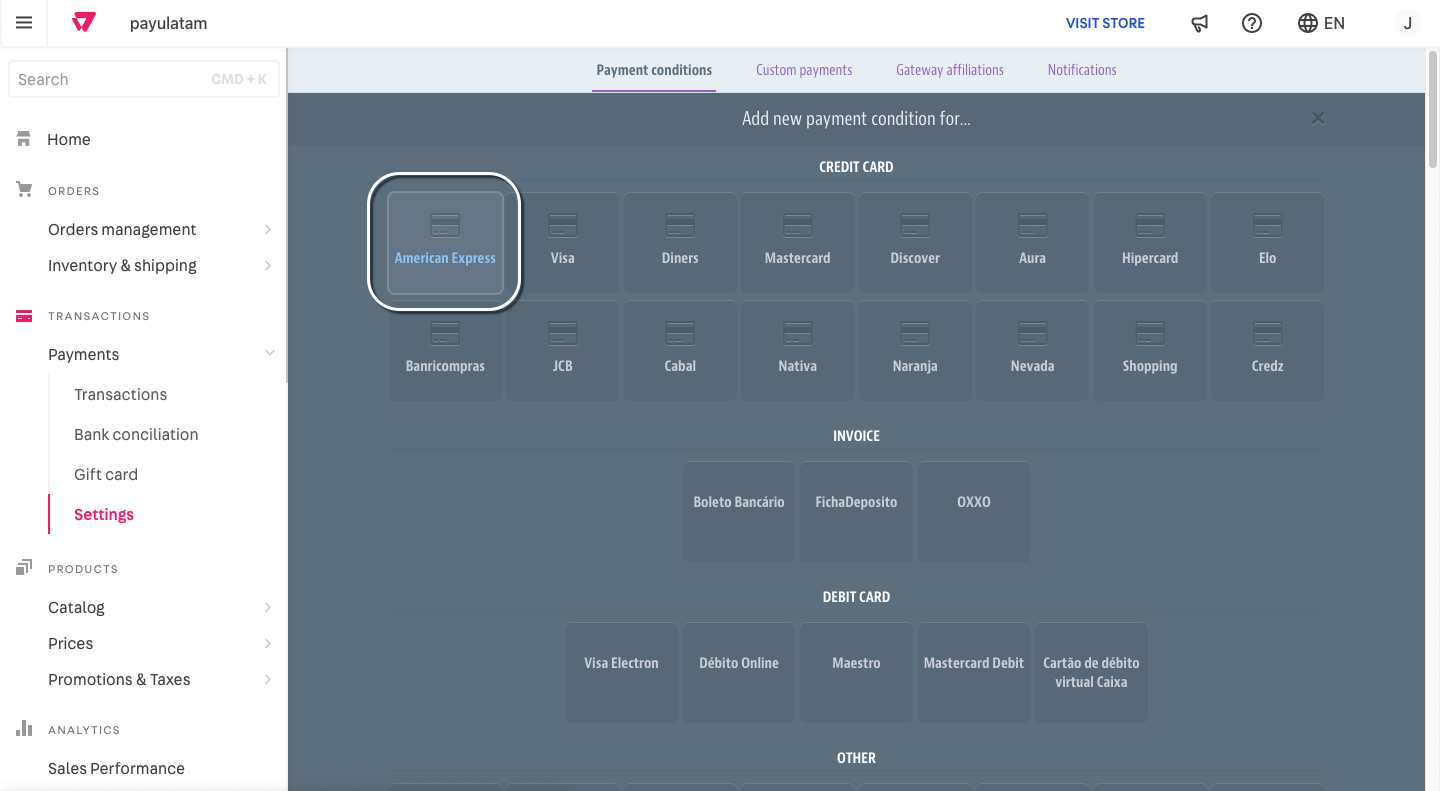
- Select the Payment method you want to include. Payments methods are grouped by their type.
For the sake of our example, we select American Express in the Credit Card section.
- Provide the following information.
- Rule Name (to help you quickly identify): provide a meaningful name for the payment condition next to the payment method you selected.
- Status: set the status of the payment condition. You can only have one active payment condition per payment method.
- Process with affiliation: select the gateway affiliation configured before.
- Prepaid in full or in installments?: select Prepaid in full*.
*Processing in installments is not yet supported.
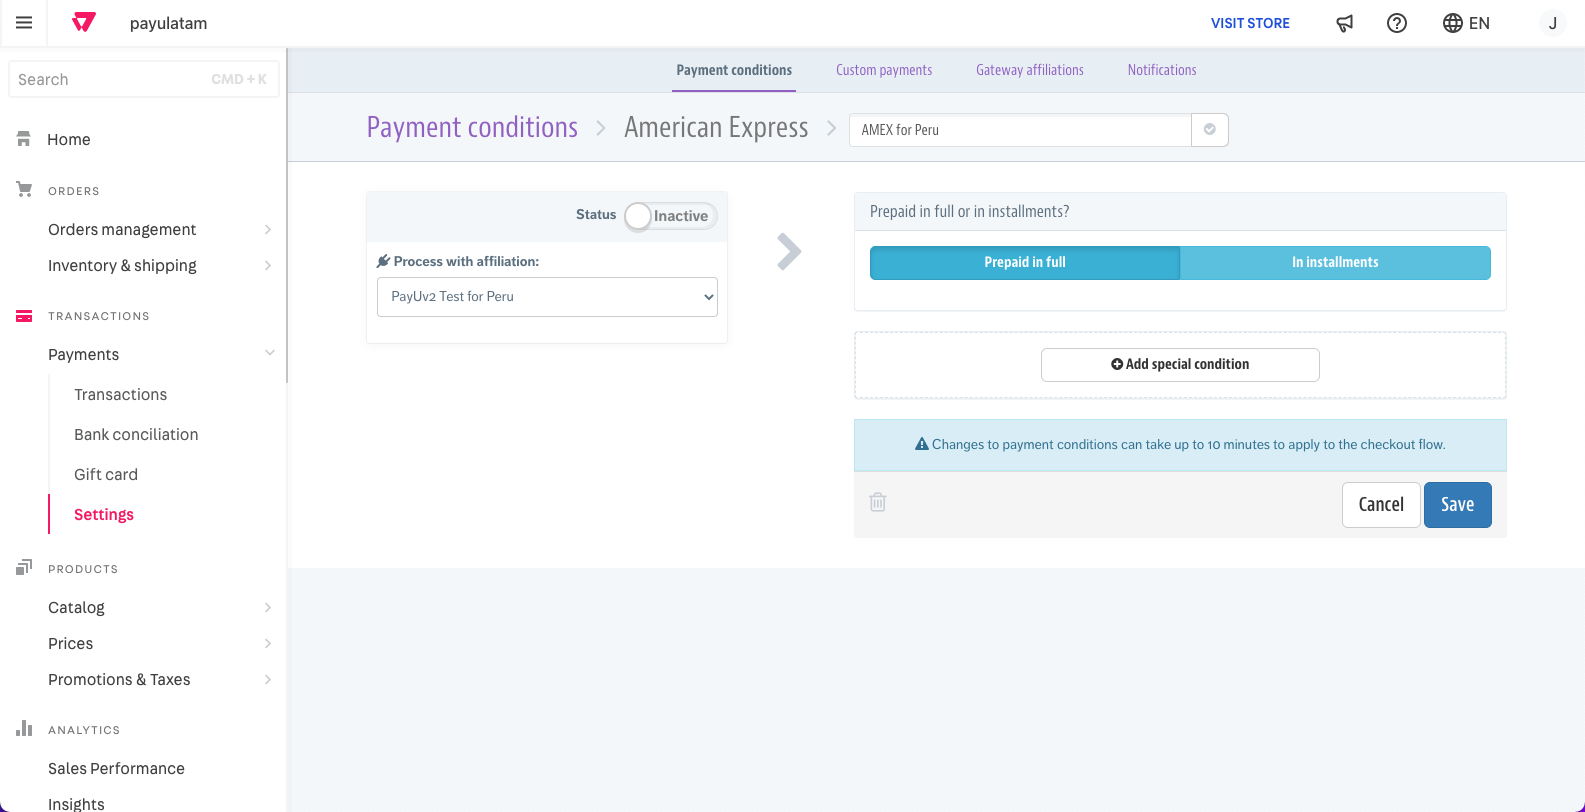
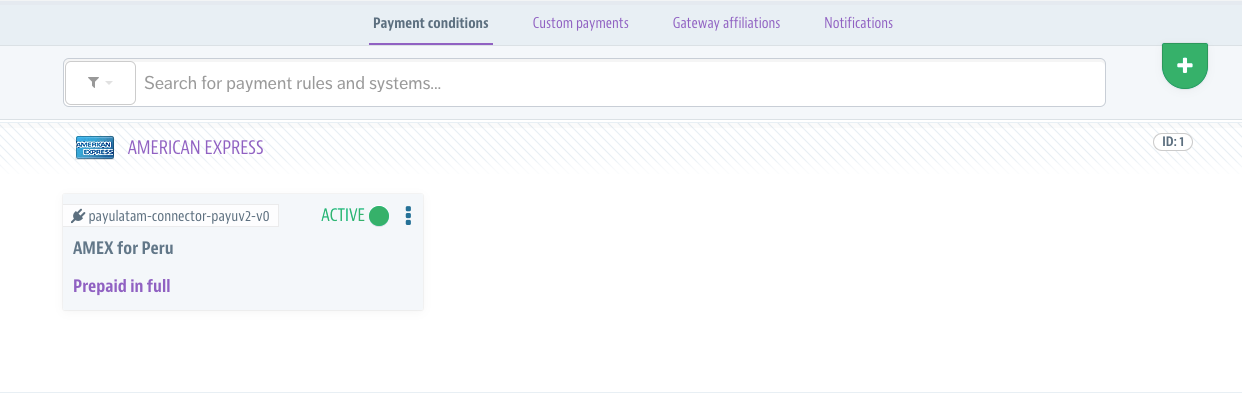
- Click Save. When the payment condition has been created, it is listed in the Payment conditions tab.
Configure Co-branded or Private labels cards.
Co-branded and Private label cards are credit cards issued by an store or brand which can be issued in partnership with a network such as AMEX, VISA, MasterCard, etc. Follow the instructions below to add this payment method to your VTEX shop.
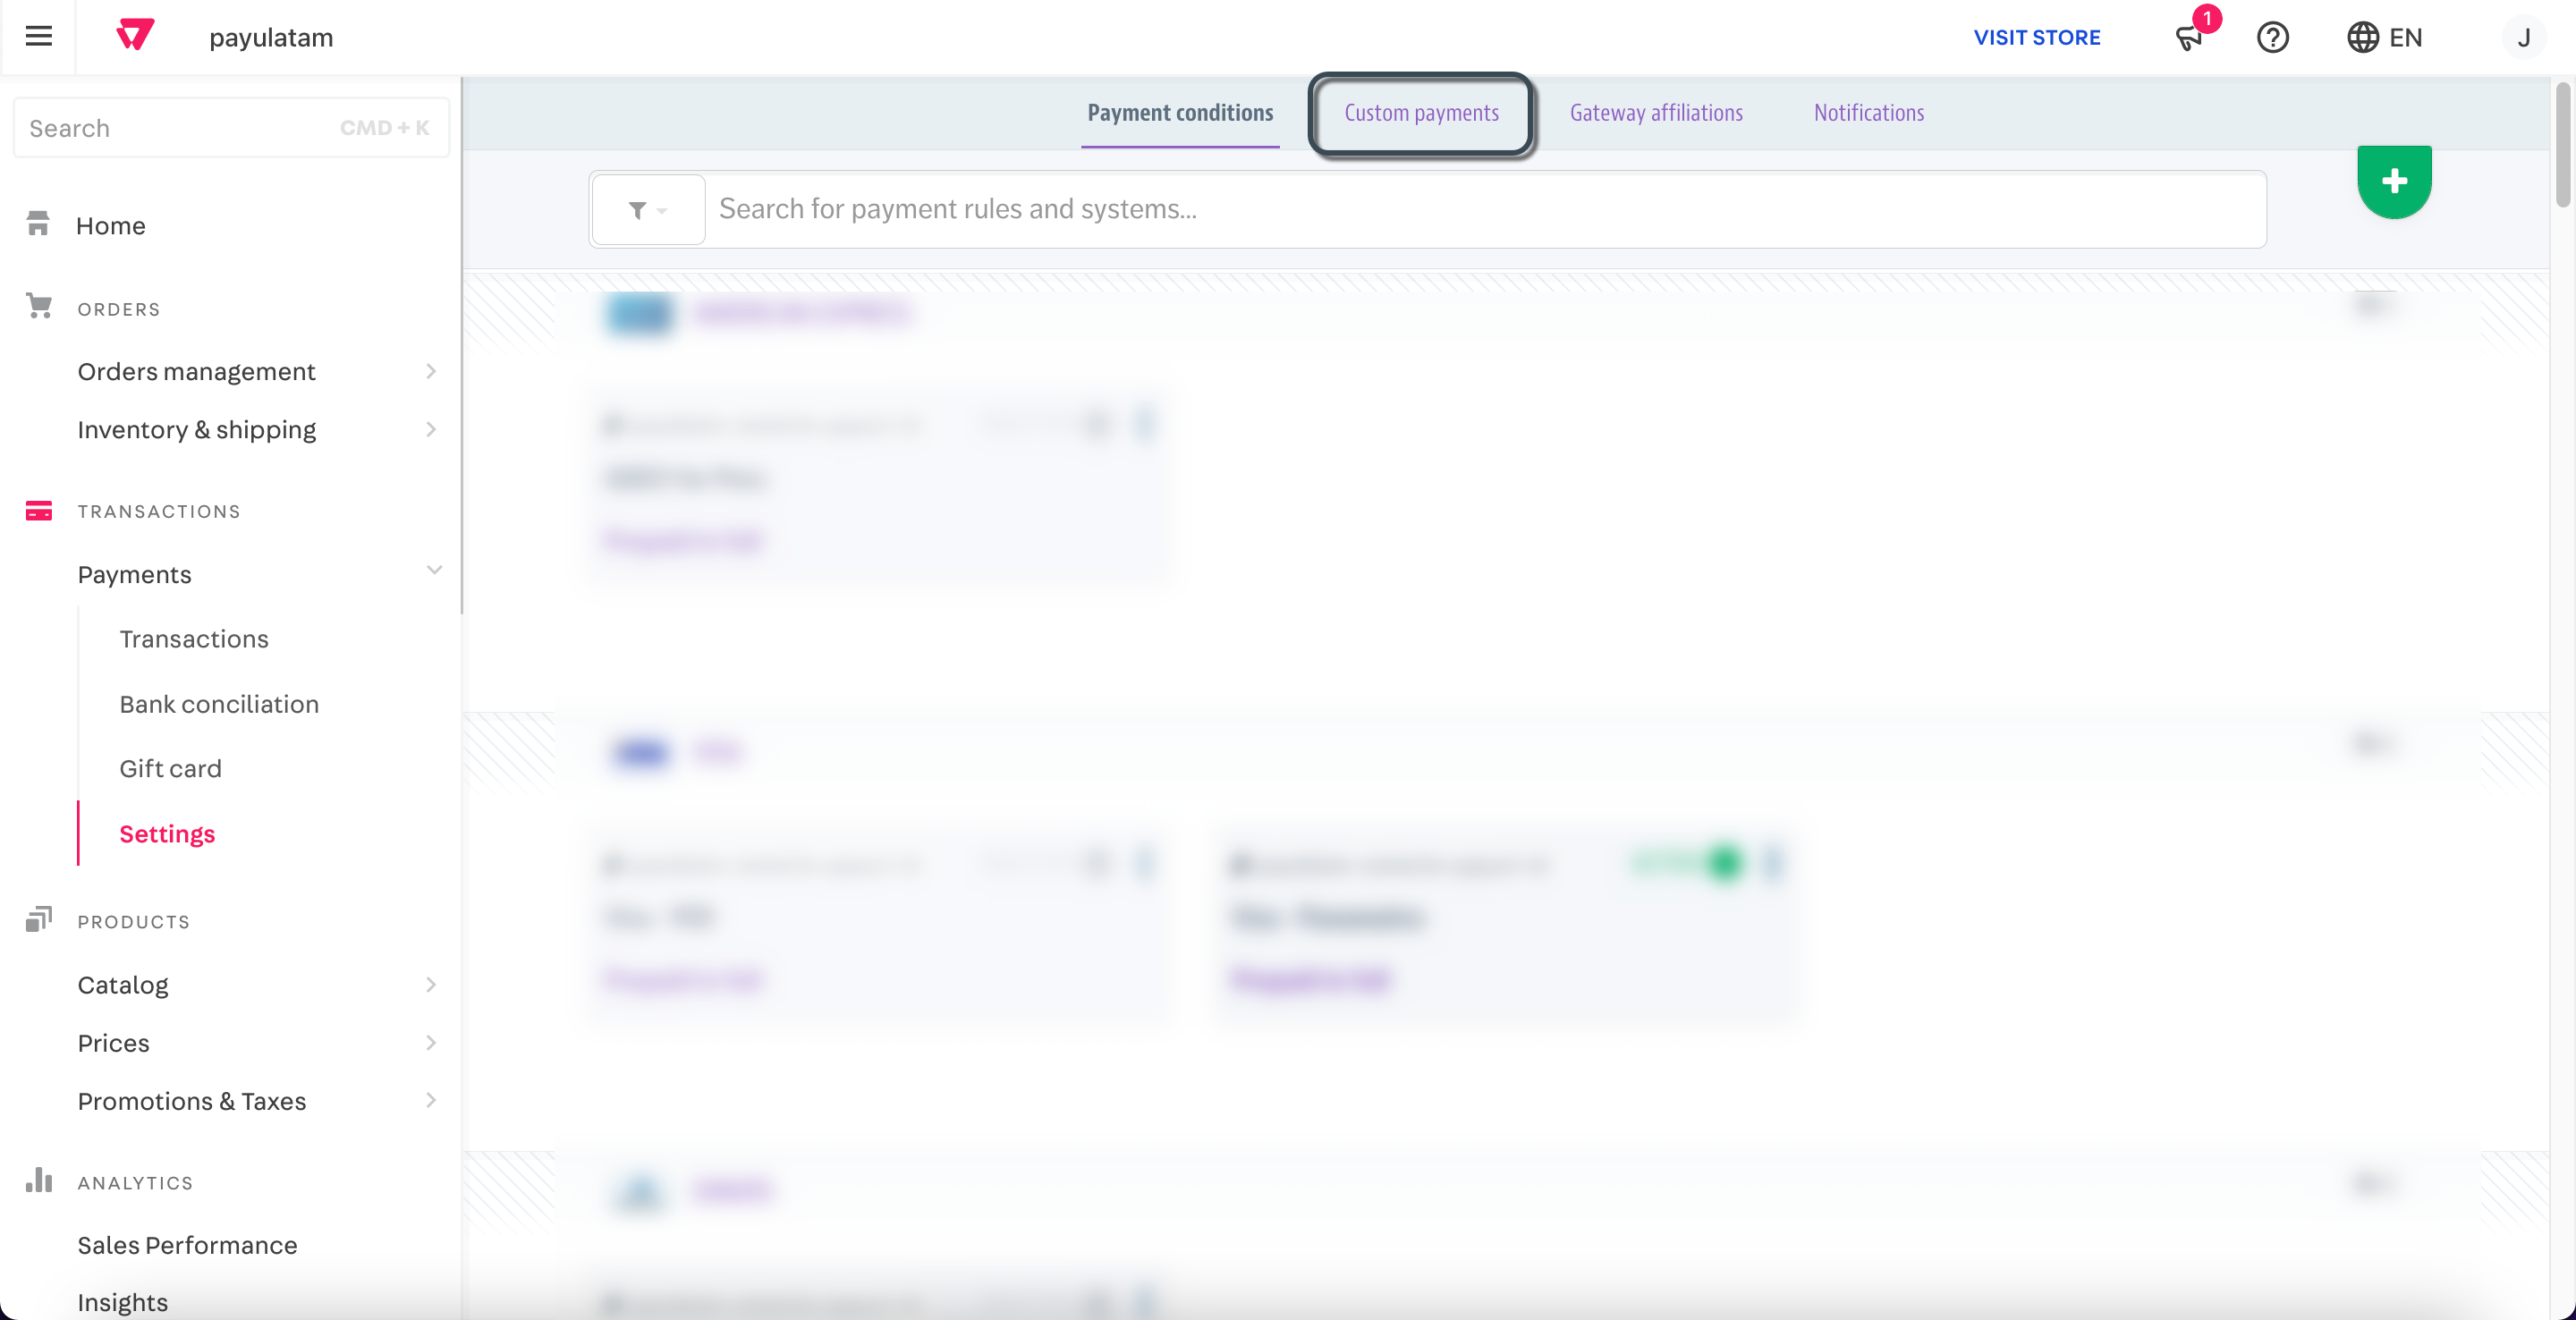
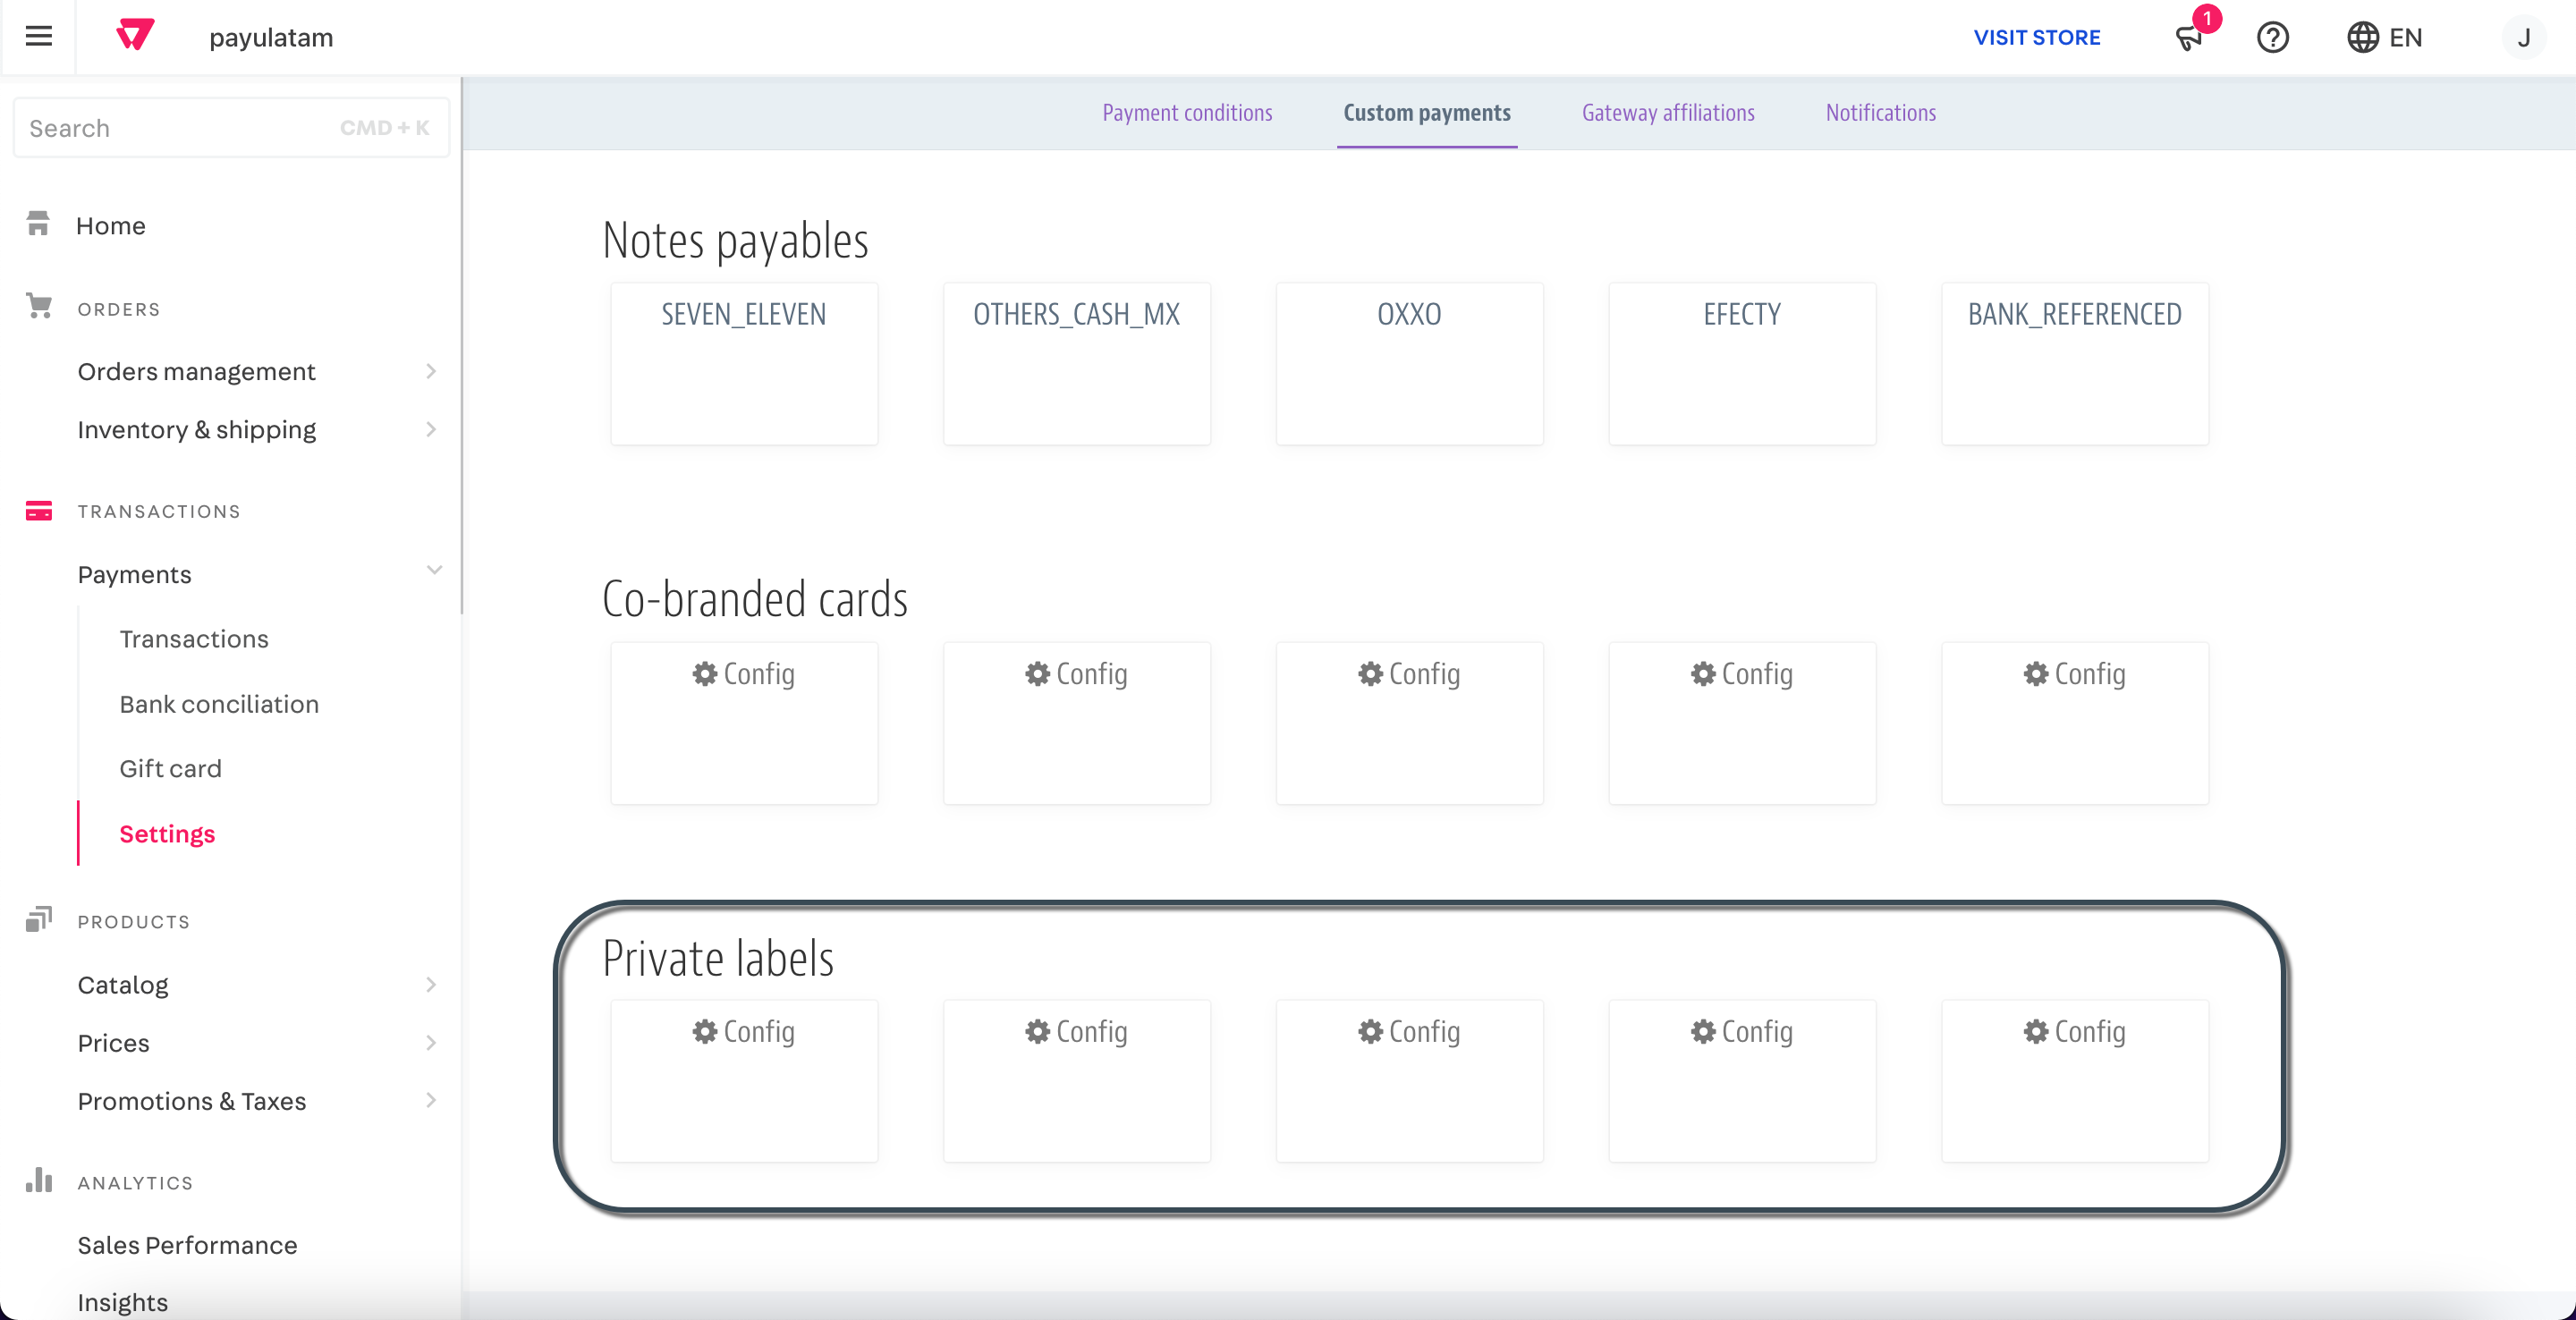
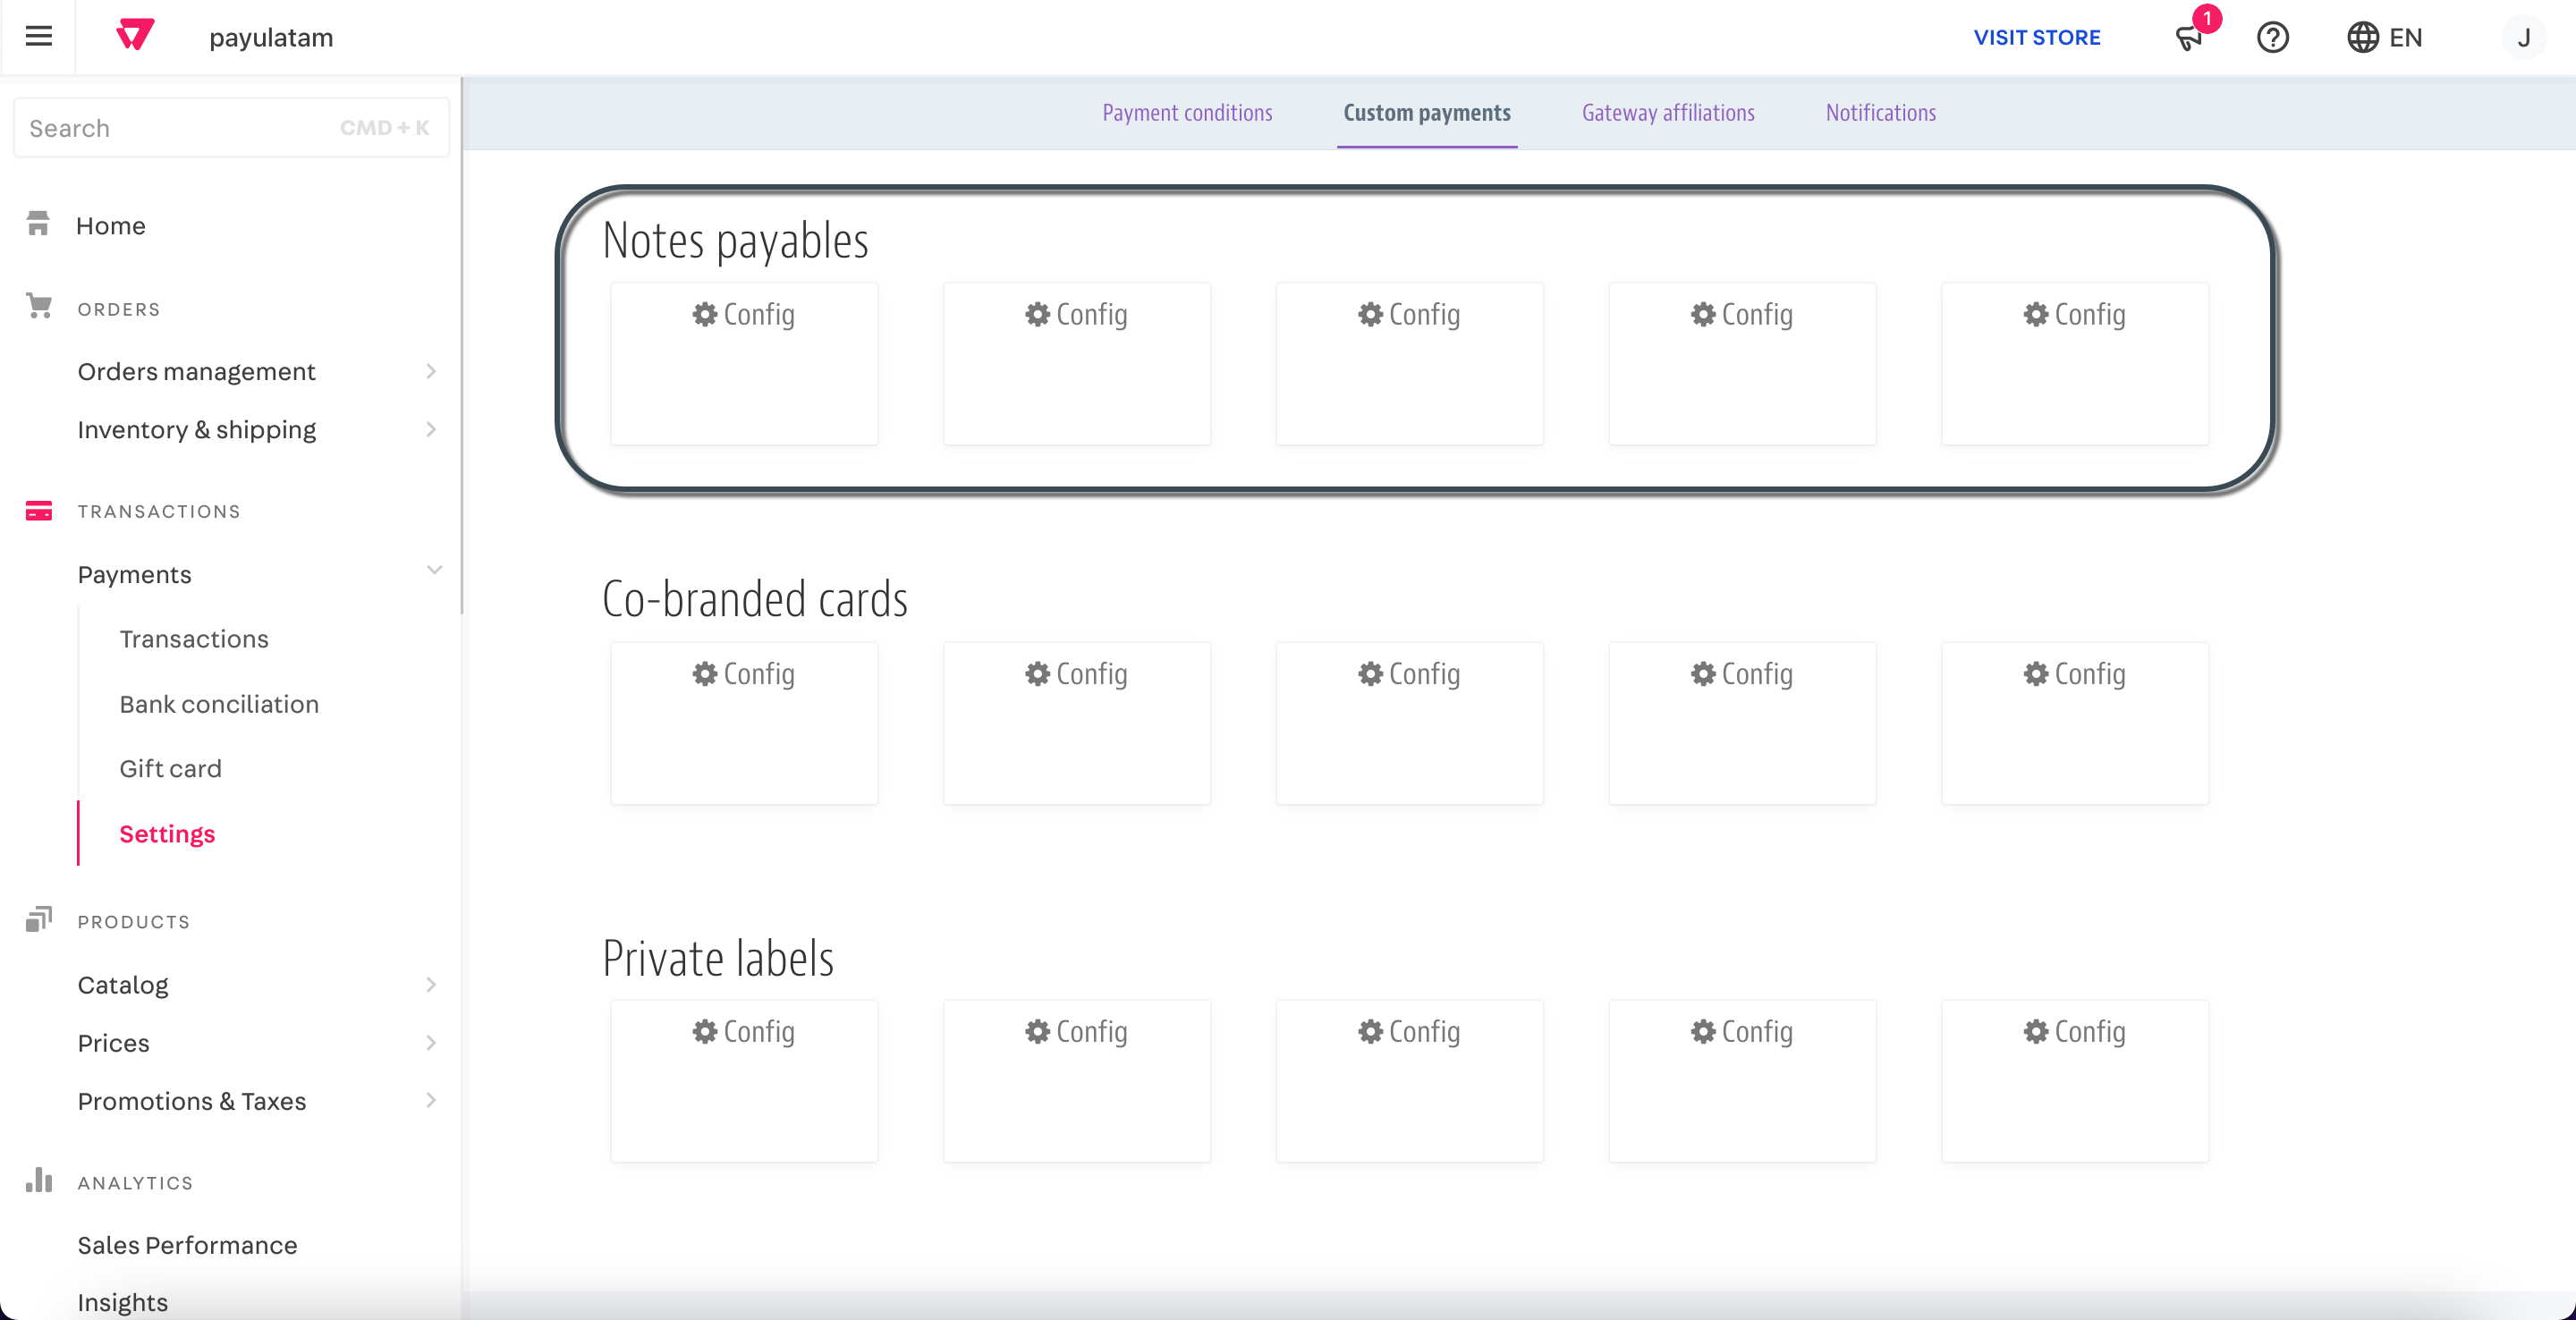
- In the Settings option (Transactions > Payments > Settings), go to Custom payments tab.
- In this tab, you have five (5) available space to configure both Co-branded and Private label cards. In this example, we will set up the Colombian card Codensa which is a Private label card.
Click in any of the available boxes in the Private labels section.
- Provide the following data of the card using the case displayed.
- Name:
Codensa. - Description:
Codensa - BIN ranges:
590712-590712 - Acquirer payment code:
codensa
Note
For Co-branded cards, you also need to select the card brand.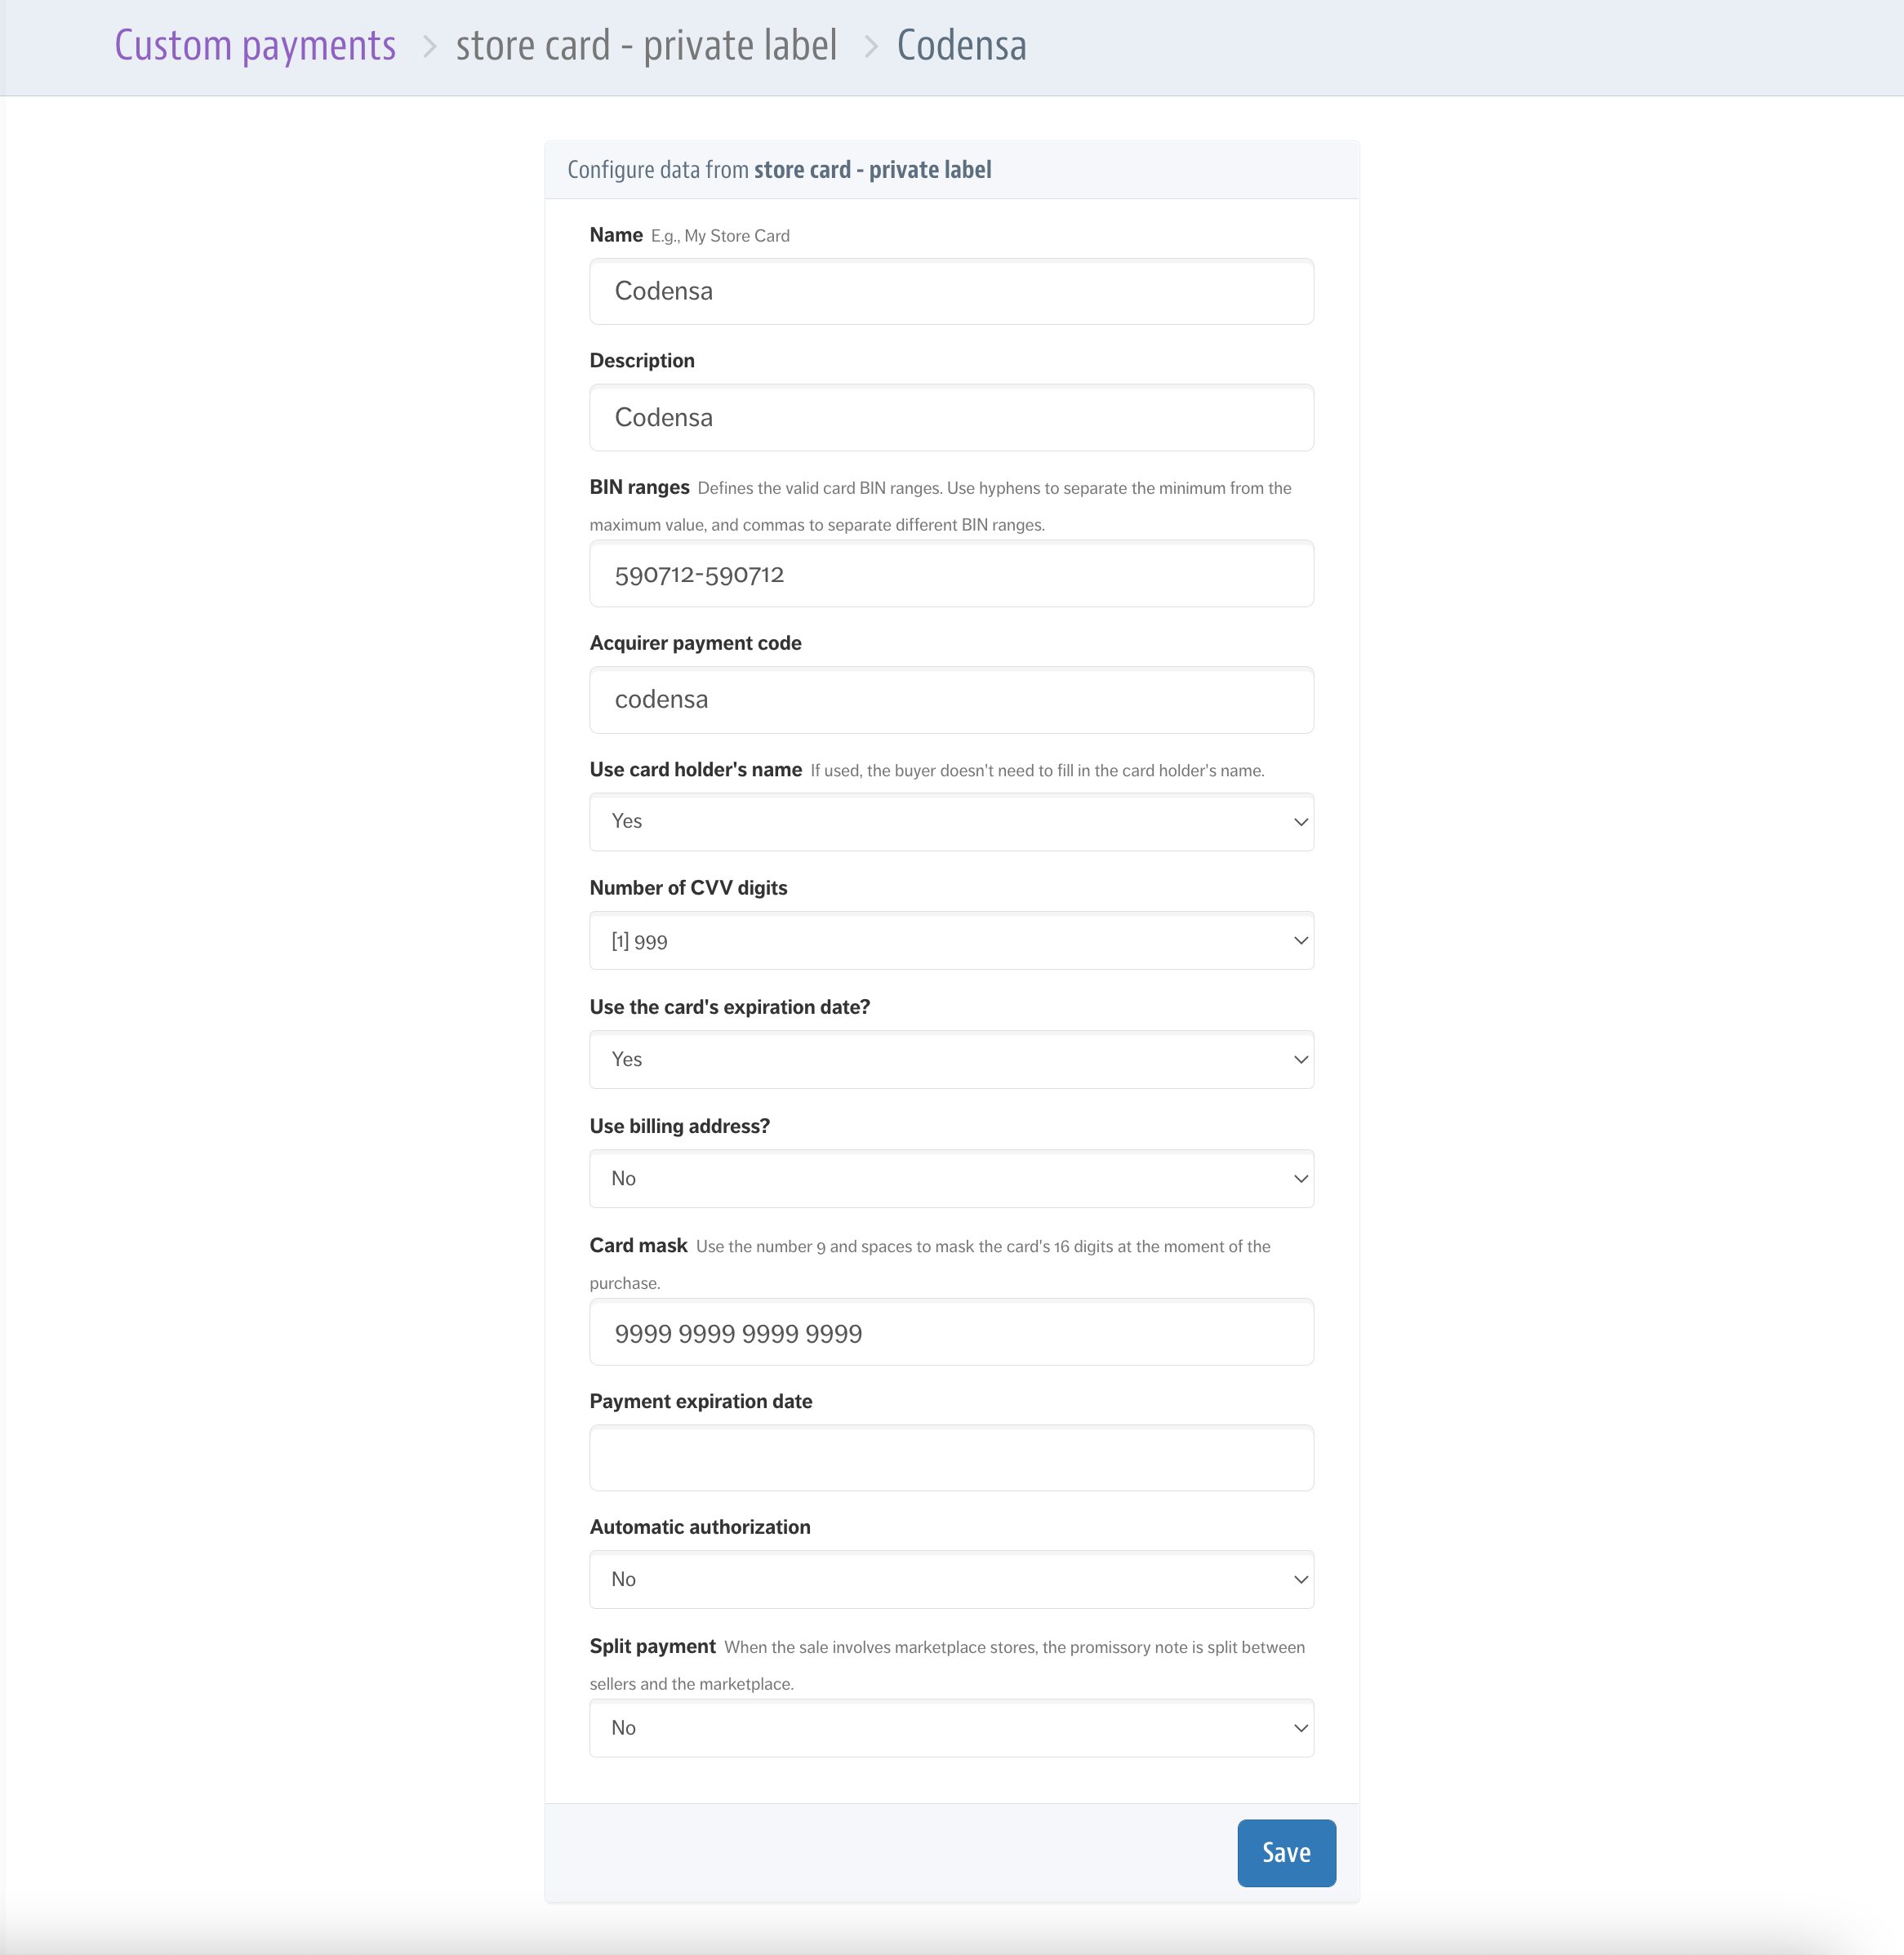
The remaining values can be left as default. Use the following values to configure Co-branded and Private label cards.
| Country | Name | Description | BIN ranges | Acquirer payment code |
|---|---|---|---|---|
 |
Argencard | Argencard | 501105-532362 |
argencard |
|
Cabal | Cabal | 60423,60400,589657 |
cabal |
|
Cencosud | Cencosud | 603493-603493 |
cencosud |
|
Naranja | Naranja | 589562 |
naranja |
|
Shopping | Shopping | 603488 |
shopping |
 |
Codensa | Codensa | 590712-590712 |
codensa |
For more information about how to configure Co-branded and Private label cards, refer to the VTEX Help Center.
- Click Save. When the custom payment has been created, you are redirected to the option to create a new Payment conditions. This payment condition is created as explained in Configure credit or debit cards section.
Configure cash payment methods.
As cash payments require that your customer pays in physical offices, you can configure this payment method in VTEX as promissory notes (Notes payables).
Note
For Boleto bancario in Brazil, this procedure it is not required, just locate and configure this payment method as a Payment condition.When you configure a cash payment method, your customers are redirected to the PayU’s checkout so they can download the payment voucher and pay it in the respective physical office. Follow the instructions below to add this payment method to your VTEX shop.
- In the Settings option (Transactions > Payments > Settings), go to Custom payments tab.
- In this tab, you have five (5) available space to configure Cash payments. In this example, we will set up
OXXO, a Mexican cash payment method.
Click in any of the available boxes in the Notes payables section.
- Provide the following data for the cash payment.
- Name: In this parameter, you need to use the value displayed here in the column
paymentMethod parameter. For the sake of our example, setOXXO. - Description: Provide the description you want to show when the customer selects this payment method. This parameter is optional.
- Notes payable expiration date: provide the number of days before the cash payment expires. By default, this value is assigned to seven days.
Leave the other parameters with their default values
- Click Save. When the custom payment has been created, you are redirected to the option to create a new Payment conditions. This payment condition is created as explained in Configure credit or debit cards section.
Testing the integration
Once you have configured the Payment conditions for your payment methods, it is strongly recommended to test your integration before starting to receive real transactions. As a prerequisite, make sure your PaymentsOS account is in TEST mode, as well as the Environment selector in your Gateway affiliation.
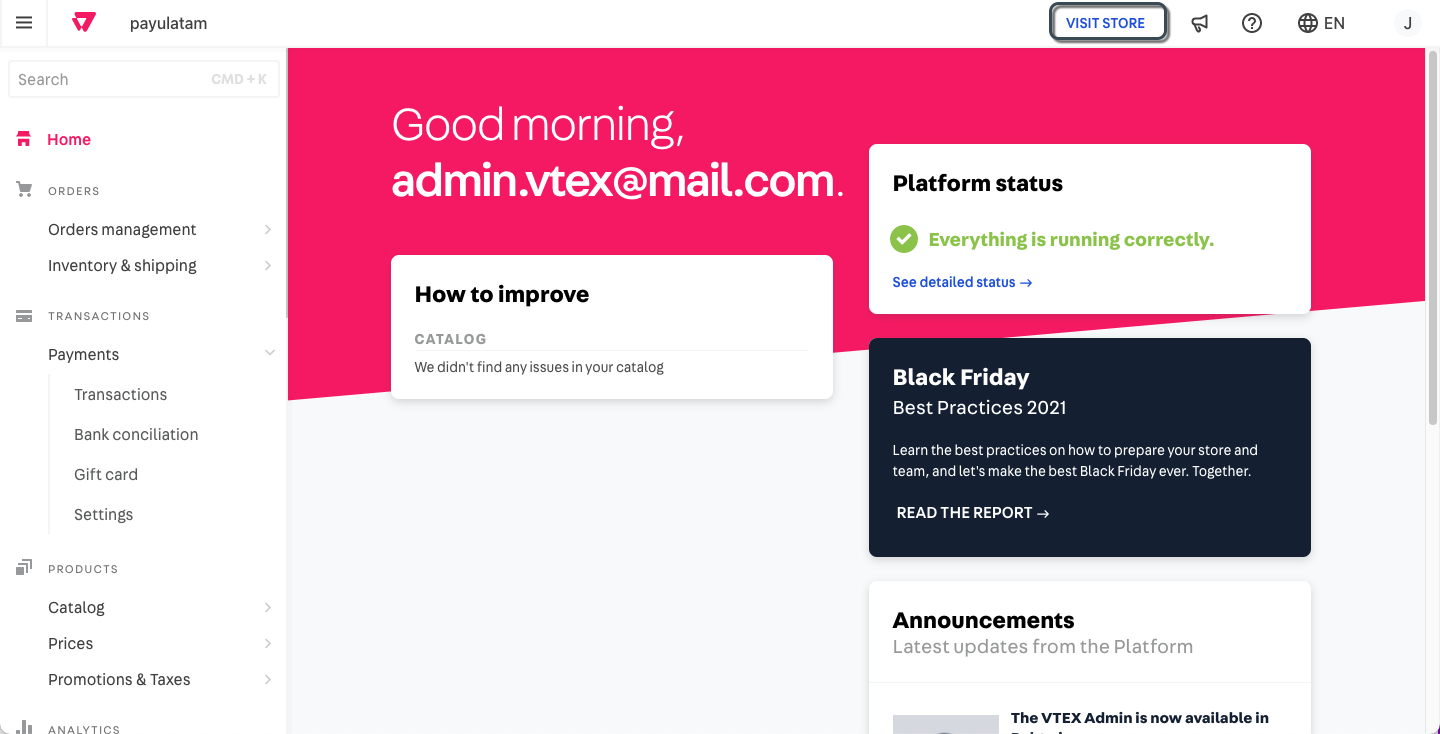
- In the VTEX admin, click VISIT STORE at the top panel.
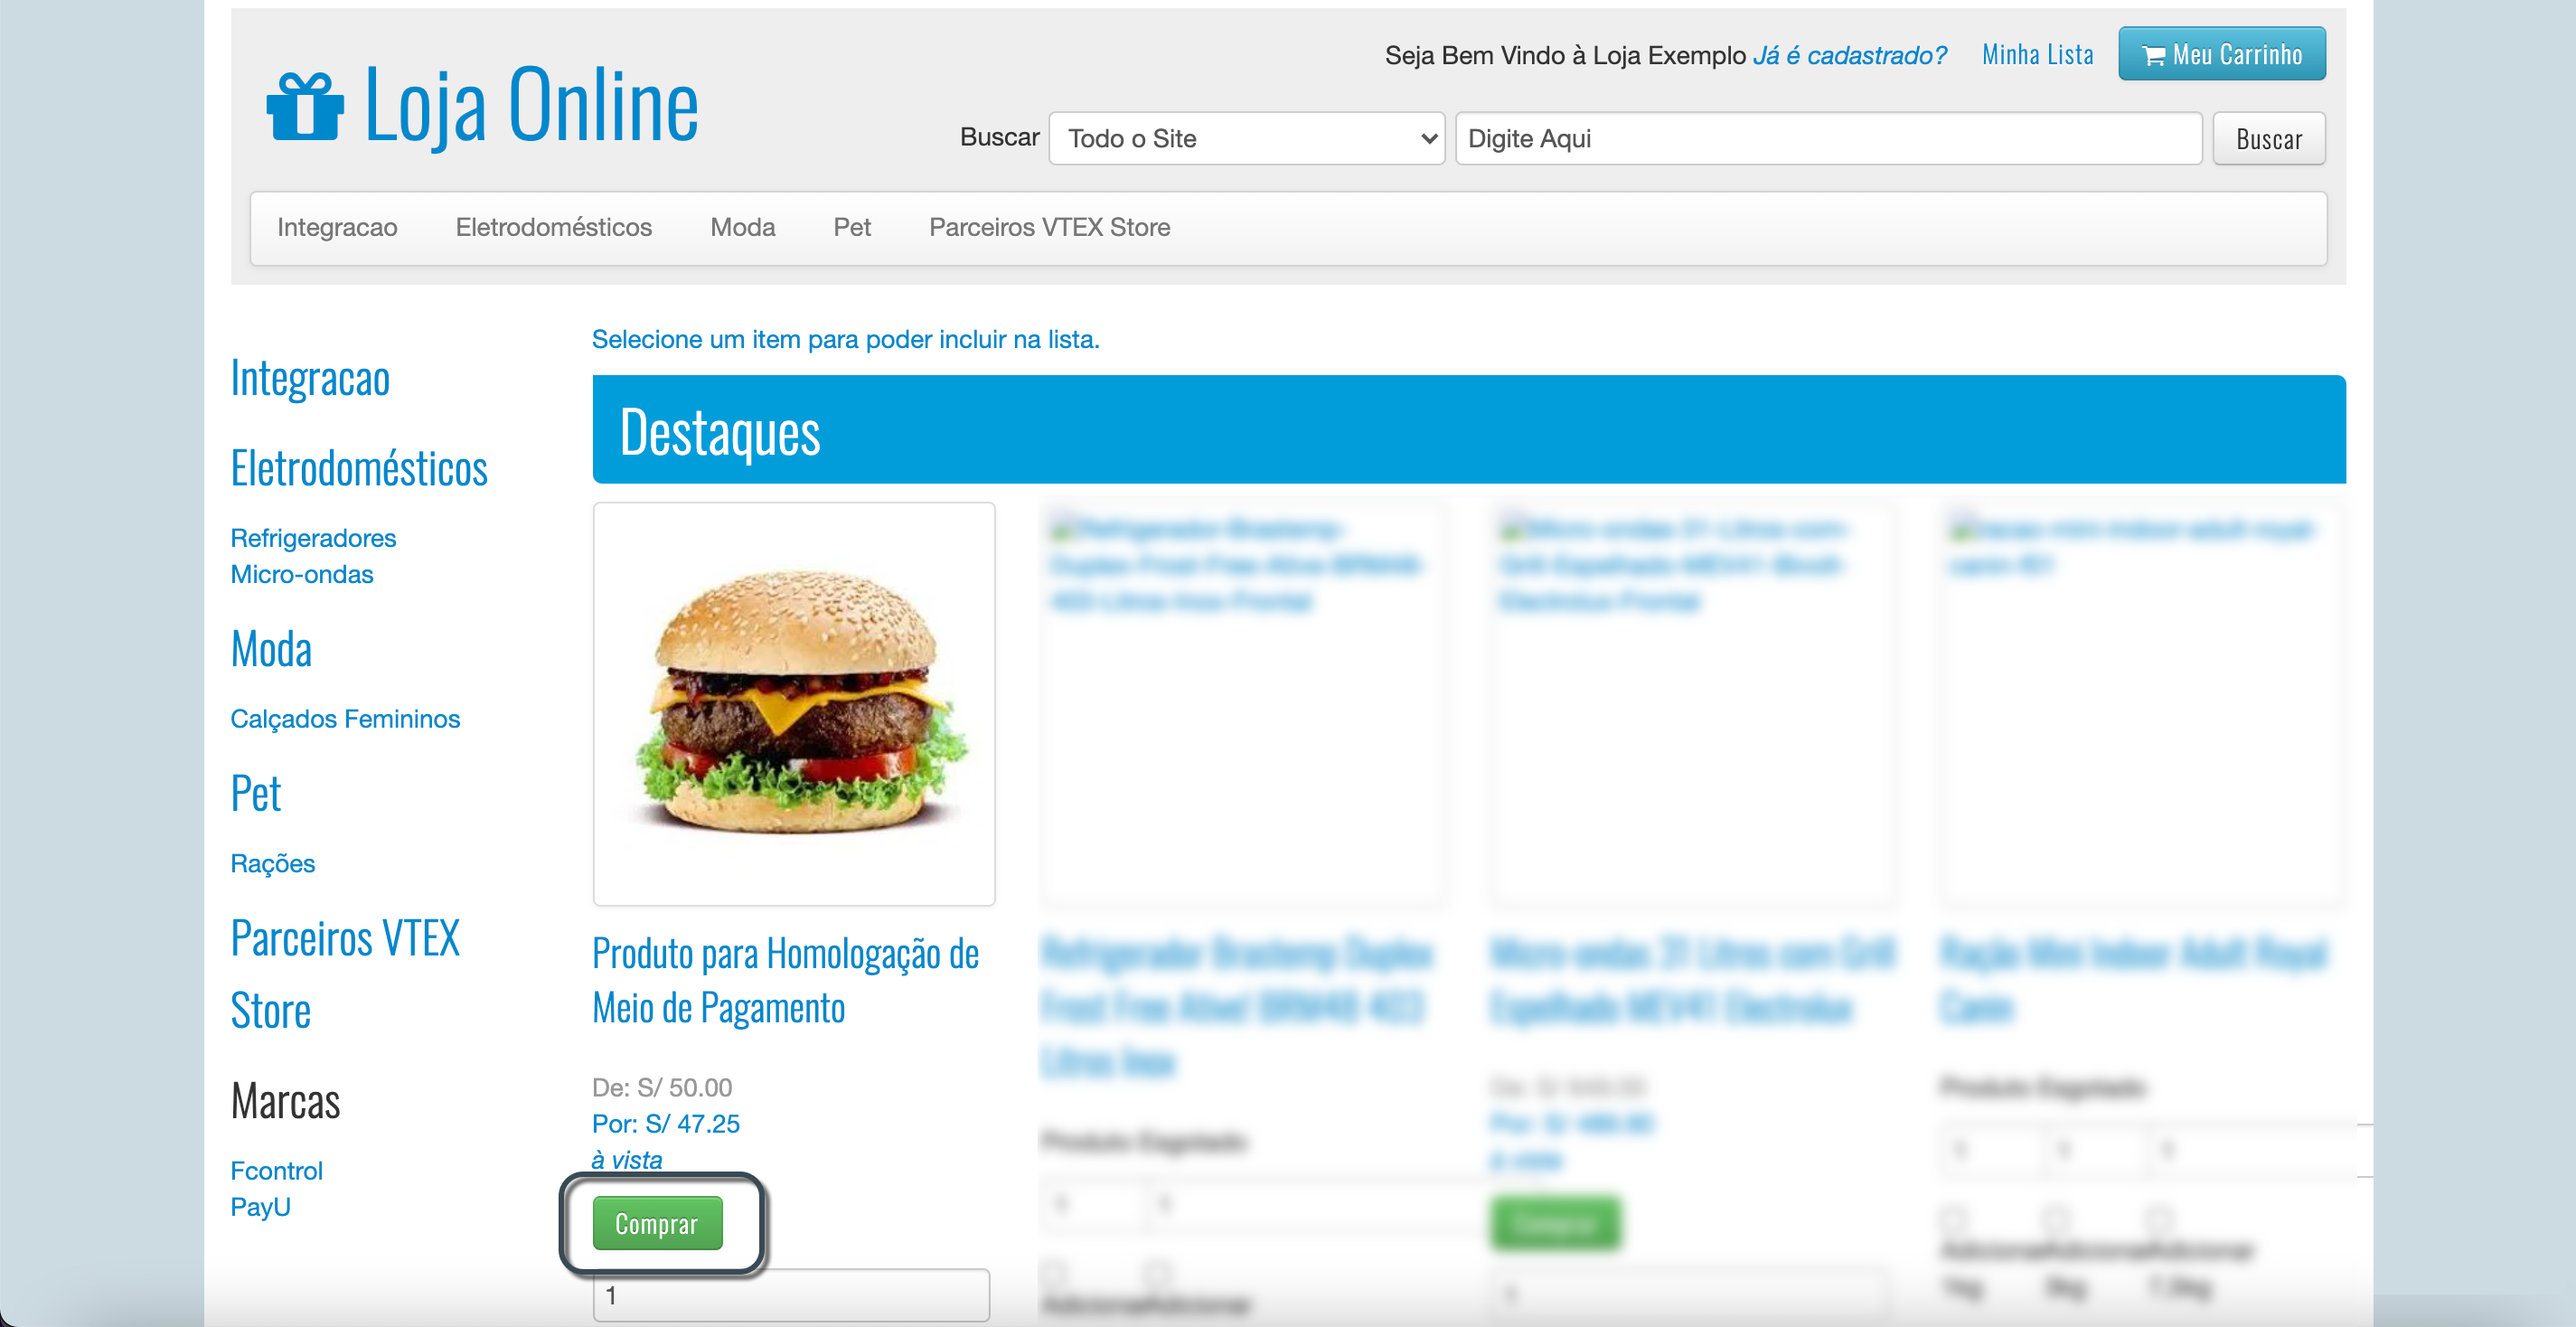
- The store configured for your VTEX account opens. Select any product and click purchase.
- In the shopping cart, click the place order button.
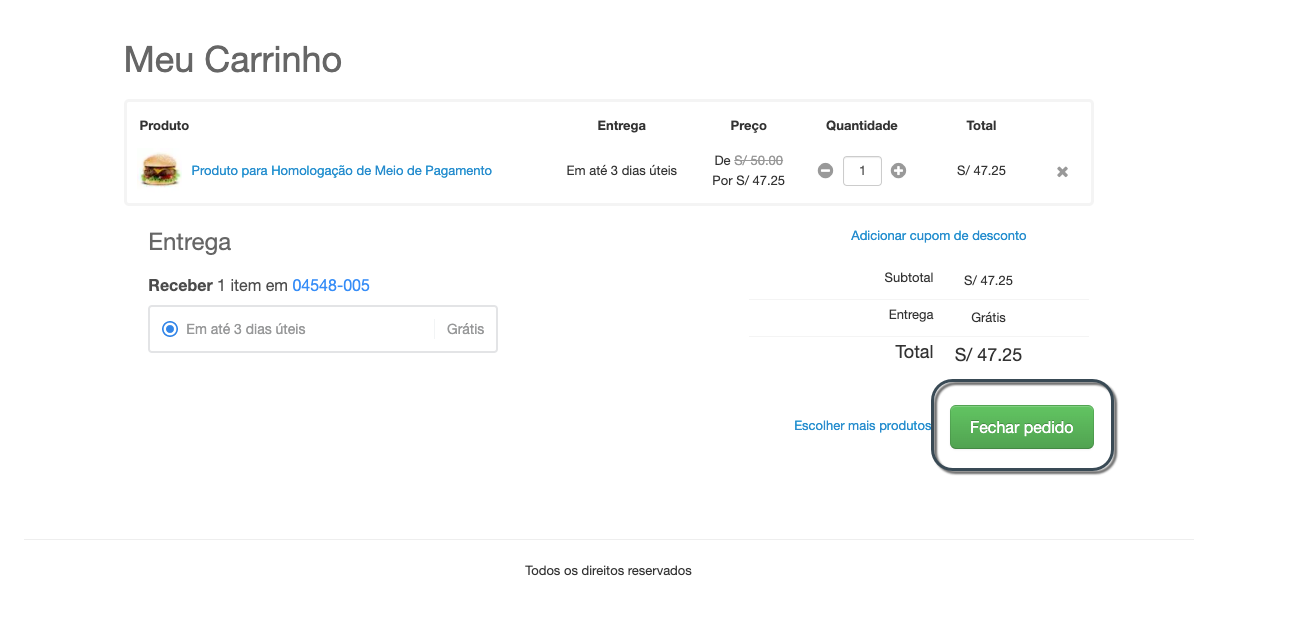
- In the payment section, the payment methods appears grouped by their type. Select the one you want to test and enter the test data, find here some test card numbers and information to test status.
Finally, click in Complete purchase

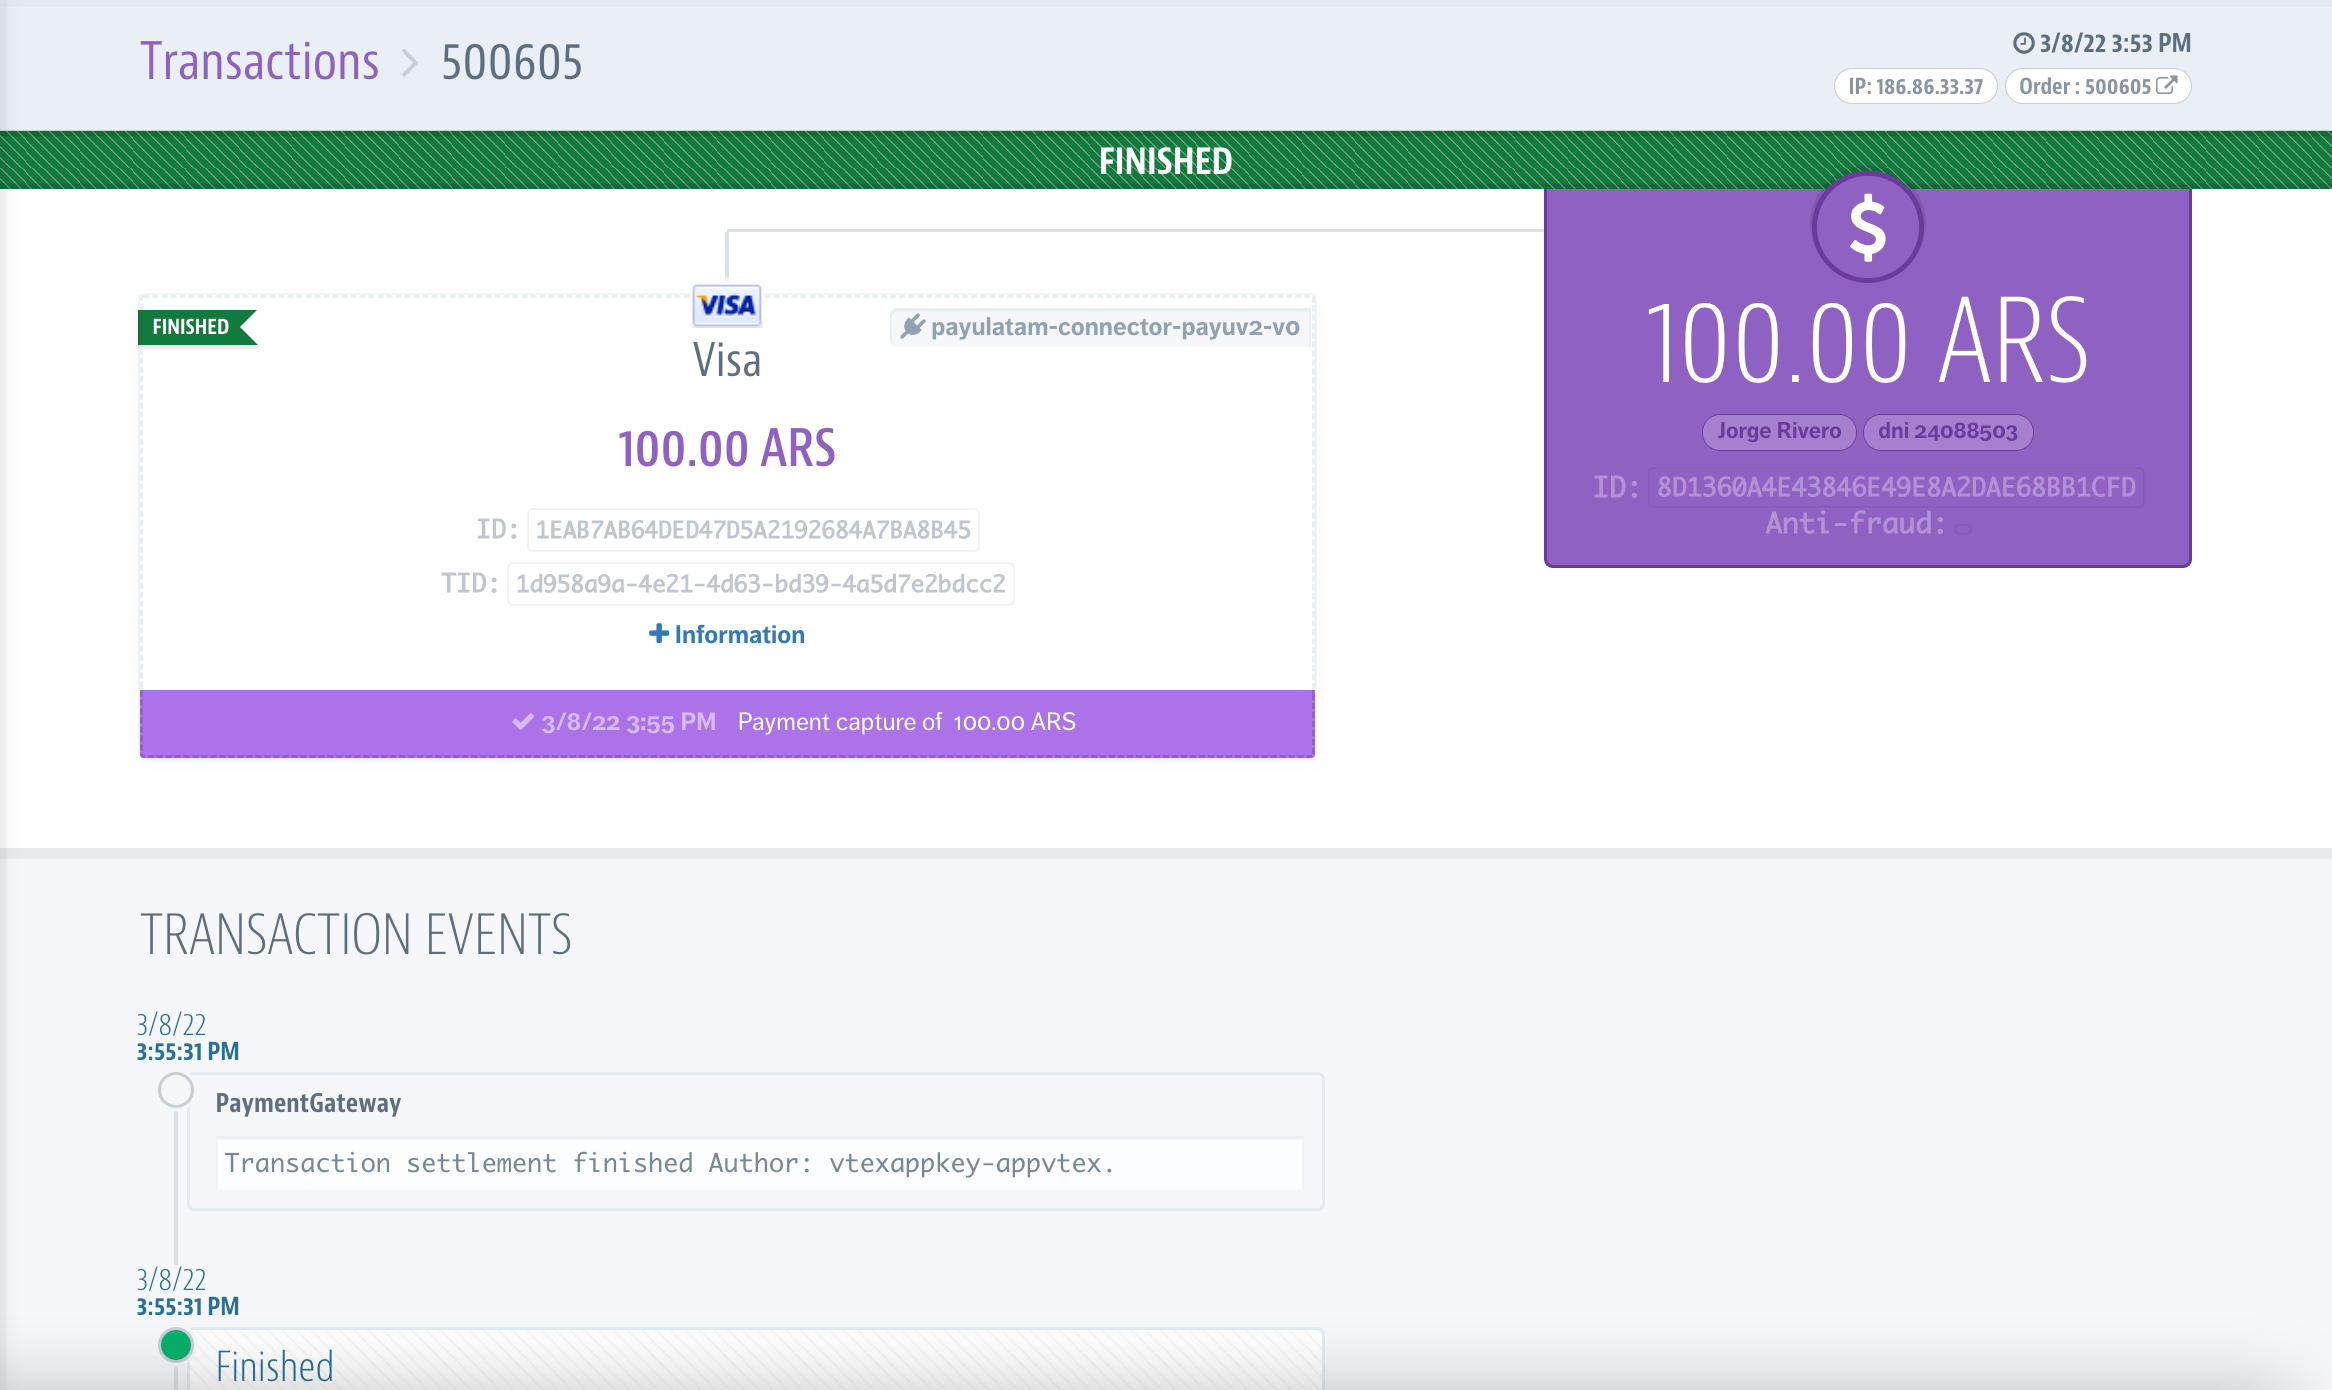
Once the purchase has been approved you can check it in:
- VTEX Admin: Payments > Transactions.
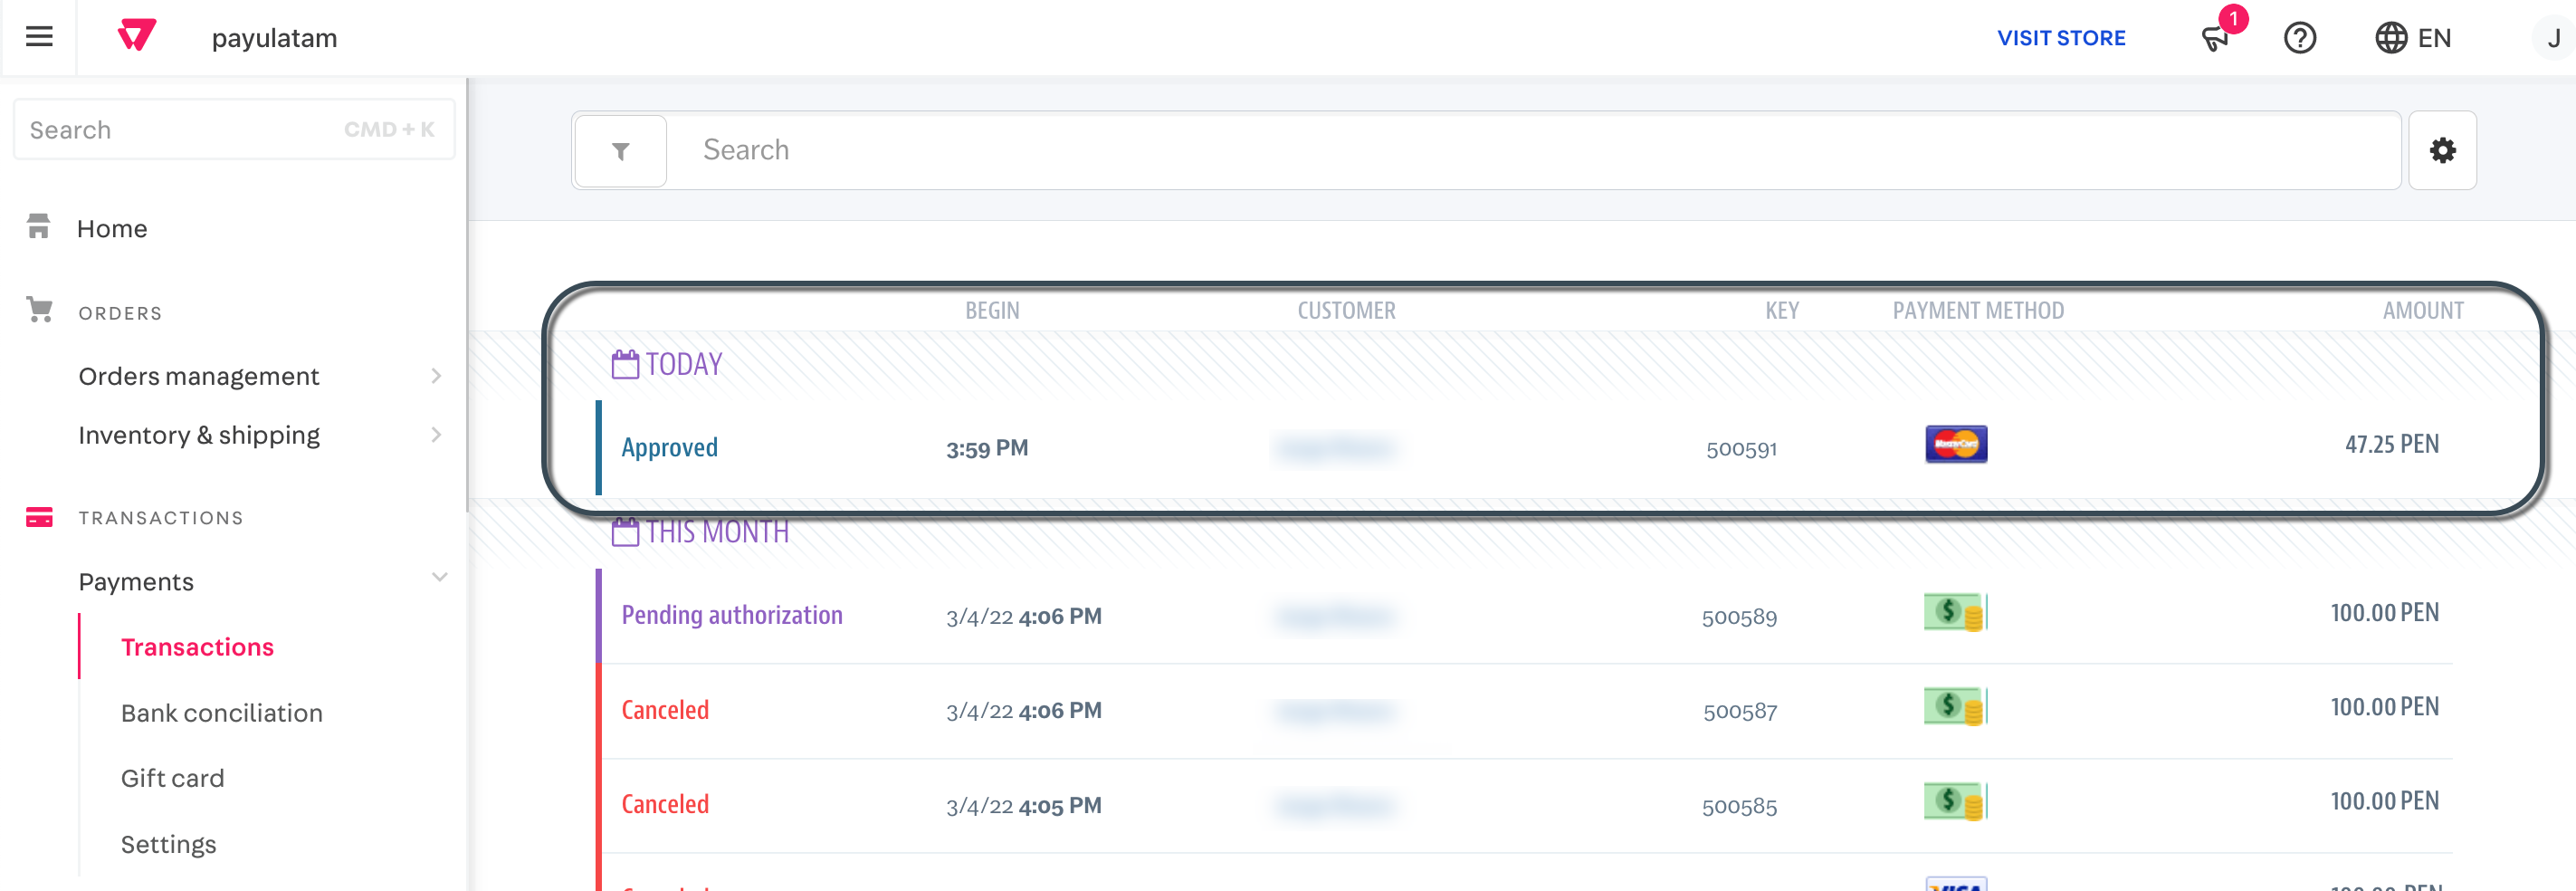
-
PaymentsOS dashboard: Payments > Search.

The parameter External Transaction ID inside the Transaction Activity is the Order ID in PayU. -
PayU Module: in the Sales Report module.
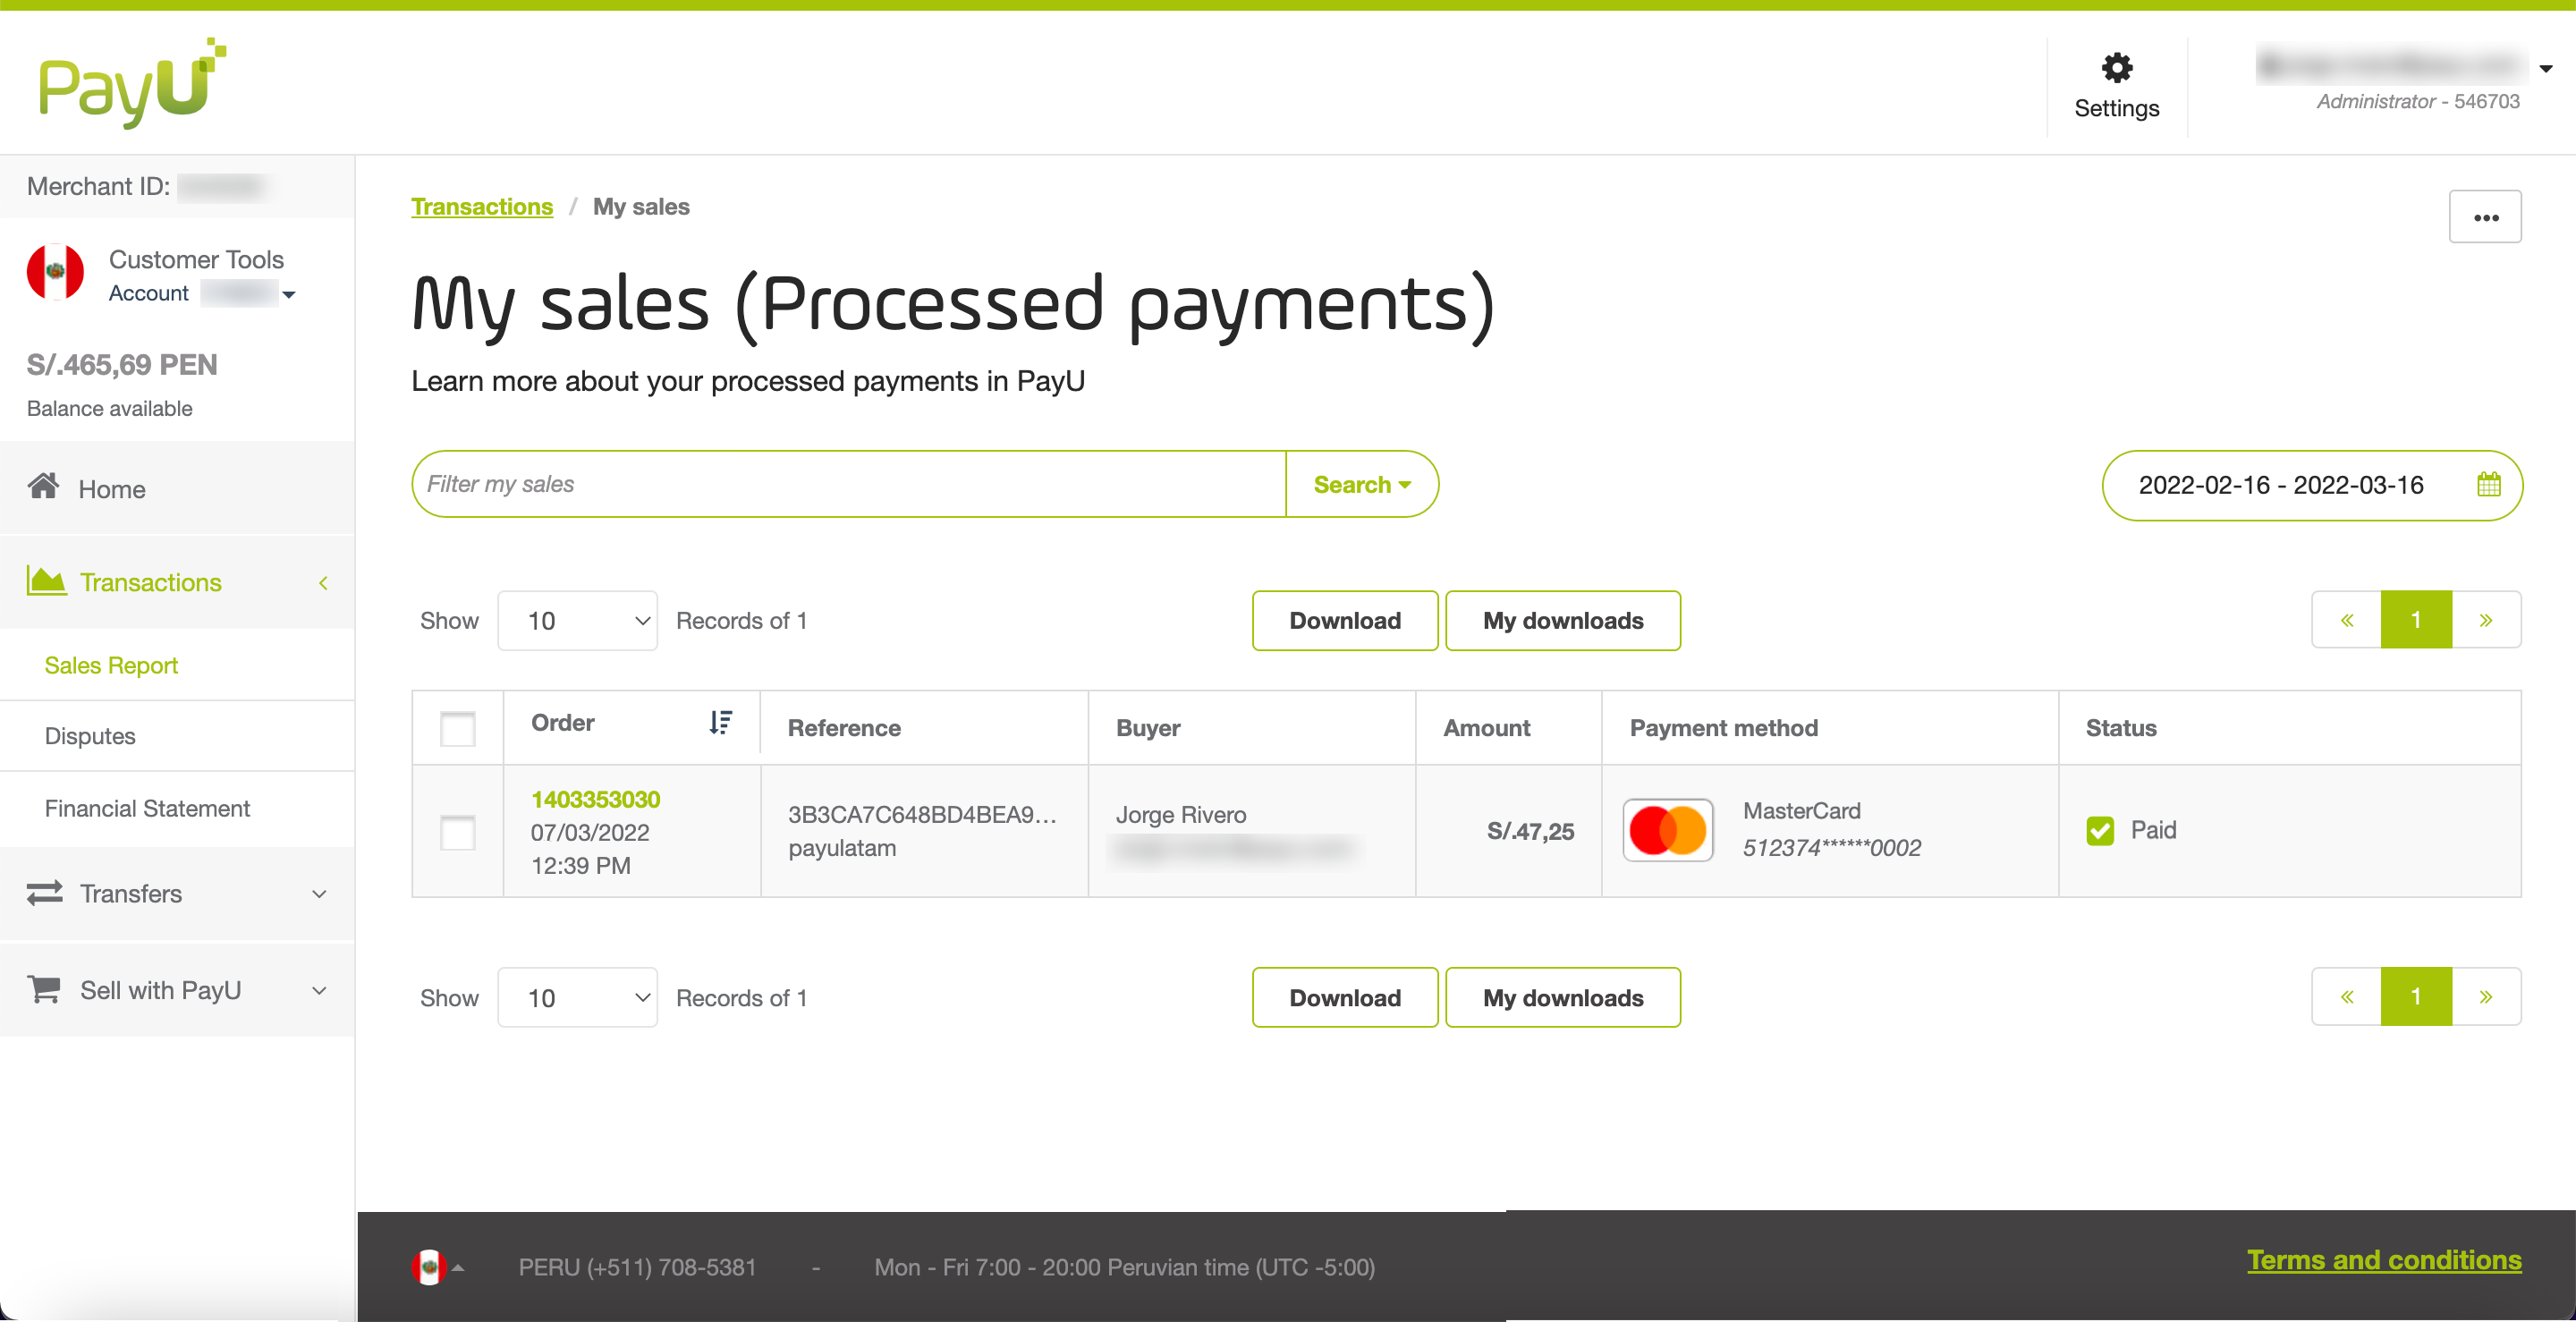
- Queries API using the parameter External Transaction ID as OrderID.
Testing two-step flows
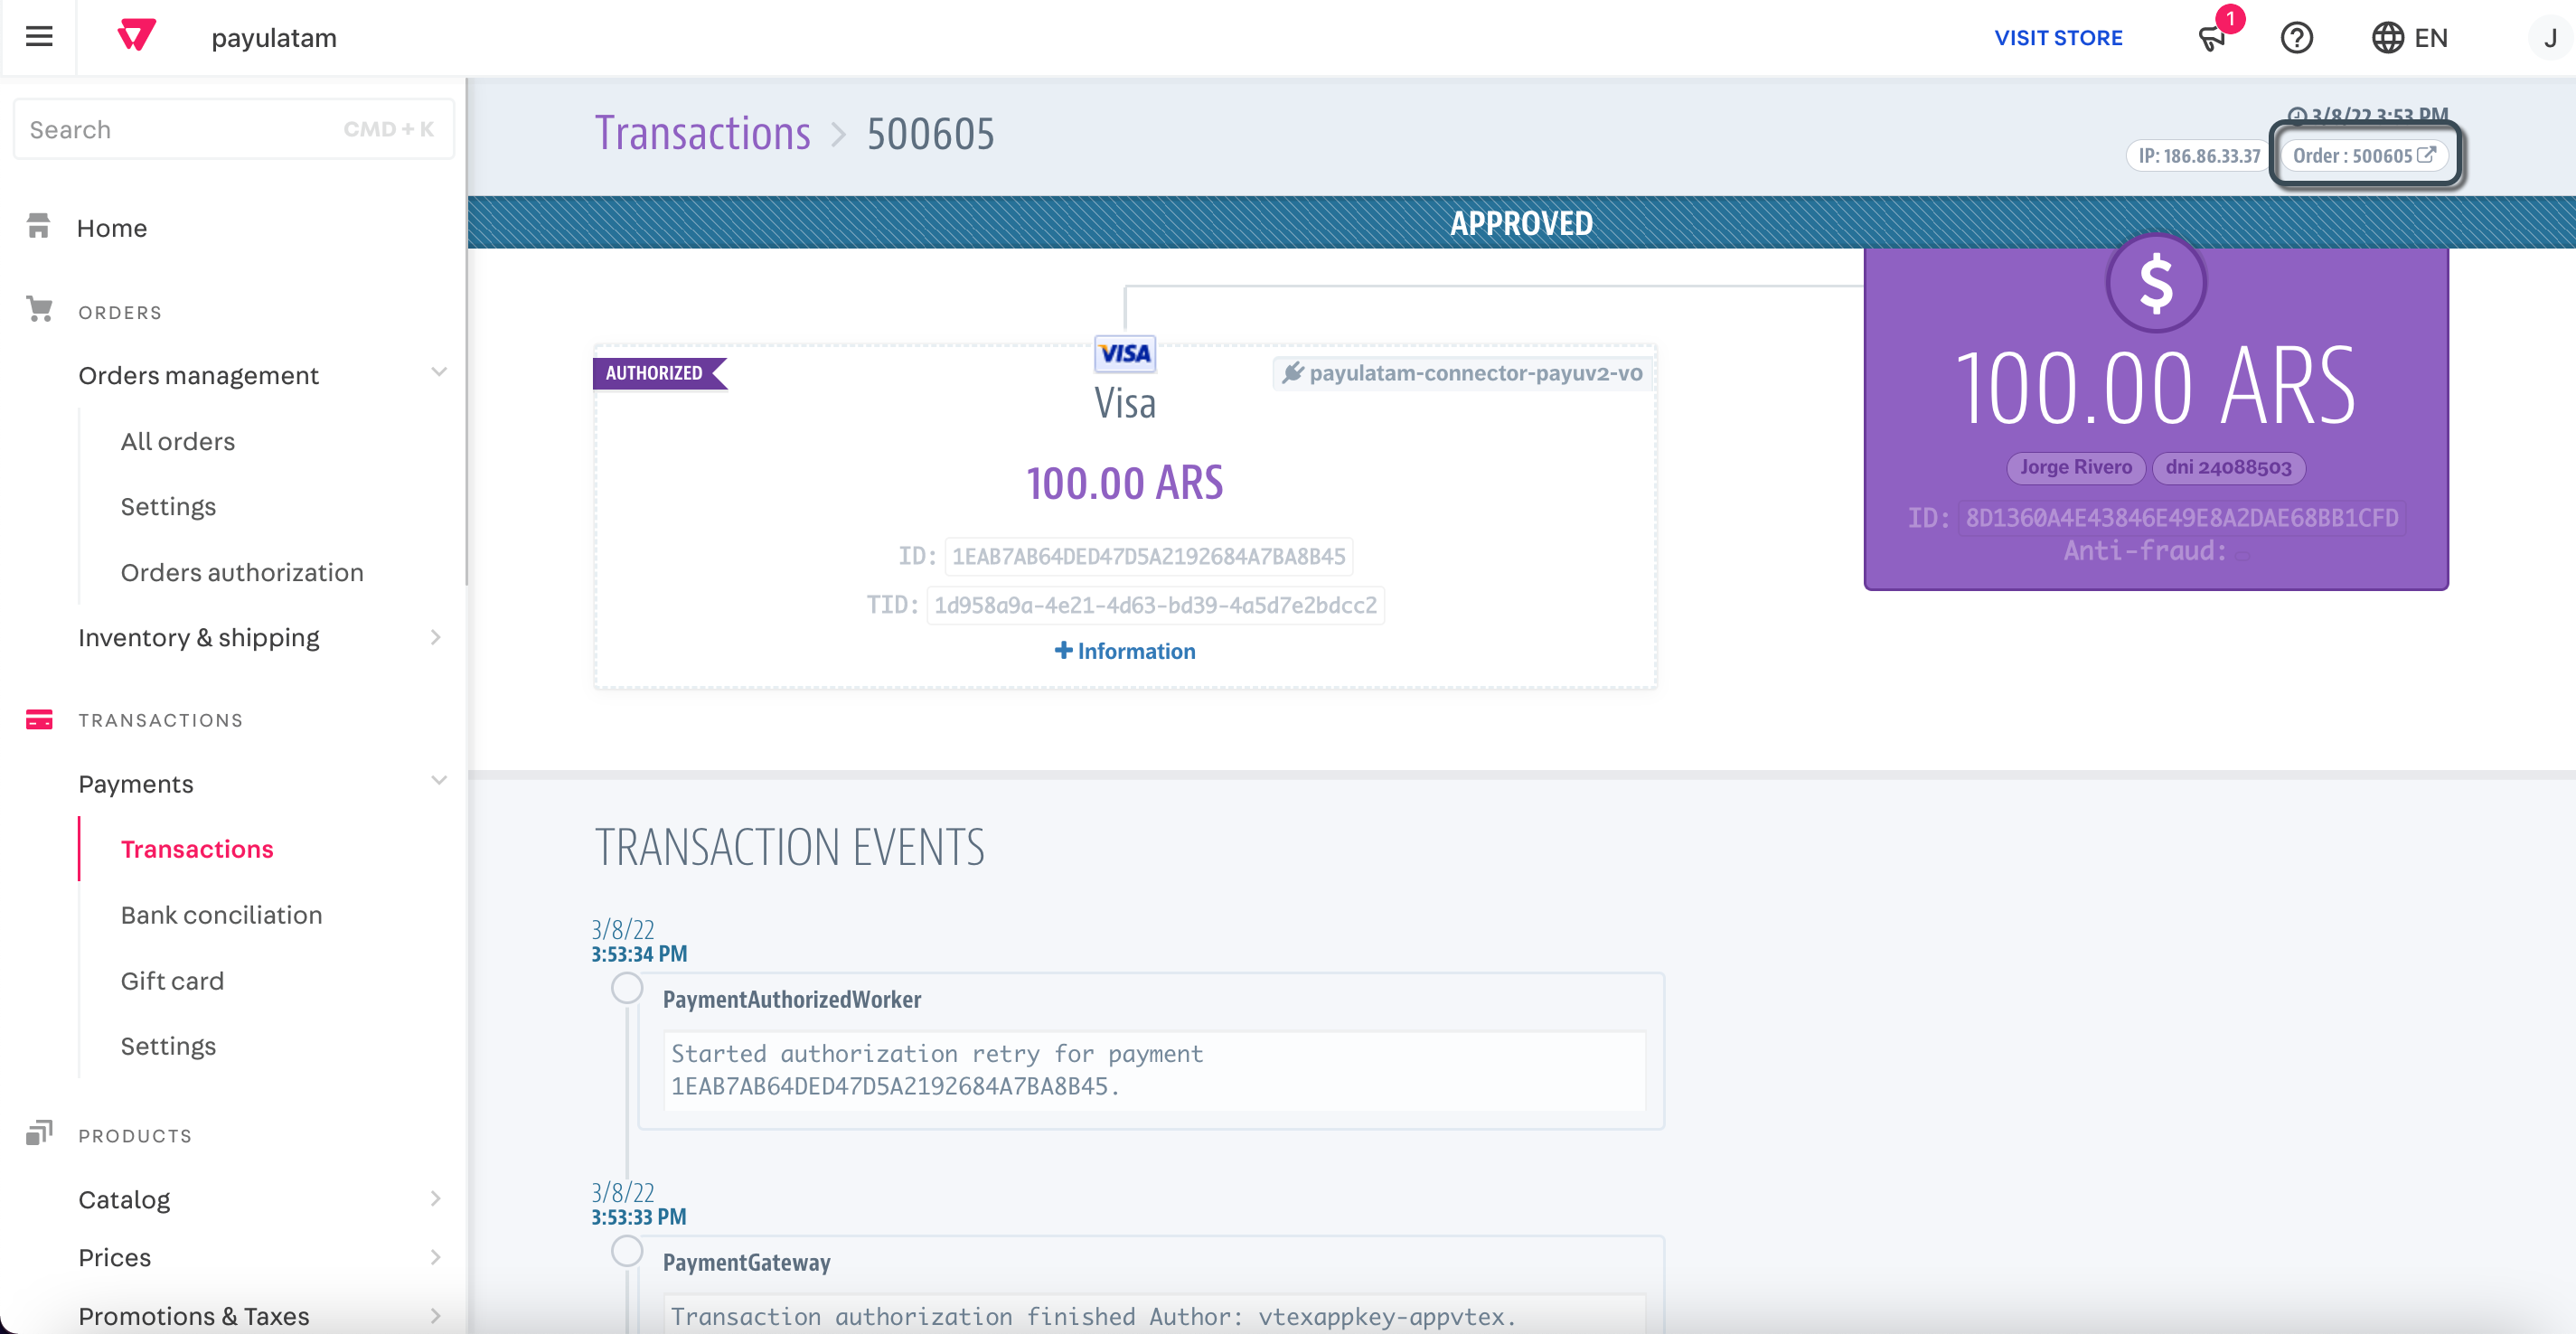
When you have configured your Gateway affiliation to process transactions in two-step flows, the funds authorized in the credit card are not settled until you explicitly request the settlement. To request the settlement, you need to invoice the order.
To invoice an order, locate the transaction in the VTEX Admin (Payments_ > _**Transactions**_) and click it. Then, click the _**Order**_ button at the top right corner.
Scroll down to the Package section, and click Invoice package.
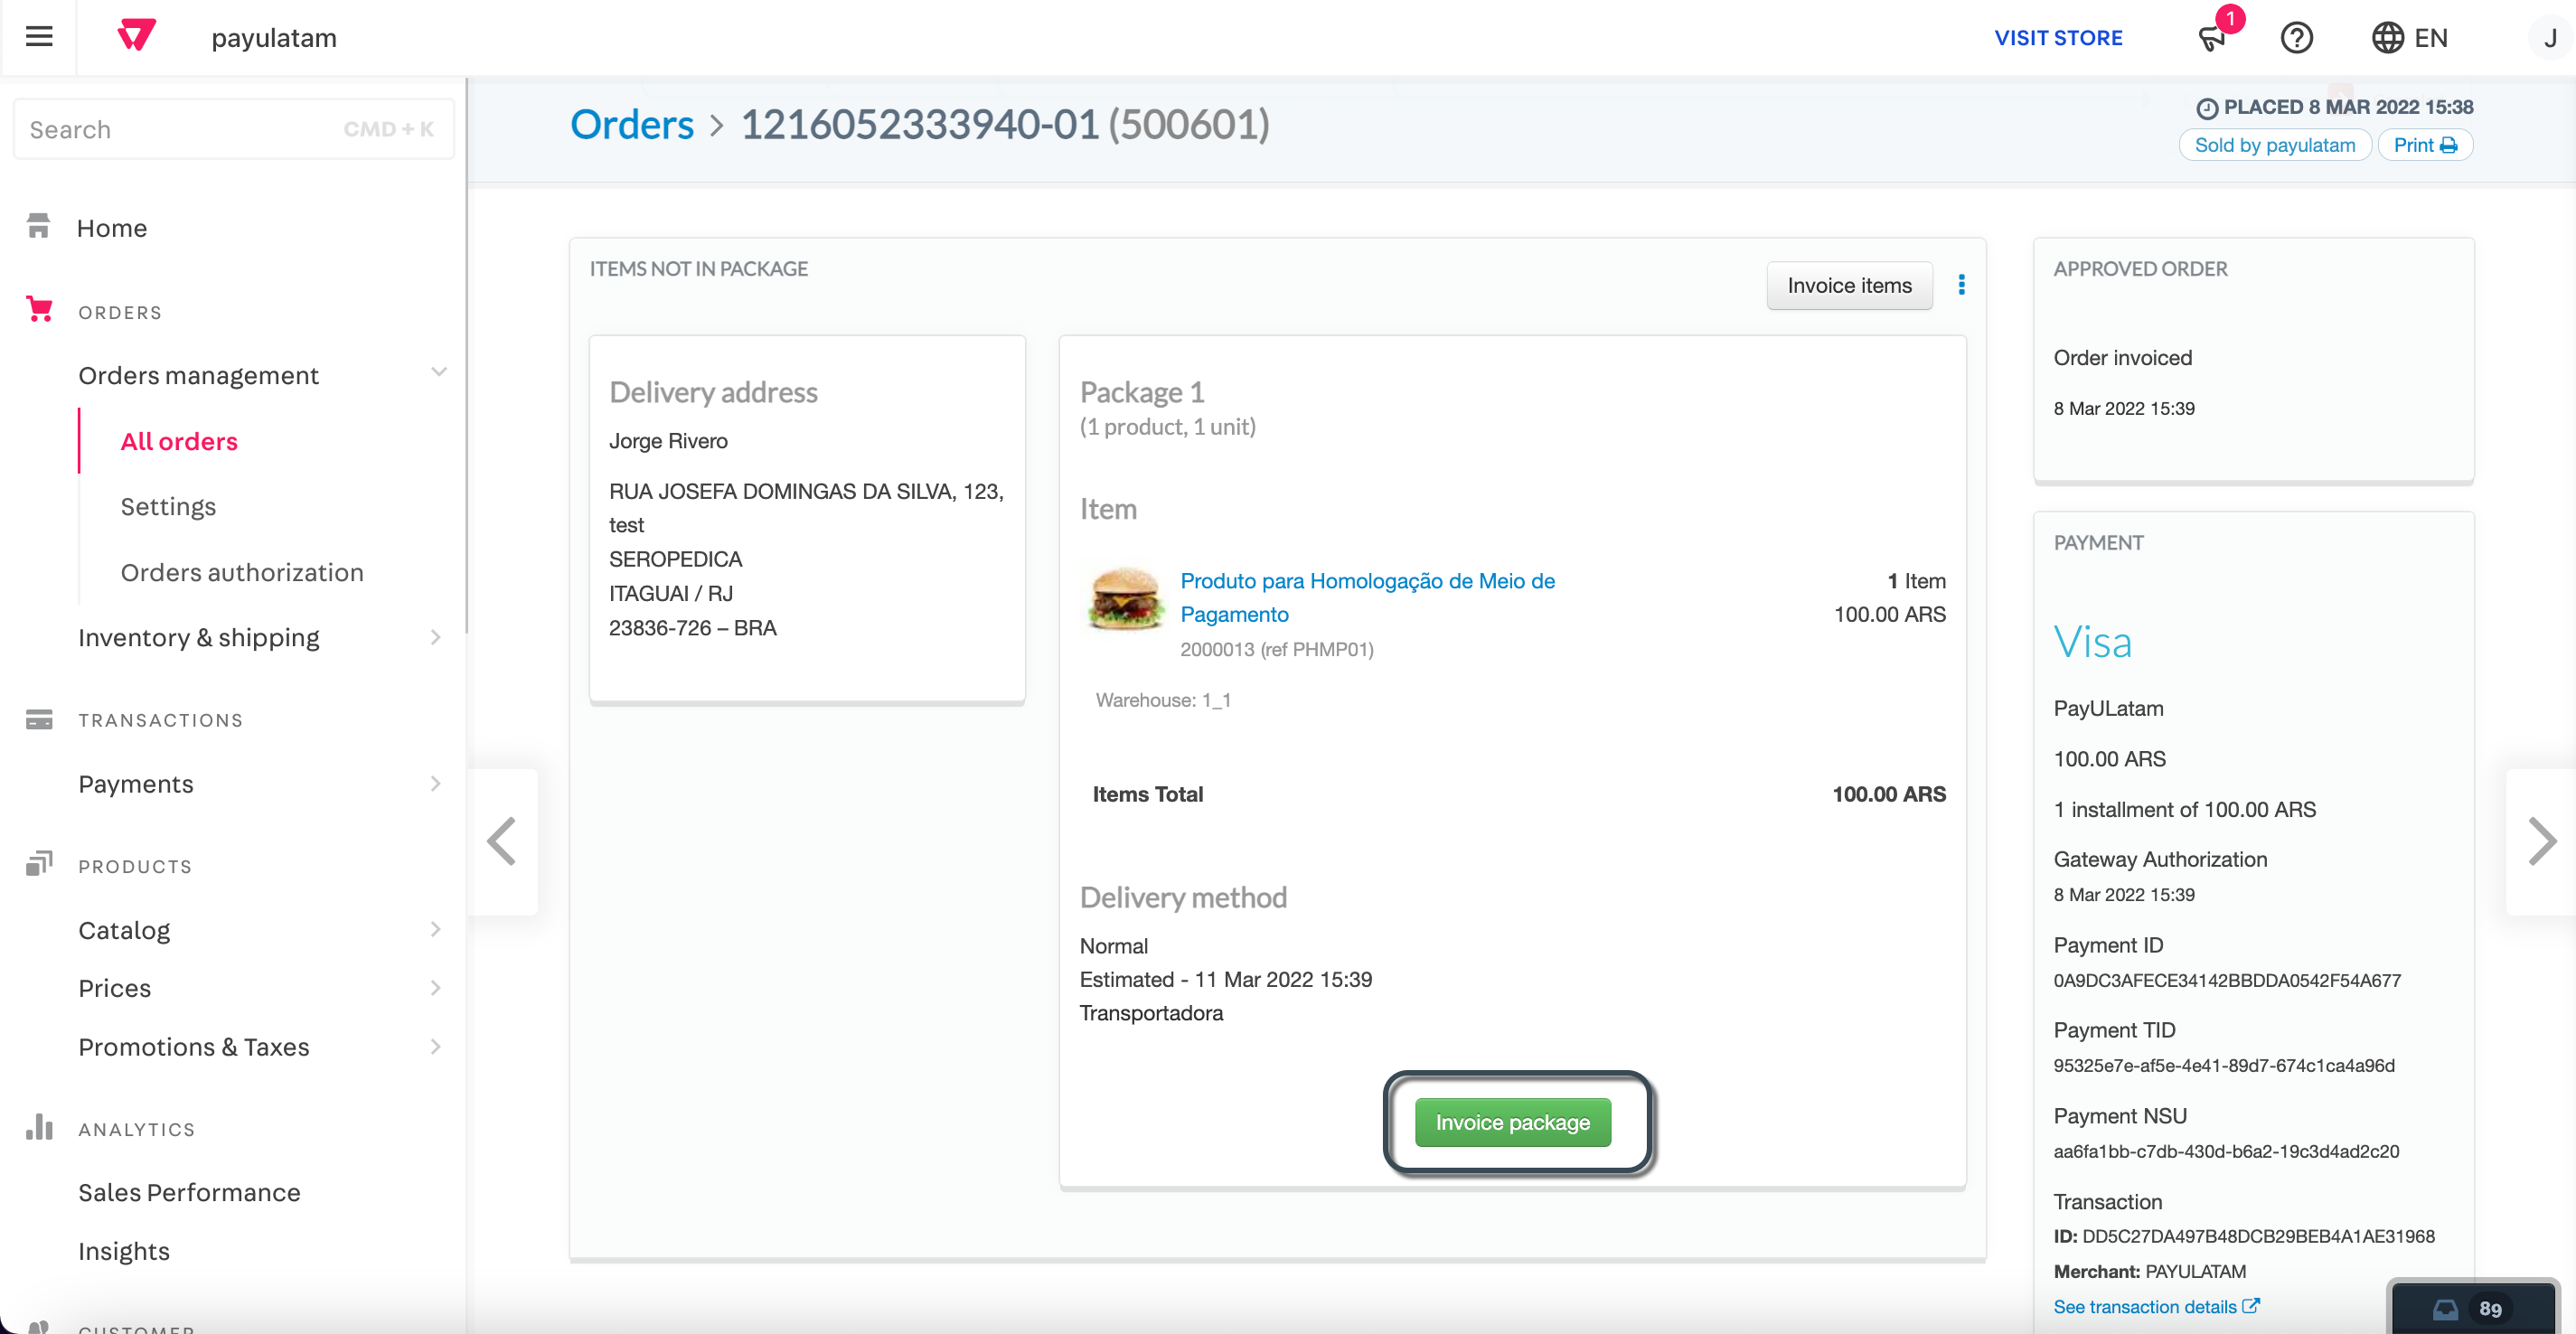
Provide the information of the invoice and click Send Invoice at the end of the panel. Once the invoice is sent to the customer, the amount authorized is charged fom the customer’s card.